

Bottle Body
Characteristics
&
Mold Seams
|
Bottle Body
Characteristics |
| Main Subject Pages |
| Home |
| Dating |
| Typing/Shapes |
|
Glassmaking ▪Makers Marks |
| Colors |
| Finishes & Closures |
| Body & Seams |
| Bases |
| Fragment ID |
| Glossary |
| References |
| Links |
| FAQ's |
| About this site |
| Website Map |
 HOME: Bottle
Body & Seams
HOME: Bottle
Body & Seams
Click here to move directly to this pages "Organization & Structure" summary.
INTRODUCTION
The subject matter of this page is a somewhat mixed bag of physical features or characteristics that are found on the major portion of a bottle - the body, including the shoulder and neck. Since this site does not have separate pages or sections to specifically cover the shoulder and neck of bottles, they are combined in with the bottle body characteristics because of the commonality of features they all share. When referring to the "body" of a bottle on this page, it is meant to mean body, shoulder, and neck unless otherwise noted. On other pages, these three morphological parts of the bottle are considered separately.
The body of a bottle has an assortment of characteristics or diagnostic features that can assist a person trying to date or at least tell a more complete story of a given bottle. The structure of this page covers three main categories of bottle body related features. The first category encompasses those that are induced by some process related to the manufacture of the bottle, excluding mold induced features. This includes various glass character features (e.g., bubbles, whittle marks) as well as bottle body attributes of bottles produced without a mold, i.e. free-blown bottle bodies. The second category includes the characteristics that are caused or induced in some way by the mold or molding process. This is the biggest category since most bottles manufactured during the time span covered by this website (early 1800s to 1950s) were produced in molds. The final category includes features induced to the bottle body after the blowing and molding has taken place, i.e. post-production features.
These categories are somewhat arbitrary since there is overlap between them and just about everything discussed here is related to the overall manufacturing process which produces a finished bottle. These categories do, however, lump similar processes together in a way that may help visualize how certain attributes of a bottle are related.
|
"Bottle Body Characteristics & Mold Seams"
Page -
|
NOTE: If unsure of some of the terminology used on this page related to the physical features of bottles, visit the General Bottle Morphology page. That page includes an illustration of a somewhat stylized "typical" bottle with the different physical "parts" (morphological features) pointed out; parts which are often easier to visualize than describe.
A. Manufacturing (non-mold) Based Body
Features
 Free-blown
bottles were produced without the aid of a mold, being instead formed and shaped
by the skills of the glassblower using manipulation of the blowpipe (the use of
which dates back to the 3rd century B. C.), various
simple hand tools, a hollowed out
block, and usually a flat table called a marver
(Hunter 1950).
Free-blown utilitarian bottles found or made in the U.S. typically date from
before the American Civil War (early 1860s and prior) and of course can be much
older than that. The were rarely produced after the 1860s by American
glass companies producing utilitarian bottles but the technique is still likely
being used to some degree for specialty or artist bottles (Toulouse 1969a;
empirical observations). The
following are the primary characteristics of a free-blown bottle taken from
Jones & Sullivan's Glass Glossary (1989):
Free-blown
bottles were produced without the aid of a mold, being instead formed and shaped
by the skills of the glassblower using manipulation of the blowpipe (the use of
which dates back to the 3rd century B. C.), various
simple hand tools, a hollowed out
block, and usually a flat table called a marver
(Hunter 1950).
Free-blown utilitarian bottles found or made in the U.S. typically date from
before the American Civil War (early 1860s and prior) and of course can be much
older than that. The were rarely produced after the 1860s by American
glass companies producing utilitarian bottles but the technique is still likely
being used to some degree for specialty or artist bottles (Toulouse 1969a;
empirical observations). The
following are the primary characteristics of a free-blown bottle taken from
Jones & Sullivan's Glass Glossary (1989):
One additional observation is that the glass at the heel or base edge of a free-blown bottle will tend to be somewhat thicker than the rest of the bottle which will be fairly evenly distributed (last "bullet" above). In addition, the heel and extreme lower body of a free-blown bottle will often flare out somewhat with the base diameter being slightly wider than the average diameter of the bottle body. Both of these features are related and caused by a combination of the action of the tool that formed the push-up inside the base and the hot glass flowing or sagging as it was not contained by any mold surface (Jones 1983). This feature shows most distinctly with the bottle to the right in the picture. Bottles produced with a block and/or marver are typically (always?) round in cross-section and hard to differentiate from a purely free-blown bottle, though the latter method produces bottles with generally less symmetry. Block/marver produced bottles are considered with free-blown bottles here since they are largely indistinguishable from free-blown items and are still produced almost purely by the skill of the glassblower without the use of a dip or full-sized mold, both of which are covered later on this page (Kendrick 1968; Deiss pers. comm. 2005).
The photo to the right above (click to enlarge) shows two free-blown European-made bottles in shapes that were also likely made and used in the U.S. also. Both bottle bodies show varying degrees of non-symmetry. The dark olive green bottle to the left is likely a Dutch (possibly English) generic liquor bottle most likely made between 1750 and 1800 (McKearin & Wilson 1978; Jones 1986). It's symmetry indicates very good craftsmanship and control by a master glassblower. The bottle to the right in the picture is an early to mid-19th century French "Muscat" (a sweet dessert wine) bottle that exhibits very asymmetrical form and a distinctly flared out heel.
 The photo to the left is of the bases of both bottles showing the lack of
symmetry from another angle. Both bottles exhibit varying
amounts of an out-of-round shape, with the French bottle being much more
asymmetrical than the other bottle although the French bottle is a generation or
two "younger" than the Dutch bottle. Mold-blown bottles can be asymmetrical due to
sloppy craftsmanship, but are typically uniform and symmetrical.
The photo to the left is of the bases of both bottles showing the lack of
symmetry from another angle. Both bottles exhibit varying
amounts of an out-of-round shape, with the French bottle being much more
asymmetrical than the other bottle although the French bottle is a generation or
two "younger" than the Dutch bottle. Mold-blown bottles can be asymmetrical due to
sloppy craftsmanship, but are typically uniform and symmetrical.
One note of caution is that turn-mold
bottles will, like free-blown bottles, have no evidence of mold seams either. However, turn-mold bottles will be very
symmetrical, always be round, and just not "look" as old as free-blown bottles.
This is an important distinction to make since free-blown bottles usually date
prior to the Civil War and often are much older than that; turn-mold bottles
usually date from the late 19th century to early 20th century. They are discussed in more depth
under the "Mold Induced Body Features" section later on this page.
 The body of a bottle
can have a host of different features or imperfections that can be
observed and classified. Some features were induced on purpose like the
whimsical spiral of glass on the upper half of the likely English made ale
bottle pictured to the right, which dates from the late 19th century or even
possibly the early 20th century. Click
applied glass ale bottle to see this entire bottle which likely had the spiral added when
the finish glass was applied; it has a true applied finish. Many other body features are
not intentionally induced. These include stretch marks, "straw" lines, slumps and sagging
spots, bumps, folds, thin and thick spots in the glass, foreign material
imbedded in the glass, and others. Bubbles and whittle marks
are also considered imperfections in the glass, but are covered in separate
sections
below. In the glassmaking world
these are all considered as defects or "faults" and were not desired by
glassmakers though they do not always compromise the utility of the bottle. Many
of these flaws can be found in either mouth-blown and machine-made
bottles, but some are fairly specific to one or the other (Tooley 1953; Kendrick 1968).
The following is a listing and description of the most common imperfections
along with a discussion of the utility the feature offers in gaining
information about the bottles these imperfections are found on.
The body of a bottle
can have a host of different features or imperfections that can be
observed and classified. Some features were induced on purpose like the
whimsical spiral of glass on the upper half of the likely English made ale
bottle pictured to the right, which dates from the late 19th century or even
possibly the early 20th century. Click
applied glass ale bottle to see this entire bottle which likely had the spiral added when
the finish glass was applied; it has a true applied finish. Many other body features are
not intentionally induced. These include stretch marks, "straw" lines, slumps and sagging
spots, bumps, folds, thin and thick spots in the glass, foreign material
imbedded in the glass, and others. Bubbles and whittle marks
are also considered imperfections in the glass, but are covered in separate
sections
below. In the glassmaking world
these are all considered as defects or "faults" and were not desired by
glassmakers though they do not always compromise the utility of the bottle. Many
of these flaws can be found in either mouth-blown and machine-made
bottles, but some are fairly specific to one or the other (Tooley 1953; Kendrick 1968).
The following is a listing and description of the most common imperfections
along with a discussion of the utility the feature offers in gaining
information about the bottles these imperfections are found on.
 "Stretch" Marks: Bottle glass can
have varying lines, ripples, or twists in the glass that are the result of the
irregularities in the glassblowing process, i.e. twisting of the blowpipe, the
way the glass was initially gathered, glass temperature differentials, and other
reasons. In the glass making trade these type irregularities in the glass
were called "cords", "washboards", or "laplines" but these terms were more in
reference to ripples and such in the body of a bottle (Tooley 1953; Kendrick
1968). As used on this website, the term "stretch marks" refers to these
marks found on the outside surface (primarily) of the bottle neck and to a lesser degree, the
shoulder.
"Stretch" Marks: Bottle glass can
have varying lines, ripples, or twists in the glass that are the result of the
irregularities in the glassblowing process, i.e. twisting of the blowpipe, the
way the glass was initially gathered, glass temperature differentials, and other
reasons. In the glass making trade these type irregularities in the glass
were called "cords", "washboards", or "laplines" but these terms were more in
reference to ripples and such in the body of a bottle (Tooley 1953; Kendrick
1968). As used on this website, the term "stretch marks" refers to these
marks found on the outside surface (primarily) of the bottle neck and to a lesser degree, the
shoulder.
The picture to the left shows typical, though distinct, stretch marks in the neck of an early American liquor flask - the most common location for stretch marks in a mouth-blown bottle. Click Stoddard double eagle flask to view picture of this entire bottle which is a pint flask likely made at the Granite Glass Works (Stoddard, NH.) between 1846 and 1860 (McKearin & Wilson 1978). Neck/shoulder stretch marks are usually quite diagnostic of a mouth-blown bottle as they are rarely observed on machine-made items, though machine-made bottles - especially earlier ones - are observed with ripples or irregularities in the body of the bottle. The following empirical observations have been made in regards to the presence of stretch marks:
 If there are bubbles in the neck of a mouth-blown bottle with stretch marks, they will
almost always follow the twist and trend of the stretch marks. This is, as
described above, a function of the glassblower twisting the neck glass during
some part of the bottle making process, i.e. . Sometimes this twisting distorts
the glass of the neck significantly. The picture to the right is of a
small
schoolhouse ink with a cracked-off finish dating from about 1880. It
has a large stretch mark running from the right shoulder up through the middle
of the neck in the picture. This mark manifests itself inside the bore of
the bottle as a distinct, rounded hump that is obvious looking down the bore.
If there are bubbles in the neck of a mouth-blown bottle with stretch marks, they will
almost always follow the twist and trend of the stretch marks. This is, as
described above, a function of the glassblower twisting the neck glass during
some part of the bottle making process, i.e. . Sometimes this twisting distorts
the glass of the neck significantly. The picture to the right is of a
small
schoolhouse ink with a cracked-off finish dating from about 1880. It
has a large stretch mark running from the right shoulder up through the middle
of the neck in the picture. This mark manifests itself inside the bore of
the bottle as a distinct, rounded hump that is obvious looking down the bore.
Straw Marks or Lines: Straw marks are hair fine wavy lines on the surface of the body (and/or neck and base) glass that can be alone or in patterns. These very fine lines are physically "etched" (for want of a better term) into the glass surface and can be felt as a sharp "tick" or "catch" when running ones fingernail across the surface. There appear to be at least two reasons for straw marks on bottles, either of which are hard to tell apart without knowing something about the origin of the bottle itself and which may be related to each other anyway.
 The
early American snuff bottle pictured to the left has various straw marks
running around the sides and shoulders (none on the base). This bottle was
produced in a dip mold as there are no mold seams visible on the bottle though
it has obvious form shaping that was largely impossible to do this well
freehand. This bottle is believed to have never been buried (i.e. has wear
on the base from sitting somewhere for a long period and the provenience of the
item) so these type of straw marks are likely related in some way to the
production process. This most likely was a function of the way the glass
was made (the batch components) or the way the batch was mixed (incompletely?) though it could also be due to some unknown effect of the gathering or blowing
process or possibly related to the weathering of the glass surface by a
humid atmosphere over time (see next paragraph). Straw marks on never buried
bottles have only been observed by the author on earlier mouth-blown (pre-1870s) bottles
although this may be a skewed sample as earlier bottles were more valuable to
reuse and thus discarded less often than later ones in the 19th century.
This would proportionally increase the opportunity of surviving to the current
day without having been buried.
Also see the unusual variation of straw marks pictured in the "Other glass
imperfections" section below.
The
early American snuff bottle pictured to the left has various straw marks
running around the sides and shoulders (none on the base). This bottle was
produced in a dip mold as there are no mold seams visible on the bottle though
it has obvious form shaping that was largely impossible to do this well
freehand. This bottle is believed to have never been buried (i.e. has wear
on the base from sitting somewhere for a long period and the provenience of the
item) so these type of straw marks are likely related in some way to the
production process. This most likely was a function of the way the glass
was made (the batch components) or the way the batch was mixed (incompletely?) though it could also be due to some unknown effect of the gathering or blowing
process or possibly related to the weathering of the glass surface by a
humid atmosphere over time (see next paragraph). Straw marks on never buried
bottles have only been observed by the author on earlier mouth-blown (pre-1870s) bottles
although this may be a skewed sample as earlier bottles were more valuable to
reuse and thus discarded less often than later ones in the 19th century.
This would proportionally increase the opportunity of surviving to the current
day without having been buried.
Also see the unusual variation of straw marks pictured in the "Other glass
imperfections" section below.
 The other
"type" of straw marks seem to be induced by a variably lengthy burial in the ground and the chemical weathering reaction between the soil
and glass surface. These straw marks appear to have little or nothing directly to do with
production process of the bottle although they could be related to the
incomplete mixing of the components of the glass batch noted earlier. In
any event, these are likely connected to the chemistry of the glass.
Glass is made primarily of sand, soda, and lime with the water soluble soda content being the
part that is easiest to be leached out of the glass by contact with soil and moisture.
(This is called
patination or staining and is covered later on this page.) These swirls are
related to that deterioration though the exact reason for their conformation is unclear (Kendrick
1963). If related to the way the glass batch was mixed (incompletely) then
the etching may be swirls of less mixed soda being leached from the glass
surface faster than the other components.
The other
"type" of straw marks seem to be induced by a variably lengthy burial in the ground and the chemical weathering reaction between the soil
and glass surface. These straw marks appear to have little or nothing directly to do with
production process of the bottle although they could be related to the
incomplete mixing of the components of the glass batch noted earlier. In
any event, these are likely connected to the chemistry of the glass.
Glass is made primarily of sand, soda, and lime with the water soluble soda content being the
part that is easiest to be leached out of the glass by contact with soil and moisture.
(This is called
patination or staining and is covered later on this page.) These swirls are
related to that deterioration though the exact reason for their conformation is unclear (Kendrick
1963). If related to the way the glass batch was mixed (incompletely) then
the etching may be swirls of less mixed soda being leached from the glass
surface faster than the other components.
The bottle pictured to the right is a Ross's Aromatic Tonic. This ca. 1880 medicine bottle was definitely buried and excavated since it was heavily stained and subsequently "polished" to remove most of the staining although the straw marks remain. It has an assortment of straw marks running around the sides of the bottle which show in the upper part of the embossing pattern. In a side by side comparison with the snuff bottle above, the straw marks look essentially identical.
Whatever the cause, there are no particularly useful dating opportunities related with straw marks (and patination in general) since they can be found on mouth-blown (buried or unburied) and earlier machine-made bottles that have been buried. However, straw marks seems to be more common on mouth-blown items than machine-made, though that is likely just a function of time and the effects of it on glass. Earlier (pre-1930s approximately) machine-made bottles tend to weather faster than earlier mouth-blown bottles due to a higher soda content of earlier machine-made glass composition and chemistry which was necessary for proper feeding into machines (Kendrick 1968).
(Note: If viewers of this section have additional information on this interesting phenomena, we would be interested in hearing about it - especially with bottles that appear to have been never buried. The above is our best guess as to the reasons behind straw marks based on years of observations.)
 Stones:
Also called "potstones" by collectors, "stones" and "knots" by 20th century
glassmakers, and a "non-glassy inclusion" by some
archaeologists (Scholes 1941; Dillon 1958; Jones & Sullivan 1989). Since
glassmakers used the term "stones" that is the preferred terminology here,
though potstones is the most widely used term. These are imperfections
in the glass itself that are are usually the result of poor or incomplete melting of the
glass batch components. Other possible causes of stones are detached particles from
the bricks in the walls of the glass furnace or the glass pot itself, both
of which are gradually wore out over time by the intense heat of molten glass
(Kendrick 1968).
Stones:
Also called "potstones" by collectors, "stones" and "knots" by 20th century
glassmakers, and a "non-glassy inclusion" by some
archaeologists (Scholes 1941; Dillon 1958; Jones & Sullivan 1989). Since
glassmakers used the term "stones" that is the preferred terminology here,
though potstones is the most widely used term. These are imperfections
in the glass itself that are are usually the result of poor or incomplete melting of the
glass batch components. Other possible causes of stones are detached particles from
the bricks in the walls of the glass furnace or the glass pot itself, both
of which are gradually wore out over time by the intense heat of molten glass
(Kendrick 1968).
The picture to the left shows a particularly large (1.1 cm in length) stone in the shoulder of a Lindsey's Blood Searcher (Pittsburgh, PA.) - a large patent medicine bottle that dates from between 1865 and 1875. Most stones are smaller than this, but they vary in size from pinhead sized specks to larger than the one pictured (which is shown because larger ones are easier to photograph and see).
Generally speaking, there is no precise dating information connected to the presence (or absence) of stones, though they are very common in bottles made prior to the 1870s and commonly noted in mouth-blown bottles that date prior to the 1890s. After this time glass batch processes and chemistry made rapid improvements and stones became increasingly rare. Stones are unusual in machine-made bottles, but do occur. They are much more likely to be found in the earliest machine-made bottles, i.e. early 1900s up into possibly the 1920s. After that time, stones are very rarely found (empirical observations).
 Other glass imperfections:
There
are many other bottle glass imperfections that include sunken, sagging, or bulging sides; uneven glass thickness
particularly in the base;
crooked necks; "orange-peel" surface texture; off color striations in the glass
(images of a circa 186o Dyottville Glass Works blue green soda bottle
with green striations at the following links -
image 1;
image 2);
and others. (Photos courtesy of Richard D. Martin.) Bubbles and whittle marks are glass
imperfections also, but covered separately below. These forming defects
are caused by a myriad of flaws in the glassmaking and glassblowing processes
ranging from the temperature and chemistry of the glass to the skill or
sloppiness of the glassblower and his helpers (and maybe even the day of the week
like reportedly with automobile quality!).
Other glass imperfections:
There
are many other bottle glass imperfections that include sunken, sagging, or bulging sides; uneven glass thickness
particularly in the base;
crooked necks; "orange-peel" surface texture; off color striations in the glass
(images of a circa 186o Dyottville Glass Works blue green soda bottle
with green striations at the following links -
image 1;
image 2);
and others. (Photos courtesy of Richard D. Martin.) Bubbles and whittle marks are glass
imperfections also, but covered separately below. These forming defects
are caused by a myriad of flaws in the glassmaking and glassblowing processes
ranging from the temperature and chemistry of the glass to the skill or
sloppiness of the glassblower and his helpers (and maybe even the day of the week
like reportedly with automobile quality!).
As one example of an inexplicable imperfection that one can run across, the picture to the right shows a strange variation of the previously discussed "straw marks" on a mid-19th century English-made bottle that was known to have been never buried (i.e. "attic found"). These lines have regular "railroad tie" type cross hatching lines included in what would otherwise be typical glassmaking induced straw marks. How (or why) these marks were formed is unknown, but had to be related to the glassmaking process. (Photo courtesy of Richard Martin, Harrisonburg-Rockingham Historical Society, VA.) There is a possibility that these lines were caused by the bottle being blown in a fired clay mold as such lines have been reported by potters on their wares. These unusual lines would be the plastic hot glass picking up the surface imperfections on the inside of the clay mold. (Joel Williams pers. comm. 2008).
The following quote on bottle glass defects is taken from Grace Kendrick's excellent 1968 book on bottle making - The Mouth-Blown Bottle:
One of the major causes of defects in bottles is the nature of glass itself. It "sets up" too quickly! As man is forming a bottle out of this pliant substance, it very suddenly turns rigid and resists any further manipulation. The action works in reverse also, allowing the glass to suddenly turn TOO fluid when re-exposed to heat. Further, the hardening and softening won't be uniform throughout the glass object, since thinner areas will cool more quickly than the thicker parts.
A typical defect caused by the short period between softening and hardening of the glass, is the distortion of the shapes of the bottles. The necks may rise off-center, the lips may be non-round, the body of the bottle may slump or sag to one side. The slumping may cause wrinkles or grooves to appear in the glass, or it may give a concave surface to one wall of the bottle.
Faulty temperature may also cause the glass not to conform to the mold, allowing hollow depressions to appear on the bottles.
There is little utility in discussing these miscellaneous bottle body flaws at length except except to say that they are much more likely to be found on mouth-blown than machine-made bottles and earlier bottles (in both categories) tend to have more glass flaws than later produced bottles. The uniformity of machine manufacture - the precision of the machine itself in conjunction with better technology in all aspects of the glassmaking - eliminated many of the flaws that were common in earlier mouth-blown items. Most notably is that the glass in a machine-made bottle is much more uniform with heavy uniform bases and relatively thick even walls. Conversely, some mouth blown bottles will have base glass that is an inch thick on one side slanting off to paper thin on the other side (Kendrick 1963).
For more information on glass
imperfections or forming defects, consult Tooley (1953) for machine-made bottles
and Kendrick (1963 & 1968) and Munsey (1970) for mouth-blown bottles.
 "Bubbles"
are air or gas filled cavities within the glass. See the image to the left
for a close-up of a bottle with bubbles in atypically high quantity for
illustrative purposes. In the glass making industry, small bubbles
were referred to as "seeds" and larger bubbles as "blisters." Bubbles are caused by an assortment of
irregularities in the production process, including a glass pot or tank
that is too hot, a glass tank which is not full enough, glass cut-off or
shearing irregularities, and various gob feeder problems. The
presence and/or amount of bubbles in glass is also related to where in the
glass pot/tank the glass is drawn from for blowing (Tooley 1953).
Early glass makers would allow a batch of glass cook for several days at a
temperature higher than they would actually work it in order to reduce the
number of bubbles in the glass; to allow the glass to become "plain" in
their terminology (Trowbridge 1870). The following is a good
explanation from Toulouse (1969) on bubble formation and common presence
in mouth-blown bottle glass:
"Bubbles"
are air or gas filled cavities within the glass. See the image to the left
for a close-up of a bottle with bubbles in atypically high quantity for
illustrative purposes. In the glass making industry, small bubbles
were referred to as "seeds" and larger bubbles as "blisters." Bubbles are caused by an assortment of
irregularities in the production process, including a glass pot or tank
that is too hot, a glass tank which is not full enough, glass cut-off or
shearing irregularities, and various gob feeder problems. The
presence and/or amount of bubbles in glass is also related to where in the
glass pot/tank the glass is drawn from for blowing (Tooley 1953).
Early glass makers would allow a batch of glass cook for several days at a
temperature higher than they would actually work it in order to reduce the
number of bubbles in the glass; to allow the glass to become "plain" in
their terminology (Trowbridge 1870). The following is a good
explanation from Toulouse (1969) on bubble formation and common presence
in mouth-blown bottle glass:
As the glass batch melted, the glass became filled with bubbles of entrapped gas. The chief source was the chemical release of carbon dioxide from the carbonates in the batch - the soda-ash, potash and lime. The second source was the gas entrapped in the spaces between the particles of batch materials. During the later stages of the melting, usually called the "fining" or refining, the gas bubbles rose to the top, burst, and disappeared. The speed with which fining took place depended much on the temperature of the melt. Lower temperatures retarded the refining by slowing the rate of rise of the bubbles to the top of the glass mass... Unfortunately for hand blowing, the blowpipe must be dipped into the upper area of molten glass, where the last of the bubbles still remained. With incompletely refined glass therefore the blowpipe will pick up many seeds and bubbles, large and small. The very act of inserting the blowpipe could drag large bubbles of air into the glass. The result would be many seeds and bubbles in the first production... The fact that some (bottles) from one company may generally be seedy may reflect only that company's policies, or the degree of supervision. Later in the day the same pot may be making seed-free glass. If the factory manager and the men had waited, or could have waited, it would have had fewer seeds at the start. The fact does not indicate a different glass in any event...
 Very
generally speaking, bubbles in the body of a mouth-blown bottle - if they
have a distinctive orientation - tend to be vertically elongated
reflecting the up and down stretching of the hot glass while being
inflated. (This phenomena seems much less distinct in machine-made
bottles, though machine-made bottles on average have far fewer bubbles
than mouth-blown bottles.) Conversely, if the bubbles in the finish
of a mouth-blown bottle with an
applied finish have any distinctive orientation (most don't) they tend
to be horizontal. This is a product of the way the finishing glass
was applied to the point where the blow-pipe was removed.
Specifically, the hot glass was added via a small gather made on a
blowpipe or other tool as a variably thick (depending on the finish type
and size desired) strip or "string" immediately below the cracked-off or
sheared point of the neck as the bottle was rotated by another glassworker
holding the bottle by the base with either a pontil rod or within a
snap-case tool (Jones & Sullivan 1989). Like body bubbles,
mouth-blown tooled
finish bottles tend to have vertically elongated bubbles since the
glass of a tooled finish was blown with the remainder of the bottle, not
applied after removal from the blowpipe (empirical observations).
Very
generally speaking, bubbles in the body of a mouth-blown bottle - if they
have a distinctive orientation - tend to be vertically elongated
reflecting the up and down stretching of the hot glass while being
inflated. (This phenomena seems much less distinct in machine-made
bottles, though machine-made bottles on average have far fewer bubbles
than mouth-blown bottles.) Conversely, if the bubbles in the finish
of a mouth-blown bottle with an
applied finish have any distinctive orientation (most don't) they tend
to be horizontal. This is a product of the way the finishing glass
was applied to the point where the blow-pipe was removed.
Specifically, the hot glass was added via a small gather made on a
blowpipe or other tool as a variably thick (depending on the finish type
and size desired) strip or "string" immediately below the cracked-off or
sheared point of the neck as the bottle was rotated by another glassworker
holding the bottle by the base with either a pontil rod or within a
snap-case tool (Jones & Sullivan 1989). Like body bubbles,
mouth-blown tooled
finish bottles tend to have vertically elongated bubbles since the
glass of a tooled finish was blown with the remainder of the bottle, not
applied after removal from the blowpipe (empirical observations).
Some authors have noted that the presence of a considerable number of bubbles are an indicator of manufacture prior to 1910 (mouth-blown and some machine-made bottles) and even more likely prior to 1904, which would have been primarily bottles of mouth-blown manufacture (Kendrick 1963). Others, have noted that "the number and size of bubbles has absolutely no connection with the age of the glass" (Jones & Sullivan 1989). Both appear to be at least partially true.
During the early 20th century glassmaking technology had improved enough so that the chemical reduction of bubbles in the molten glass was possible in bottles of any manufacture. Specifically, arsenic or sodium nitrate was added to the glass to reduce bubble formation (Kendrick 1963). Since the large majority of the bottles produced during and prior to the early 1900s were mouth-blown, the presence of a significant amount of bubbles is likely to be at most a weak dating indicator of relative age. The author of this website has several mid-18th to early 19th century free-blown bottles that have few bubbles in the glass and bottles from the late 19th or early 20th century that have hundreds of bubbles.
As the machine-made bottle era of the
early 20th century progressed technology improved and glass homogeneity and
uniformity also improved. Besides glass chemistry improvements like
those already noted, bubbles became relatively uncommon in machine-made
bottles due to the machines drawing glass from the center of the glass vat
instead of from the top where bubbles tended to congregate like foam on a
beer. By the end of the 1920s, machine-made bottles which have
numerous and/or large bubbles did exist but were increasingly unusual (Berge
1980; Girade 1989; Lockhart pers. comm. 2003). This feature is still,
however, a tenuous one for dating since there are many earlier machine-made
bottles (prior the 1920s) with few if any bubbles. It is largely true
that the presence of a large amount of bubbles in a glass fragment makes it
likely that it was from a mouth-blown bottle, though without other
diagnostic features evident it may not be possible to tell for sure
(Kendrick 1963; Girade 1989; empirical observations).

One "type" of bubble that seems to be found only in machine-made bottles is shaped like an upside down "V", i.e. the narrow end of the "V" points towards the bottle finish (picture to the right). It is unknown exactly what causes this shape of bubble, though it appears to be a result of the much higher pressures that a machine can exert over a man's lungs. These type bubbles seem to be present primarily in earlier machine-made bottles, i.e. 1905 to through the 1920s and usually in bottles produced by the Owens Automatic Bottle Machine. Since these machines brought the glass into the parison or blank (first stage) mold from below via suction (i.e. a created vacuum pulls the glass into the mold from above) the shape of this bubble makes sense as the larger middle portion would be distended upwards by the powerful suction action.
The presence of this shape of bubble in
the glass of a fragment is almost a sure indicator of machine-made
manufacture, though most bubbles in machine-made bottles are
not this shape. It is common for a machine-made bottle to have a
couple of the inverted "V" bubbles, with the rest being normal round or oval
shaped (empirical observations).
 Whittle
marks are a very descriptive term for a bottle body feature that generally has
nothing
whatsoever to
do with its name. The term "whittled" or "whittle marked" is a reference
to a hammered or wavy surface to the glass that one could imagine was caused by the "whittle" marks of the mold maker on the inside surface of
a wooden mold. Early 19th century glass makers called this effect "ruffled
glass" while later it was referred to as a "hammered look" (Toulouse 1966, 1969a).
See picture to the left.
Whittle
marks are a very descriptive term for a bottle body feature that generally has
nothing
whatsoever to
do with its name. The term "whittled" or "whittle marked" is a reference
to a hammered or wavy surface to the glass that one could imagine was caused by the "whittle" marks of the mold maker on the inside surface of
a wooden mold. Early 19th century glass makers called this effect "ruffled
glass" while later it was referred to as a "hammered look" (Toulouse 1966, 1969a).
See picture to the left.
Appealing though this notion is, the large majority of molds used to produce bottles during the era covered by this webpage (1800 through the 1950s) were made of various metals, or in the earlier years, fired clay (Van den Bossche 2001). Although wooden molds were extensively used in the very early days of bottle making (pre-1800 up until the 1850s) and continued to be used for some applications until the early 20th century, including for the block in free-blowing, wood had too short of a life span to be of much use for most industrial bottle making where the temperature of molten glass was 2000°F and wood burns at about 1/4th that temperature (Whitall Tatum 1880; Toulouse 1966; Lohmann 1972; Boow 1991). It is believed impossible to visually determine that a bottle was blown in a wooden mold since these type of molds had to be kept very wet in order to avoid premature burn-out or even ignition when the hot glass hit the wood. Due to the water, steam was formed in the mold creating a cushion that the bottle "rode" on between the glass and the mold surface (Scholes 1952). This would not leave any trace of the mold surface texture and would likely preclude embossing on the bottle. When used, wooden molds were often lined with clay, coal, pitch, and other materials to try to extend the life. All were poor substitutes for metal molds (Atwater 1893; Toulouse 1966; Kendrick 1968; Lohmann 1972; Munsey 1970; Deiss pers. comm. 2005).
Whittle marks were actually caused by a reaction of the hot glass hitting the surface of a colder mold; cold relative to the temperature of the molten glass. Thus, the alternative name for this feature - "cold mold" although it was sometimes the glass itself that was too "cold" relatively speaking (Ceramic Industry 1949). Molds needed to be red hot" to properly produce a bottle without the wrinkles or ripple-marks that are known as whittle marks (Scholes 1952). This hammered look of mouth-blown bottles was also believed to sometimes be caused by the rolling the hot parison on the usually colder marver (Toulouse 1966). In a sense, whittle marks are bottle "goose bumps." As glassblowers were paid for the number of intact bottles blown, not by the surface quality of the items, there was little incentive to pay much attention to things like whittle marks or for that matter, bubbles in the glass or other largely non-impairing flaws (Toulouse 1966; Munsey 1970). The August 1890 edition of the National Bottlers Gazette (a carbonated beverage industry publication) noted the following - "The hammered look that some bottles present is not a sign of weakness except so far as the appearance of the bottle is concerned. The cause of this 'Hammered' appearance is that the glass has been put into a mould which has not been sufficiently hot, and the steam from the surface has imprinted itself upon the bottle." The steam was from the water that metal molds were either sprayed with or dipped into periodically to cool them (Toulouse 1966).
 Kendrick
(1968) suggested that the term whittle marks, though inaccurate,
should be retained because of its ubiquitous use and because "although the
(term) may be misleading as to the true cause of the deformity, it represents
a true picture in the mind's eye of how the marks appear."
This is not to say there have not been periodic debates over whether some
whittle marked bottles actually do exhibit the signs of the wooden mold makers
knife. The most notable argument for this was put forth by the pioneering
May Jones in Volumes 7 & 8 of her "The Bottle Trail"
publications during the 1960s (Jones 1967). However, as noted above, the
steam caused by the hot glass vaporizing the moisture in a wooden mold would
almost certainly preclude any subtle mold surface irregularities from expressing
themselves on the bottle surface (Deiss pers. comm. 2005). It is now
believed that the vast majority - if not all - of the bottles exhibiting whittle
marks are the result of the noted glass to metal mold reaction.
Kendrick
(1968) suggested that the term whittle marks, though inaccurate,
should be retained because of its ubiquitous use and because "although the
(term) may be misleading as to the true cause of the deformity, it represents
a true picture in the mind's eye of how the marks appear."
This is not to say there have not been periodic debates over whether some
whittle marked bottles actually do exhibit the signs of the wooden mold makers
knife. The most notable argument for this was put forth by the pioneering
May Jones in Volumes 7 & 8 of her "The Bottle Trail"
publications during the 1960s (Jones 1967). However, as noted above, the
steam caused by the hot glass vaporizing the moisture in a wooden mold would
almost certainly preclude any subtle mold surface irregularities from expressing
themselves on the bottle surface (Deiss pers. comm. 2005). It is now
believed that the vast majority - if not all - of the bottles exhibiting whittle
marks are the result of the noted glass to metal mold reaction.
The bottle pictured to the above left exhibits an extreme level of whittle marks. This is an Old Dr. Townsend's Sarsaparilla (New York, NY) that dates from the 1850s (Shimko 1969; Odell 2000). This bottle was probably blown early in the day before the mold had warmed up much or after extensive cooling with water. Though having whittle marks way more distinct than normal, this bottle makes a good illustrative item for showing this feature. Most bottles having whittle marks exhibit them in less density and less distinctly than the pictured item. As an example of more subdued whittle marks, click on the picture to the right. This is a ca. 1865-1875 medicinal tonic bottle (C. G. PENDLETON'S / TONIC - the embossing is turned away in the picture) thought to be from Memphis, TN. (Incidentally, whittle marks can be evident on any color of bottle; dark ones were used here since the dark glass surface photographs better.)
In the 20th century, much more attention was paid to all aspects of a bottles conformation and quality. Whittle marks were, as Kendrick noted above, a deformity of the glass and something that 20th century bottle makers worked to eliminate. They referred to whittle marks as "washboards", "brush marks", "wavy," "wavy surface", "ripple-marks", "wrinkles", "cold mold," and probably other terms (Anonymous 1949; Scholes 1952; Tooley 1953). Some automatic machines pre-heated the molds (called a "hot mold" - molds are also cooled if too hot) though whittle marks are observed occasionally in machine-made bottles also. These defects are less likely in fully automatic machines because they would run 24 hours a day rarely cooling off; the mold heat being supplied by the glass itself. In addition, the cycling time from one bottle to the next was very short since machines in the mid-20th century were producing soda bottles at the rate of 30-125 (or more) per minute with one operator - hardly time to cool of much. As a comparison earlier hand production operations produced about 1 bottle per minute with several people involved (Tooley 1953; Kendrick 1968; Jones & Sullivan 1989).
(Note: A similar bottle surface irregularity that is seen now then on mouth-blown bottles is what is termed an "orange-peel" effect or surface. It is quite descriptive as it is a pebbly surface to the glass that very closely resembles the texture of orange peel. This effect is probably caused similarly to whittle marks, though it is possible that at it is caused at times by the rough surface texture of a more crudely made or worn iron mold.)
Dating notes: In general, there is little in the way of dating refinement or opportunities associated with whittle marks except that this feature is much more common on mouth-blown bottles than machine-made items and more common on earlier machine-made items (pre-1925 or so) than bottles made after that time. If one has a fragment that exhibits distinct whittle marks it is most likely from a mouth-blown bottle though other diagnostic features would have to be considered in arriving at a reasonably narrow dating range (empirical observations). (Since whittle marks are molding related - though not intentional - the subject could have been covered under the next section on "Mold Induced Body Features.")
Return to the top of this page.
Introduction
 The large majority of bottles produced
within the time span covered by this website (1800 to the mid-20th century) were
produced in some type of metal mold (e.g., brass, iron, and later steel) though molds were
also made of various woods, ceramic, fired clay, clay lined wood, soapstone, and
likely other materials (Jones 1967; McKearin 1970; Lohmann 1972; Van den Bossche 2001
and other sources).
One source noted that the changeover from cut brass molds to cast iron molds
occurred in England - and likely in the U.S. also - during the 1820s to 1830s
(Bown & Addams 2015). Molds could range from the most simple - a dip mold which could just be a bucket
or dug out hole in the floor of the glassworks - to the elaborate full
sized molds
with as many as 9 different mold sections (Toulouse 1969b). Molds
increased the production of bottles greatly since less skills and labor were needed to produce
a bottle with a mold than for a
free-blown bottle. While forming the
shape of the bottle, molds leave behind diagnostic "bread crumbs" that provide
information on the manufacturing techniques used and often the age of a bottle
(Kendrick 1968; Munsey 1970).
The large majority of bottles produced
within the time span covered by this website (1800 to the mid-20th century) were
produced in some type of metal mold (e.g., brass, iron, and later steel) though molds were
also made of various woods, ceramic, fired clay, clay lined wood, soapstone, and
likely other materials (Jones 1967; McKearin 1970; Lohmann 1972; Van den Bossche 2001
and other sources).
One source noted that the changeover from cut brass molds to cast iron molds
occurred in England - and likely in the U.S. also - during the 1820s to 1830s
(Bown & Addams 2015). Molds could range from the most simple - a dip mold which could just be a bucket
or dug out hole in the floor of the glassworks - to the elaborate full
sized molds
with as many as 9 different mold sections (Toulouse 1969b). Molds
increased the production of bottles greatly since less skills and labor were needed to produce
a bottle with a mold than for a
free-blown bottle. While forming the
shape of the bottle, molds leave behind diagnostic "bread crumbs" that provide
information on the manufacturing techniques used and often the age of a bottle
(Kendrick 1968; Munsey 1970).
The great 1908 image to the right is from a West Virginia glass factory and shows a "gaffer" (blower) at work to the far left with his crew. This is a typical mouth-blown shop crew which included the "mold tender" boy (lower right) with a set of "tongs" in his right hand, the "gatherer" (behind gaffer) with the next gob of glass for the gaffer on a second blowpipe, and the "snapper up" (to the right standing) with a snap case tool in his left hand. The caption to the photo is: "Glass Blower and Mold Boy. Boy has 4 1/2 hours of this at a stretch, then an hour's rest and 4 1/2 more: cramped position. Day shift one week: night shift next. Grafton, W. Va. Location: Grafton, West Virginia" (Lewis Hine photo, Library of Congress).
The following is quoted from The Illustrated Guide to Collecting Bottles (Munsey 1970) - probably the best general bottle book ever published:
The study of the seams and other markings found on bottles can be of great assistance in identifying the type of molds and tools used in the their manufacture. Knowing when the various molds and tools were in common use provides a basis for the approximate dating of bottles...
With that lead-in, we move on to the major mold induced features found on the body of historic bottles. One of the best articles written on the subject of mold induced bottle features is the following written by Dr. Toulouse in the late 1960s:
|
Toulouse, Julian. 1969b. A Primer on Mold Seams. The Western Collector, Part 1 - Vol. 7, no. 11, pp. 526-35; Part 2 - Vol. 7, no. 12, pp. 578-87, (Nov. & Dec. 1969), San Francisco, CA. Exceptional work on bottle diagnostic features based on production related methods and materials. These articles are available on this website – courtesy of the late Dr. Cecil Munsey - at the following URL: http://www.sha.org/bottle/pdffiles/moldseams.pdf |
 The dip mold is a step up
in technology from
simple hand tool and
marver manipulated free-blowing in the manufacture of bottles and was used for various types of glass manufacturing
back into
antiquity, beginning long before the era covered by this website. A dip mold is a
simple open top mold that was used to gain
uniformity and consistency (and likely increased production) in the shaping of
the bottle body and base. A simple one-piece round bottle dip mold is illustrated
to the left showing its open top and the slight narrowing taper from top to
bottom necessary for the removal of the inflated bottle (Toulouse 1969b).
The illustration below right shows 19th century glassblowers using dip molds (middle &
right in image) that look like buckets, to help form their
bottles. Some dip molds were simply appropriately shaped holes dug into
the floor of the glassworks (Kendrick 1968). Dip molds were also used for
shapes other than round, e.g., square, hexagonal, and octagonal (Jones 1986).
Click
modern art glass dip molds to see examples of such which - though not used
for bottle production - are identical in form and function to those used for
bottles in the 19th century and before. (Photo courtesy of Bill Lockhart.)
The dip mold is a step up
in technology from
simple hand tool and
marver manipulated free-blowing in the manufacture of bottles and was used for various types of glass manufacturing
back into
antiquity, beginning long before the era covered by this website. A dip mold is a
simple open top mold that was used to gain
uniformity and consistency (and likely increased production) in the shaping of
the bottle body and base. A simple one-piece round bottle dip mold is illustrated
to the left showing its open top and the slight narrowing taper from top to
bottom necessary for the removal of the inflated bottle (Toulouse 1969b).
The illustration below right shows 19th century glassblowers using dip molds (middle &
right in image) that look like buckets, to help form their
bottles. Some dip molds were simply appropriately shaped holes dug into
the floor of the glassworks (Kendrick 1968). Dip molds were also used for
shapes other than round, e.g., square, hexagonal, and octagonal (Jones 1986).
Click
modern art glass dip molds to see examples of such which - though not used
for bottle production - are identical in form and function to those used for
bottles in the 19th century and before. (Photo courtesy of Bill Lockhart.)
 One-piece round dip molds would leave no classic narrow,
raised mold seams on the body of the bottle (more below). Two (or more)
piece, shoulder height, round dip molds could potentially leave fitting joint
induced vertical mold seams on the body of the bottle. This appears to
have been uncommon as the author of this website has never seen a dip molded
cylindrical bottle with obvious
body side seams. Although it surely occurred, it was possibly more common in the era
prior to that covered by this website. Multi-sided dip mold bottles
(pictured below) may likely have been made from multi-part dip molds, though side seams showing the interface between the
mold pieces are rarely seen, being either masked by the corner edges of the
bottle or the bottle body was
fire polished
to the point that seams are unrecognizable.
One-piece round dip molds would leave no classic narrow,
raised mold seams on the body of the bottle (more below). Two (or more)
piece, shoulder height, round dip molds could potentially leave fitting joint
induced vertical mold seams on the body of the bottle. This appears to
have been uncommon as the author of this website has never seen a dip molded
cylindrical bottle with obvious
body side seams. Although it surely occurred, it was possibly more common in the era
prior to that covered by this website. Multi-sided dip mold bottles
(pictured below) may likely have been made from multi-part dip molds, though side seams showing the interface between the
mold pieces are rarely seen, being either masked by the corner edges of the
bottle or the bottle body was
fire polished
to the point that seams are unrecognizable.
Dip molds were made of a variety of materials including wood and harder more durable materials like various metals, clay, and clay lined wood. Wooden dip molds (a common pre-19th century mold material) had to be kept continuously wet in order to survive long the intense heat of molten glass. This allowed steam to form in between the hot glass and mold surface causing the glass to "ride" on the steam cushion making the evidence of molding very difficult to distinguish from free-blown bottles, although this feature did make it easier for the bottle to be removed from the dip mold (Boow 1991). Sometimes the expanding parison would touch the sides of wooden mold before the cushion of steam formed leaving ripples, though this feature may be impossible to positively distinguish the use of a wooden mold versus glass imperfections (e.g., whittle marks) caused in metal molds for other reasons (Tooley 1953; Kendrick 1968; Toulouse 1969b; Jones & Sullivan 1989; Van den Bossche 2001; Deiss pers. comm. 2005).
In use, the parison of glass on the end of the blowpipe is placed into the open top of the dip mold then blown and expanded to form the body of the bottle and giving the base at least its diameter and sometimes shape. One-piece dip molds could produce about any cross section bottle shape - round, square, octagonal - but had to be designed to be removed from the top (i.e. slightly wider at the shoulder than base). Two (or more) piece dip molds could theoretically have about any body shape (or even embossing) since the expanded bottle could be removed by opening the mold segments. Though a dip mold could be made of multiple sections, according to Jones (1986) they were not designed to be open and shut. Dip mold bottles were not generally body embossed (see section near the end of this section) and even base embossing is uncommon but not unknown (discussed below). Once the body and base were fully expanded within the mold, the bottle was removed and the shoulder and neck formed to shape with glassblower skills and hand tools like a free-blown bottle. The base may or may not receive hand forming to shape it, though in early dip molded bottles the base was usually pushed inwards with a tool to form a "push-up" or kick-up" (Jones 1986; Jones & Sullivan 1989).
 The body of a round dip mold bottle will be very similar in appearance to a
free-blown bottle except that a dip molded bottle will tend to be more symmetrical in shape with
little or no distortion. This includes the general lack of the flaring of
the extreme lower body and heel that free-blown bottles will often (but not
always) have.
(Click
free-blown lower body to view a picture showing base flaring on an early to
mid-19th century free-blown bottle.) The body of a dip molded bottle will
virtually never have
embossing (a rare exception discussed below). Because of the surface contact with the mold the
sides of a dip molded bottle body from the shoulder to the heel
usually have some distinctly "ruffled" or vaguely textured look to it as
compared to the glossy smooth, fire-polished surface of the shoulder and neck.
This type of surface glass discontinuity is a diagnostic feature of dip molded
bottles, though it is not always obvious or apparent (Toulouse 1969b; Jones 1986).
The body of a round dip mold bottle will be very similar in appearance to a
free-blown bottle except that a dip molded bottle will tend to be more symmetrical in shape with
little or no distortion. This includes the general lack of the flaring of
the extreme lower body and heel that free-blown bottles will often (but not
always) have.
(Click
free-blown lower body to view a picture showing base flaring on an early to
mid-19th century free-blown bottle.) The body of a dip molded bottle will
virtually never have
embossing (a rare exception discussed below). Because of the surface contact with the mold the
sides of a dip molded bottle body from the shoulder to the heel
usually have some distinctly "ruffled" or vaguely textured look to it as
compared to the glossy smooth, fire-polished surface of the shoulder and neck.
This type of surface glass discontinuity is a diagnostic feature of dip molded
bottles, though it is not always obvious or apparent (Toulouse 1969b; Jones 1986).
 Another
method to often differentiate a dip molded bottle from a similar free-blown
bottle is to look at the junction between the body and lower shoulder. Dip
molded bottles will very often have a distinct discontinuity in the glass
appearance right at the break between the the body and shoulder due to the
"blow-over" effect induced by the mold ending at that point; i.e. essentially an
"end-of-the-mold" mark. This shoulder discontinuity could also
be considered as a type of mold seam, though not with the typical look of
regular mold seams where two parts of a mold come together (Shafer 1969; Jones 1986; Deiss pers. comm. 2005). This shoulder discontinuity is easier to
see than describe and is shown distinctly in the picture at the
following link -
dip mold bottle shoulder - which is a close-up of the bottle to the left. This is a dip molded
likely ale/beer bottle
with a glass-tipped pontil scar on the base which dates from the 1850s (context
of where it was found in a California Gold Rush era area). The picture
also shows the glass surface texture difference between the body (slightly
wavy) and the essentially free-blown shoulder (smooth and glossy). This shoulder mold seam or
discontinuity can be observed on any shape of bottle that could be dip molded,
though on square bottles (like discussed next) it is not usually as obvious as
on a round bottle (empirical observations).
Another
method to often differentiate a dip molded bottle from a similar free-blown
bottle is to look at the junction between the body and lower shoulder. Dip
molded bottles will very often have a distinct discontinuity in the glass
appearance right at the break between the the body and shoulder due to the
"blow-over" effect induced by the mold ending at that point; i.e. essentially an
"end-of-the-mold" mark. This shoulder discontinuity could also
be considered as a type of mold seam, though not with the typical look of
regular mold seams where two parts of a mold come together (Shafer 1969; Jones 1986; Deiss pers. comm. 2005). This shoulder discontinuity is easier to
see than describe and is shown distinctly in the picture at the
following link -
dip mold bottle shoulder - which is a close-up of the bottle to the left. This is a dip molded
likely ale/beer bottle
with a glass-tipped pontil scar on the base which dates from the 1850s (context
of where it was found in a California Gold Rush era area). The picture
also shows the glass surface texture difference between the body (slightly
wavy) and the essentially free-blown shoulder (smooth and glossy). This shoulder mold seam or
discontinuity can be observed on any shape of bottle that could be dip molded,
though on square bottles (like discussed next) it is not usually as obvious as
on a round bottle (empirical observations).
The square, dark olive green bottle to the right is a dip-molded "case" or "tapered" gin that dates from the mid-19th century (Shafer 1969). This particular bottle was produced near the end of the dip mold era (see dating below) as it is not pontil scarred and was found in western Oregon in the context of immediate post-Civil War era items. It is possibly American made, though that is impossible to say for sure. The body of this bottle was dip molded in a square mold and has a faintly embossed cross on the base of the bottle - sure proof of molding. Click base embossed cross to view a picture of the embossing. Base embossed dip molded bottles are unusual though obviously occurring. Click case gin shoulder close-up to view a close-up picture of the interface between the crudely dip molded sides and the "free-blown" shoulder. This bottle does not show much of a texture difference between the mold formed sides and the free-blown shoulders. The distinct taper to these type bottles helped facilitate removal from the mold.
(Note: Sometimes European
made case gin bottles will have faint manufacturing induced vertical lines
[i.e., faintly "corrugated"] on the four body sides. On dip molded bottles this may possibly be from
rubbing as the bottle was withdrawn from the mold [Shafer 1969]. These
type gins - both dip and conventionally molded - are occasionally called "shingle mold" gins
by collectors since the lines resemble shingle texture.
Not far fetched as it is believed that some early square dip molds were formed by four wooden boards
nailed together [Jones & Sullivan 1989]. As noted earlier, wooden molds had to
be kept very wet in order to survive for long with the 2000+ degree heat of
molten glass. Steam formed at the interface between the wet wooden mold
and the hot glass helping to cushion and protect the wooden mold surface and
probably precluding any texture from the wood being impressed upon the glass
surface [Deiss pers. comm. 2005]. It has also been speculated
that this body texture feature may have been caused by the use of wooden paddles
or a block to form the body - at least in the 18th century [Boow 1991].
Mouth-blown European [primarily Dutch] case gins with a faint vertically
corrugated body surface - caused by a purposefully textured inner surface of the
predominant iron molds of the era - were commonly made during the last half of the
19th century into the early 20th. These bottles were exported widely around the world
and are common items on U. S. historic sites of that era.
Click
late 19th century "shingle mold" case gin to see an example of one of these
bottles. Click
Liquor/Spirits Bottles Typology page to view the section of that page
discussing case gin bottles.)
|
Body Embossed Dip-mold Produced Bottle(s)!
The first example is the true dip-molded bottle on the left in the image to the right. It is about 8.75" tall and a body that is about 3.6" in diameter. It is embossed with a large "P" just below the point where the dip mold ended. Click close-up of the embossed P to see such. (Note: The right bottle is an almost identical, three-piece "Rickett's" mold produced bottle from the mid-1830s to 1840s (Jones 1983a:176-177). A similar example dated 1822 is discussed on this websites' Glassmakers page; click HERE to open that discussion on a separate page.) Three examples of the "P" bottle have been noted by this author; this example acquired to illustrate here. The "P" is about 1.5" tall and is very flattened indicating the engraving on the mold wall was likely shallow - a necessity in order to remove the bottle from the mold. The body sides show no evidence that this was a two-piece construction that could be opened to facilitate removable, though it could have been and just not visible. The rest of body displays the typical features discussed above which certainly indicate this was indeed a dip-mold production. Click base view which shows the era typical pushed up base with a faint sand pontil scar. (The base also has a faint bluish cast likely caused by the application of the pre-heated pontil rod and/or when the base was pushed inwards with a tool used to create the era typical push-up.) This bottle is of a "squatty" style commonly made in England using the dip-mold method from the 1790s into the 1820s when the revolutionary Rickett's mold was employed to increase worker output (McKearin & Wilson 1978; Jones 1986; Burton 2015). The only other embossed dip-molded bottle this author has seen was lower body embossed with BGW. It was very similar bottle to the "P" bottle except with multiple letters and on the lower body. Nothing else is known about it but it looks to be from the same era as the above bottle. Click image of the BGW bottle to see such. (Image courtesy of Glass Works Auctions.) |
Another example of a dip molded American made bottle is the deep golden amber bottle to the left. This is an early "snuff" (powdered tobacco) bottle that likely dates from the first third of the 19th century. This was blown in a more elaborate square dip mold which molded the four flat sides and formed the beveled corners. The shoulders are free-blown and the flared finish tooled to shape; the base has a glass-tipped pontil scar. There is no evidence of mold seams on this bottle though it has the glossy appearance of a fire polished bottle. The body of the bottle has some texture to it which contrasts with the smooth glossy sheen of the free-blown shoulders (Jones 1986). (Note: Early American bottles in this color are often attributed to glassworks operating in the Stoddard, NH. area, though similar items in similar colors were made by many glass manufacturers along the eastern seaboard.)
Dating notes: Dip molded bottles were produced during (and before) the earliest part of the era covered by this website, being used at least as early as the early 1700s for bottles. The most common date range for English dip molded bottles is from the 1730s to 1820s, when the three-piece Rickett's mold came into widespread use. From the 1820s on dip molded bottles were gradually displaced by full-sized molds to virtual disappearance around 1865 to 1870 (Jones 1986; Boow 1991). It is likely that American made products roughly followed these same time lines with an end date maybe as late as the early 1870s (Wilson & Wilson 1968).
Be aware that dip mold produced bottles will sometimes be mistaken for turn-molded bottles and vice versa. For example, all of the champagne bottles on the S. S. Bertrand, which sank in the Missouri River in April 1865, were noted by Switzer (1974) to be turn-molded. However, inspection of a large assortment of these bottles by this website's author in October 2015 found that they may have been mostly (or entirely...the entire assemblages was not inspected) dip molded. The key to differentiation is that a turn-mold bottle will almost always have numerous, perfectly horizontal though often faint striations on the glass surface in many places on the body, shoulder and neck. A dip molded bottle will usually have a horizontal line or glass discontinuity at the should interface or break between the upper body and lower shoulder, but will not have multiple, perfectly horizontal lines anywhere else on the bottle body, shoulder, or neck. No pontil scarred examples of a turn-mold have ever been noted by the author, though are conceivably possible.
Jones (1986) noted that, "The dip mold was in use for such a long period and its use is frequently so difficult to identify that it is virtually useless as a dating tool." Though largely true, when dip mold manufacturing features are identifiable there is some dating utility. In Western America, the earlier Gold Rush era sites (1850-1870) are often indicated by the presence of dip molded bottles (empirical observations) . In general, dip molded bottles are commonly found on historic sites dating from the Civil War and before, but very rarely on sites dating after that time (Switzer 1974; Carlson 1979; Dobson et al. 2009). (Note: One of the better reference sources on dip molded bottles is Olive Jones 1986 book entitled Cylindrical English Wine & Beer Bottles 1735-1850.)
Pattern mold/half-post methods
 Pattern
molds: Any
bottle mold can have a
pattern (or lettering) inscribed or cut into its surface. As used on this website the term
"pattern
mold" is a variation of the dip mold in which a pattern was inscribed on the
inside surface of the mold. With bottles, the pattern was typically vertical lines or ribs
which resulted in a
distinct ribbed pattern on the glass surface. This gave rise the alternative name
"rib mold." Some molds had diamond (cross-hatched) or spiral rib patterns
engraved on the surface; these molds would have been two piece molds which could
open to
facilitate removal of the parison
(McKearin & Wilson 1978). The "Pitkin" style inkwell pictured to the left
was produced in a pattern mold and actually patterned twice during the
blowing process - once for the fainter vertical ribs and once for the spiral
ribs. Pattern molding was more
common with glassware, but was used frequently to produce bottles during the
first half of the 19th century (Jones & Sullivan 1989).
Pattern
molds: Any
bottle mold can have a
pattern (or lettering) inscribed or cut into its surface. As used on this website the term
"pattern
mold" is a variation of the dip mold in which a pattern was inscribed on the
inside surface of the mold. With bottles, the pattern was typically vertical lines or ribs
which resulted in a
distinct ribbed pattern on the glass surface. This gave rise the alternative name
"rib mold." Some molds had diamond (cross-hatched) or spiral rib patterns
engraved on the surface; these molds would have been two piece molds which could
open to
facilitate removal of the parison
(McKearin & Wilson 1978). The "Pitkin" style inkwell pictured to the left
was produced in a pattern mold and actually patterned twice during the
blowing process - once for the fainter vertical ribs and once for the spiral
ribs. Pattern molding was more
common with glassware, but was used frequently to produce bottles during the
first half of the 19th century (Jones & Sullivan 1989).
 Pattern molds were smaller than the
finished bottle (i.e. not a "full sized mold") since the mold was used primarily to impress a pattern on the
glass surface, not to completely form the bottle base, body,
shoulder, and/or neck. Once patterned, the bottle was removed
from the mold and blown, expanded, and manipulated with tools in order to
achieve the
desired shape and size (Munsey
1970). The pattern on finished bottles is a series of variably subtle indentations and intervening humps which
are typically more distinct towards the shoulder than towards the base. Pattern molded bottles will usually have
the mold induced pattern covering the body and continuing from the sides
"seamlessly" around the heel and onto the base (Kendrick 1968).
The image to the right shows the pattern continuing on to the
base of the inkwell pictured above.
Pattern molds were smaller than the
finished bottle (i.e. not a "full sized mold") since the mold was used primarily to impress a pattern on the
glass surface, not to completely form the bottle base, body,
shoulder, and/or neck. Once patterned, the bottle was removed
from the mold and blown, expanded, and manipulated with tools in order to
achieve the
desired shape and size (Munsey
1970). The pattern on finished bottles is a series of variably subtle indentations and intervening humps which
are typically more distinct towards the shoulder than towards the base. Pattern molded bottles will usually have
the mold induced pattern covering the body and continuing from the sides
"seamlessly" around the heel and onto the base (Kendrick 1968).
The image to the right shows the pattern continuing on to the
base of the inkwell pictured above.
Since the bottle is only patterned and not completely formed by the mold, pattern molded bottles are really a variation of a free-blown method described above. Because of the post-patterning blowing of these type bottles, the adjective "expanded" is often used to describe these bottles, i.e. "expanded vertical ribbing" like the flasks pictured below in this section. Many or most pattern molded bottles had one pattern impressed on them from one "dip" in the patterned mold. A feature of pattern molded bottles is that the ribs are expanded (wider) on the body of the bottle and drawn together at the shoulder/neck and base - a function of the post pattern molding expansion. Many pattern molded bottles have ribs that are swirled one direction or the other. This was caused by twisting the bottle on the blowpipe while expanding (McKearin & Wilson 1978). Several of the flasks below and the inkwell above have swirled ribs indicating being twisted while blown.
The early American inkwell pictured above left is a pattern molded inkwell of a style that are referred to as a "Pitkin" style inkwell. (A straight-on side view of the bottle is available by clicking HERE.) These pattern molded inkwells are attributed to the Pitkin Glassworks in Manchester, CT. who likely produced this example sometime between 1783 (when founded) and 1830 when the glasshouse closed down for a variety of reasons (Buckley 1985; McKearin & Wilson 1978). The image to the above right is a close-up view of the base of this inkwell showing the blowpipe pontil scar on the base of this inkwell as well as the ribbing continuation from the body to the base typical of a pattern molded bottle. It should be noted that some "Pitkin" style inkwells were also made by other regional glasshouses like those in Keene, NH., Coventry, CT., and likely some in Pennsylvania and Ohio (Covill 1971).
 The bottle pictured to the
left is an early American (late 18th to early 19th century)
"nursing" bottle that was
patterned once with a mold that had 19 engraved vertical ridges.
This pattern would be referred to as having "19 vertical ribs."
Click
nursing bottle side view to see a close up of the side of this bottle
showing the ribs somewhat more distinctly. This flask also has a
glass-tipped pontil scar on the base. Whether these relatively common
(for the period produced) long flattened ovoid shaped flasks were used as nursing bottles is not known for
sure, though that is what they are commonly referred to by collectors.
They well could have been used for liquor or a host of other liquid products (McKearin & Wilson 1978;
Jones & Smith 1985).
The bottle pictured to the
left is an early American (late 18th to early 19th century)
"nursing" bottle that was
patterned once with a mold that had 19 engraved vertical ridges.
This pattern would be referred to as having "19 vertical ribs."
Click
nursing bottle side view to see a close up of the side of this bottle
showing the ribs somewhat more distinctly. This flask also has a
glass-tipped pontil scar on the base. Whether these relatively common
(for the period produced) long flattened ovoid shaped flasks were used as nursing bottles is not known for
sure, though that is what they are commonly referred to by collectors.
They well could have been used for liquor or a host of other liquid products (McKearin & Wilson 1978;
Jones & Smith 1985).
 Half-post method:
A variation on the dip mold/pattern mold theme is
a method of bottle
production where the
gather is slightly
expanded then dipped
again into the molten glass to apply a second layer of glass over the initial
gather. This second
layer of glass typically covered the base and body portions of the first gather ending on the
upper shoulder. Postes was a French term for a gather of molten glass.
Thus the term
"half-post" for this method, though these bottles are well more that "half" covered by the second coating of glass (McKearin & Wilson 1978). The end
point for this second layer of glass is
indicated by a thickened ridge on the upper shoulder of the finished bottle.
Click
Pitkin shoulder to see a close-up picture of this ridge which shows just
below the bottom of the neck and just above the pattern mold ridges. (This
close-up is of the forest or olive green flask pictured to the right.)
Half-post method:
A variation on the dip mold/pattern mold theme is
a method of bottle
production where the
gather is slightly
expanded then dipped
again into the molten glass to apply a second layer of glass over the initial
gather. This second
layer of glass typically covered the base and body portions of the first gather ending on the
upper shoulder. Postes was a French term for a gather of molten glass.
Thus the term
"half-post" for this method, though these bottles are well more that "half" covered by the second coating of glass (McKearin & Wilson 1978). The end
point for this second layer of glass is
indicated by a thickened ridge on the upper shoulder of the finished bottle.
Click
Pitkin shoulder to see a close-up picture of this ridge which shows just
below the bottom of the neck and just above the pattern mold ridges. (This
close-up is of the forest or olive green flask pictured to the right.)
This method was used with regular shoulder height dip molds of various shapes and with pattern molds. Bottles produced by this method are often called "double-dipped" in collector jargon. Some early collectors incorrectly believed that the neck of these type bottles were "inserted" into the body of the bottle, a largely impossible feat. The term "inserted neck" still crops up occasionally however (McKearin & Wilson 1978). This production method is also often referred to as the "German half-post" method since it was believed to have originated in Germany (Munsey 1970).
 Certain types of half-post
produced bottles - like the "Pitkin" style flasks - were pattern molded after
the application of the second layer of glass. The flask could be patterned
once (like the aqua glass nursing bottle pictured above left) or patterned twice giving a
"broken swirl" appearance to the bottle, which can often resemble
popcorn kernels. The forest green Pitkin style flask pictured
to the above right is of early American origin and produced by the half-post method;
note the horizontal ridge encircling the shoulder just below the neck.
This flask is single patterned on the upper 40% of the body and double
patterned on the lower 60% (click picture to enlarge). It was
most likely made at a New England glassworks between 1780 and 1820 and
would be referred as being "swirled to the right" (from the bottom of the body
upwards) which is the most common direction for swirling on New England
"Pitkins" (McKearin & Wilson 1978; Noordsy 2003).
Certain types of half-post
produced bottles - like the "Pitkin" style flasks - were pattern molded after
the application of the second layer of glass. The flask could be patterned
once (like the aqua glass nursing bottle pictured above left) or patterned twice giving a
"broken swirl" appearance to the bottle, which can often resemble
popcorn kernels. The forest green Pitkin style flask pictured
to the above right is of early American origin and produced by the half-post method;
note the horizontal ridge encircling the shoulder just below the neck.
This flask is single patterned on the upper 40% of the body and double
patterned on the lower 60% (click picture to enlarge). It was
most likely made at a New England glassworks between 1780 and 1820 and
would be referred as being "swirled to the right" (from the bottom of the body
upwards) which is the most common direction for swirling on New England
"Pitkins" (McKearin & Wilson 1978; Noordsy 2003).
The light green "Pitkin" style flask pictured to the left is another example of a double patterned "broken swirl" flask from the same era. This is an unusual color for a New England style "Pitkin" as most were blown in darker shades of green and sometimes amber (e.g., olive green, olive amber) (Noordsy 2003). Click pattern mold base to view an image showing the pattern continuing on to the base of this flask.
 Not all Pitkin style flasks were made by
New England glass factories. Many were made by various glassworks further
to the west. The Pitkin style flask to the right was most
likely produced at a Midwestern glass factory - Ohio or possibly western
Pennsylvania (Pittsburgh) - during the first third of the 19th century. It's heritage is indicated by the brighter
green color
and the more circular shape of the bottle body. This flask was also twice
pattern molded resulting in the "broken swirl" pattern (McKearin & Wilson 1978).
Click
Midwestern Pitkin close-up to view a close-up of this flask which
distinctly shows the half-post "ridge" on the upper shoulder as well as the
pattern mold ridges. This flask would be referred to as being "swirled to
the left." Midwestern flasks were rarely if ever blown in olive-green or
olive-amber and are most common in more vibrant greens, shades of amber, and
aqua.
Not all Pitkin style flasks were made by
New England glass factories. Many were made by various glassworks further
to the west. The Pitkin style flask to the right was most
likely produced at a Midwestern glass factory - Ohio or possibly western
Pennsylvania (Pittsburgh) - during the first third of the 19th century. It's heritage is indicated by the brighter
green color
and the more circular shape of the bottle body. This flask was also twice
pattern molded resulting in the "broken swirl" pattern (McKearin & Wilson 1978).
Click
Midwestern Pitkin close-up to view a close-up of this flask which
distinctly shows the half-post "ridge" on the upper shoulder as well as the
pattern mold ridges. This flask would be referred to as being "swirled to
the left." Midwestern flasks were rarely if ever blown in olive-green or
olive-amber and are most common in more vibrant greens, shades of amber, and
aqua.
Dating notes: Pattern molded bottles are some of the earliest American bottles. American made pattern molded bottles and flasks like those discussed here would not likely date after the 1840s and typically would date from the 1780s into the 1830s. New England "Pitkin" flasks and inkwells are believed to date between 1780 and the 1820s; the Midwestern "Pitkins" date from about 1800 to 1835 (McKearin & Wilson 1978). Because of the early production of these type bottles, pattern molded bottles and flasks are rarely found on historic sites in the West, but would be commonly encountered in the East and Midwest.
(If not already
obvious, the best
discussion of pattern molds and molding, as well as the differences between New
England and Midwestern Pitkins is found in McKearin & Wilson's (1978)
classic book
American Bottles and Flasks and Their Ancestry - pages 322-333. See
the
References page.)
 Full
sized bottle molds could be made to create just about any body shape for a bottle
that could be imagined including animals, human figures, vegetables, purely
decorative designs, as well as a myriad of more mundane and purely functional shapes. The photo to the
left shows a variety of molded body shapes that does not even begin to represent the
variety found in bottles made during the era covered by this website - the 1800s
to mid 20th century. (Two illustrations of full sized molds are shown in this
section below.)
Full
sized bottle molds could be made to create just about any body shape for a bottle
that could be imagined including animals, human figures, vegetables, purely
decorative designs, as well as a myriad of more mundane and purely functional shapes. The photo to the
left shows a variety of molded body shapes that does not even begin to represent the
variety found in bottles made during the era covered by this website - the 1800s
to mid 20th century. (Two illustrations of full sized molds are shown in this
section below.)
Molds were created to produce either standard shaped bottles that were used by various purchasers wanting standard, product identifiable shapes or were custom made to reflect the specific desires of a bottle buyer. Individual molds were produced by custom mold shops or, at larger glass companies, by the company itself in on site machine shops. Relative to the latter point regarding custom made molds, the following is quoted from the Illinois Glass Company's 1906 Illustrated Catalogue and Price List:
Moulds for Special Shapes - Many Bottle users prefer shapes and designs of their own. For all such we are thoroughly equipped in our own extensive Machine Shop to make at short notice moulds for any practicable bottle, and at the lowest possible cost for first-class work. In ordering a special shape, an exact model of same should be furnished. In cases where this is impracticable, our own artist will produce a wooden model of the desired bottle if furnished with the idea by a drawing or otherwise. If we make the moulds no expense will attach for models; otherwise a charge for the actual cost of producing same will be necessary. Special Moulds should always be made in pairs for each size and shape, for economy's sake. Where large quantities of bottles are desired this is indispensable. Better and more uniform bottles are always secured when moulds are worked in pairs. The cut herewith shows a mould for an oval prescription bottle. The mould is made of the best grade of gray iron, and weighs about 80 lbs.
The noted mold illustration (i.e. "cut") from the 1906 catalog is shown to the above right (Illinois Glass Company 1906). This illustration shows a very typical side-hinged mold conformation for a mouth-blown bottle that appears to be a cup-mold which dominated mold types by the early 20th century. The skills needed to form a bottle with a mold - though considerable - were less than the skills needed to form a bottle free-blown. Even a master glassblower (gaffer) was limited in what could be produced free-blown as the shapes were limited by the techniques that could done via the glassblower lungs, movement of the blowpipe, use of a marver (a flat surface) and block (hollowed out surface), and other hand tools (Kendrick 1968). Click molding a mouth-blown bottle to see an illustration of a bottle being blown in a two-piece mold.

 The use of
full sized molds also allowed for a
dramatic increase in the speed of production. Free blowing likely
only allowed for a production of a few hundred bottles per day (likely 12-14
hour days) per glassblower,
who was assisted by at least one other person - the
servitor. Dip molding probably increased this production significantly,
but still was low production compared to later eras (McKearin & Wilson 1978).
Tooley noted the following 24 hour production amounts between shops using hand production using a mold
- 45-105 gross taking 6-7 people to produce - and modern (1953) machine production
of 250-1500 gross with one person running the machine. These ranges
covered bottles from 3 to 32 oz. in size, with larger bottles taking more time than
smaller ones (Tooley 1953).
The use of
full sized molds also allowed for a
dramatic increase in the speed of production. Free blowing likely
only allowed for a production of a few hundred bottles per day (likely 12-14
hour days) per glassblower,
who was assisted by at least one other person - the
servitor. Dip molding probably increased this production significantly,
but still was low production compared to later eras (McKearin & Wilson 1978).
Tooley noted the following 24 hour production amounts between shops using hand production using a mold
- 45-105 gross taking 6-7 people to produce - and modern (1953) machine production
of 250-1500 gross with one person running the machine. These ranges
covered bottles from 3 to 32 oz. in size, with larger bottles taking more time than
smaller ones (Tooley 1953).
The body, shoulder, and or neck of a bottle can be molded into a variety of shapes. A common molding feature is the paneled body. Panels are generally flat indentations into the body formed by the mold and usually perpendicular to the base. Click Hall's Balsam for the Lungs to view a picture of two bottle which have sunken or indented panels on all four sides of the bottle. Panels can come in all types of shapes including arched or gothic (like large blue-aqua pickle bottle in the group picture above), chamfered (like the Hall's Balsam bottles), tapered, rectangular, round, square, and others (Berge 1980).
 Bottle
shapes during the mouth-blown era were incredibly varied and done for a variety
of reasons (no particular order):
Bottle
shapes during the mouth-blown era were incredibly varied and done for a variety
of reasons (no particular order):
▪Product or content identification - use of
an accepted shape for a given product type;
▪For brand identification - use of special shapes to identify a specific
proprietary product like the H. H. Warner Company's Tippecanoe (a
proprietary medicine) pictured to the left;
▪As a warning - use of special shapes or embossing in order to warn the
consumer that the contents were poisonous;
▪Functionality - certain shapes or designs were necessary for certain products
because of carbonation or other physical attributes;
▪Decorative reasons - to attract potential purchasers;
▪Vanity of the bottle buying customer;
▪...and likely a lot of other reasons.
The illustration and photo to the above right shows a ca. 1870-1880 full sized post-bottom mold for a "Saratoga" style mineral water bottle and an emerald green mineral water bottle that was produced in a similar mold. The subject of molded bottle shapes is more comprehensively covered on the Bottle Typing/Diagnostic Shapes page since form follows function to a large degree with historic bottles. The "Bottle Typing/Diagnostic Shapes" page makes an attempt at classifying bottles by diagnostic - and typically molded - shapes, so the subject is not pursued further here.
Return to the top of this page.
 General
Information:
With
the exception of one-piece dip molds and turn-mold bottles (covered later), all
bottle molds potentially leave evidence of the joints where the mold pieces came
together, i.e. mold seams where were also know in the industry as "joint-marks"
(Scholes 1952). Mold seams can be virtually impossible to see
on bottles where the parts of the mold fit together very tightly (unusual even
with modern machine molds) or the body of
the bottle received post-molding fire polishing which usually erases the evidence of
mold seams. On this website the term "mold seam" is used to refer to the
seams on the bottle where two parts came together and the interface or joints between mold sections
that result in the bottle seams, depending on context. Fortunately, on a large majority of
full sized mold blown bottles all or a major
portion of the side mold seams are quite evident.
General
Information:
With
the exception of one-piece dip molds and turn-mold bottles (covered later), all
bottle molds potentially leave evidence of the joints where the mold pieces came
together, i.e. mold seams where were also know in the industry as "joint-marks"
(Scholes 1952). Mold seams can be virtually impossible to see
on bottles where the parts of the mold fit together very tightly (unusual even
with modern machine molds) or the body of
the bottle received post-molding fire polishing which usually erases the evidence of
mold seams. On this website the term "mold seam" is used to refer to the
seams on the bottle where two parts came together and the interface or joints between mold sections
that result in the bottle seams, depending on context. Fortunately, on a large majority of
full sized mold blown bottles all or a major
portion of the side mold seams are quite evident.
Bottles blown in loose
fitting molds can result in glass being forced or extruded into the mold seams.
This is evidenced on a bottle by distinctly thickened mold seams or mold seams
that project distinctly outward from the body of the bottle. Extreme
examples of these glass extrusions usually broke off with handling leaving a rough edge to the mold
seam. This feature is observed typically near the base on the lower sides of a
bottle or at the junction area between the shoulder and neck. Bottles with
this feature are virtually
always mouth-blown and not machine-made. The picture to the right shows this
mold seam feature at the junction of the neck and shoulder on a ca. 1870 liquor flask made
by (and embossed as such)
CUNNIGNHAMS & IHMSEN GLASSMAKERS, PITTSBURGH, PA. Click link to view a picture of the entire flask. The pictured example has
some of extrusion glass remaining with the remainder (gap between flap of glass
and shoulder) having been broken off at some time in the past - possibly when
removing the bottle from the mold. The author of this site has never seen a
machine-made bottle with this feature, though such could theoretically exist
since all molds have seam joints.
However, a person could be quite confident that a bottle fragment with this feature would
surely be from a mouth-blown bottle.
Click link to view a picture of the entire flask. The pictured example has
some of extrusion glass remaining with the remainder (gap between flap of glass
and shoulder) having been broken off at some time in the past - possibly when
removing the bottle from the mold. The author of this site has never seen a
machine-made bottle with this feature, though such could theoretically exist
since all molds have seam joints.
However, a person could be quite confident that a bottle fragment with this feature would
surely be from a mouth-blown bottle.
The portion of a bottle where it is usually the easiest to observe mold seams is on the shoulder and lower portion of the neck. On round (in cross section) bottles, the body is also usually an easy place to observe the seams. On non-round bottles (e.g., square, rectangular, hexagonal, etc.) the body side mold seam is often concealed by the mold formed corners where two sides meet. As a general rule (with exceptions of course as with virtually all bottle diagnostic features) mouth-blown bottles will have more distinct (thicker, higher) body mold seams than machine-made bottles, which tend to have very fine (hair thin, little protuberance) mold lines as well as other attributes covered later. The following discussion just covers mouth-blown bottles; machine-made bottles are covered later on this page.
Note: One of the best sources for information
on mold seams is in Dr. Julian Toulouse's often cited two-part article entitled
"A Primer on Mold Seams" in the November and December 1969 editions of the long
defunct magazine The Western Collector (Toulouse 1969b). Faster
loading "jpg" scans of
this milestone work are available by clicking on the following links - 2
magazine pages per scan, 20 magazine pages in total. The page numbers listed here coincide with the pages of
the original articles. (Articles reproduced courtesy of Dr. Cecil Munsey.)
Part I -
pages 526-527,
pages 528-529,
pages 530-531,
pages 532-533,
pages 534-535.
Part II -
pages 578-579,
pages 580-581,
pages 582-583,
pages 584-585,
pages 586-587.
A better quality version of the entire article, which is more suitable for printing, is available by clicking on the following link: " Primer on Mold Seams" - Parts I & II This file (pdf) is viewable in Adobe Acrobat Reader.
|
Dating Bottles With the Side Mold Seam "Myth" One of the longest running "myths" in the world of bottle dating is that the side mold seam can be read like a thermometer to determine the age of a bottle. The concept is that the higher the side mold seam on the bottle the later it was made - at least in the era from the early to mid 19th century until the first few decades of the 20th century. This dating tool was apparently devised by Grace Kendrick in her 1963 book "The Antique Bottle Collector." This book was pioneering and reprinted many times into the 1970s and is probably the most common and widely quoted (by collectors and archaeologists alike) bottle book ever written, containing a wealth of generally good information. This concept was articulated by Kendrick in a chapter entitled the "The Applied Lip" which contains an "Age Gauge: Mold Seams of Bottles" chart (Figure 9). Kendrick explains in the text (pages 45-47) that...
The chart accompanying this statement notes that bottles made before 1860 have a side mold seam ending on the shoulder or low on the neck, between 1860 and 1880 the seam ends just below the finish, between 1880 and 1900 the seam ends within the finish just below the top lip surface, and those made after 1900 have mold seams ending right at the top surface of the finish, i.e. lip (Kendrick 1963). Although there are examples of bottles having mold seams that fit these date ranges properly, the issue of dating bottles is vastly more complicated than the simple reading of side mold seams. If it were that simple much of this website would be unnecessary! For example, the process that produces a tooled finish frequently erases traces of the side mold seam an inch or more below the base of the finish whereas the typical applied finish has the seam ending higher - right at the base of the finish. The reason this is noted here is that the concept keeps popping up in the literature of bottle dating and identification ranging from Sellari's books (Sellari 1970:5) published shortly after Kendrick's book to as recent as Fike (1998:4) and Heetderk's (2002:15). It is also frequently noted by sellers on eBay® when describing their offerings. For a broader discussion of this subject see Lockhart, et al. (2005e) - Debunking the Myth of the Side Seam Thermometer The issue of mold seams and dating is explored in various portions of this website, but in particular on the Bottle Body Characteristics & Mold Seams and Bottle Bases pages, with additional information found in various other locations. |
Mouth-blown bottle body mold seams
|
|
Two-piece mold body seams: Two-piece molded bottles have 2 opposite body mold seams running from the heel of the bottle to a termination point somewhere on the upper neck or finish. Two-piece molds are by far the most common orientation of molds, though these molds typically were made of at least three separate pieces when one includes the base plate. Plates for embossing were also commonly incorporated into two-piece molds giving at least four sections to the mold. However, the pervasive use of the term "two-piece" mold for all bottles with two mold seams on opposite sides of the bottle is not going to change even though it is semantically incorrect (Toulouse 1969b). Due to the universal use, we continue that convention on this website.
The body or side mold seams formed by a hinge/key mold, post-bottom mold, or cup-bottom mold are indistinguishable from each other without looking at the base of the bottle. The figured flask base pictured to the right is a true two-piece hinge mold as there was no separate base plate - each half of the base was included with that half of the body mold. As there are no unique diagnostic features associated with the fact that a bottle body has two opposing mold seams, the user is directed to review the discussion of the varying related base mold markings on the Bottle Bases page. Specifically, click keyed & hinged mold to view the discussion of the different true two-piece molds; click post-bottom mold to view the discussion of that type of "two-piece" mold; and click cup mold to view the discussion of that type of "two-piece" mold. For a discussion about where the mold seam ends on the neck/finish of a bottle and what it means, view the applied and tooled finish portion of the Bottle Finishes & Closures page.
 Three-piece
mold body seams:
In conjunction with the true two-piece mold, one of the earliest mold types to
be used in the U.S. was the "three-piece mold" which was likely first used in
about 1814, patented by the Henry Ricketts
(Bristol, England) in 1821 or 1822, and likely adapted into the U.S. by the 1830s
(McKearin & Wilson 1978; Hume 1991).
Although earlier versions of a three-piece mold may pre-date the Rickett's mold
it is not certain. If so, they would have been essentially a dip mold with
two shoulder mold sections added. Rickett's patent added several other
features, including hinged shoulder parts and foot controls for opening and
closing the mold, both of which were significant improvements in efficiency
(Jones 1986). The
Rickett's mold also consisted of at least four parts - two opposing
shoulder parts, dip mold body portion, and a moveable base plate which could
be changed to achieve different base configurations or for different embossing.
This was likely the
first
plate mold
(McKearin & Wilson 1978, Jones 1983). Most true Rickett's produced bottles
are embossed on the base with H. RICKETT'S & CO. GLASS WORKS BRISTOL, date between 1821 and the 1850s, and usually have a
sand
pontil scar.
Three-piece
mold body seams:
In conjunction with the true two-piece mold, one of the earliest mold types to
be used in the U.S. was the "three-piece mold" which was likely first used in
about 1814, patented by the Henry Ricketts
(Bristol, England) in 1821 or 1822, and likely adapted into the U.S. by the 1830s
(McKearin & Wilson 1978; Hume 1991).
Although earlier versions of a three-piece mold may pre-date the Rickett's mold
it is not certain. If so, they would have been essentially a dip mold with
two shoulder mold sections added. Rickett's patent added several other
features, including hinged shoulder parts and foot controls for opening and
closing the mold, both of which were significant improvements in efficiency
(Jones 1986). The
Rickett's mold also consisted of at least four parts - two opposing
shoulder parts, dip mold body portion, and a moveable base plate which could
be changed to achieve different base configurations or for different embossing.
This was likely the
first
plate mold
(McKearin & Wilson 1978, Jones 1983). Most true Rickett's produced bottles
are embossed on the base with H. RICKETT'S & CO. GLASS WORKS BRISTOL, date between 1821 and the 1850s, and usually have a
sand
pontil scar.
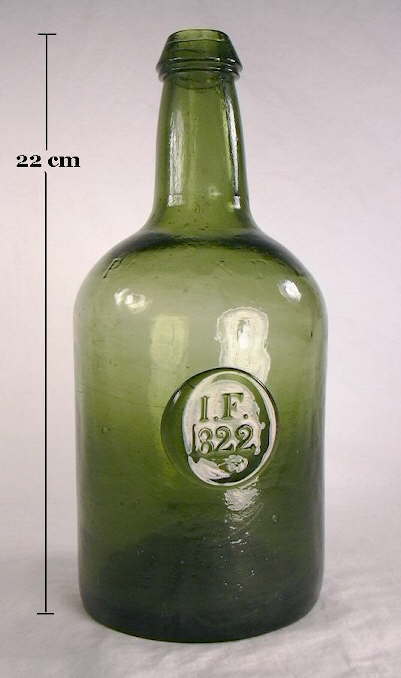 Morphologically,
typical three-piece mold bottles have a horizontal mold seam encircling the
bottle where the shoulder and body meet and two mold seams on opposite sides
running vertically from the shoulder seam, up the shoulder, and variably up the
neck and/or finish. Click on the picture of a light amethyst liquor bottle
below to view a close-up of the very distinct mold seams on the shoulder and
neck of this later mouth-blown, three-piece mold liquor bottle dating from the
early 20th century (1900-1910). Consider the location of the mold seams in
the picture with the conformation of the three-piece mold in the illustration
above. Three-piece mold liquor bottles were a popular style and
manufacturing method into the early 20th century and are shown in catalogs
dating until at least 1908 (Illinois Glass Co. 1908).
Morphologically,
typical three-piece mold bottles have a horizontal mold seam encircling the
bottle where the shoulder and body meet and two mold seams on opposite sides
running vertically from the shoulder seam, up the shoulder, and variably up the
neck and/or finish. Click on the picture of a light amethyst liquor bottle
below to view a close-up of the very distinct mold seams on the shoulder and
neck of this later mouth-blown, three-piece mold liquor bottle dating from the
early 20th century (1900-1910). Consider the location of the mold seams in
the picture with the conformation of the three-piece mold in the illustration
above. Three-piece mold liquor bottles were a popular style and
manufacturing method into the early 20th century and are shown in catalogs
dating until at least 1908 (Illinois Glass Co. 1908).
 The vertical body side seams on earlier (1821 to about 1840) three-piece mold
bottles disappear right at the junction of the shoulder and neck (Jones 1986).
This is typical of the early Ricketts' bottles which were not molded above this
point; the neck instead being formed by glassblower manipulation. The
olive green bottle pictured to the right is an early sand pontiled
Ricketts' liquor bottle which is blob sealed and dated (1822). This bottle
is also embossed H. RICKETT'S & CO. GLASS WORKS BRISTOL on the base and PATENT on the shoulder. The
horizontal shoulder seam is faint but in evidence as well as the vertical
shoulder seams, which both terminate right at the neck-shoulder junction
indicating that the neck and finish were both hand formed. It should be
noted that similar (though usually a bit taller and smaller in diameter)
three-piece molded cylindrical bottles with PATENT embossed on the shoulder were
widely made and used for spirits in the U. S. from the 1830s to 1870s.
Click
Tall, moderately slender bodied, straight neck "Patent" style spirits cylinder
(mid-19th century) for more information on these bottles.
The vertical body side seams on earlier (1821 to about 1840) three-piece mold
bottles disappear right at the junction of the shoulder and neck (Jones 1986).
This is typical of the early Ricketts' bottles which were not molded above this
point; the neck instead being formed by glassblower manipulation. The
olive green bottle pictured to the right is an early sand pontiled
Ricketts' liquor bottle which is blob sealed and dated (1822). This bottle
is also embossed H. RICKETT'S & CO. GLASS WORKS BRISTOL on the base and PATENT on the shoulder. The
horizontal shoulder seam is faint but in evidence as well as the vertical
shoulder seams, which both terminate right at the neck-shoulder junction
indicating that the neck and finish were both hand formed. It should be
noted that similar (though usually a bit taller and smaller in diameter)
three-piece molded cylindrical bottles with PATENT embossed on the shoulder were
widely made and used for spirits in the U. S. from the 1830s to 1870s.
Click
Tall, moderately slender bodied, straight neck "Patent" style spirits cylinder
(mid-19th century) for more information on these bottles.
Later vertical side mold seams end immediately below the base of the applied finish (about 1840 through the 1880s). The latest three-piece mold bottles (1890s into the 1910s) have tooled finishes with the vertical side mold seams ending on the upper portion of the neck or in the finish itself, i.e. end just beyond where the lipping tool ended. The liquor bottle pictured to the left has the side mold seams ending within the finish if one looks closely. Three-piece mold bottles are not embossed on the body of the bottle, though as noted above may have embossing on the shoulder (common), neck (unusual), and/or base (also common).
Most bottles which are commonly referred to as three-piece molds were actually made in a mold that had a fourth base plate piece, like noted above for the Rickett's bottles. Use of a separate base piece probably made construction of the mold easier. Although most three-piece mold bottles actually had four mold parts, referring to them as "three-piece" molds will continue due to its ubiquitous use over the years, similar to the two-piece mold discussed earlier. To suggest changing the name would be confusing and unproductive since most people understand what is being referred to (Toulouse 1969b). The four-piece mold is a variation of the three-piece mold with two body halves instead of one; this mold type is discussed in the box below.
An unusual, though minor, variation of the standard three-piece mold conformation is as discussed and pictured at the following link: http://www.bottlemysteries.com/2008/08/bottle-mystery-key-lock-on-a-shoulder-seam-bottle-mark/ This three-piece mold style included small locking flange points where the two upper halves connected or "locked" with the lower "dip" portion of the mold. This is evidenced by the squared off mold seam discontinuity that disrupts the horizontal shoulder seam on each side of these bottles - one in the middle of each of the two upper mold parts - with a corresponding "lock" portion on the immediately opposing upper surface of the lower mold part. These type bottles are rarely encountered and seem to date only from the pre-Civil War period, i.e., 1830-1860. See the image and discussion at the above link for more information.
 Three part mold with three body-mold
leaves: This mold type is a distinct variation of the above described three-piece mold
with a very different orientation to the mold portions. Instead of the
single body mold and split (two-part) shoulder/neck molds like described for the typical
three-piece mold bottle, this three-piece mold is composed of three more or less
equal sized pieces that fit together along vertical seams, i.e. three equal mold
"leaves' that produce a bottle that has three vertical mold seams from heel to
upper neck or finish. One of the mold pieces was typically attached
permanently to the base plate, with the other two hinged so that they could open
to insert a gather and to extract the blown item. The base can be either
of a "post-bottom" or "cup-bottom" design (McKearin & McKearin 1941; Toulouse 1969b).
This type mold is referred to as a three-piece "leaf" mold on this website.
Three part mold with three body-mold
leaves: This mold type is a distinct variation of the above described three-piece mold
with a very different orientation to the mold portions. Instead of the
single body mold and split (two-part) shoulder/neck molds like described for the typical
three-piece mold bottle, this three-piece mold is composed of three more or less
equal sized pieces that fit together along vertical seams, i.e. three equal mold
"leaves' that produce a bottle that has three vertical mold seams from heel to
upper neck or finish. One of the mold pieces was typically attached
permanently to the base plate, with the other two hinged so that they could open
to insert a gather and to extract the blown item. The base can be either
of a "post-bottom" or "cup-bottom" design (McKearin & McKearin 1941; Toulouse 1969b).
This type mold is referred to as a three-piece "leaf" mold on this website.
 This
early method of molding was used primarily to produce what is termed "blown three mold glass"
and other highly decorative type bottles. A benefit of this mold
conformation was the ability to engrave much more elaborate designs than could
be produced with conventional two-piece molds; designs that covered the entire
bottle right up to the mold seams (McKearin & McKearin 1941; Toulouse
1969b). A typical example of an item produced in a three-piece "leaf" mold is the
late 19th century salt shaker pictured above right. This is 1896 pattern
was called the "Imperial" (also known by collectors as the "Jeweled Moon & Star"
pattern) by the producer - the Co-operative Flint Glass Co. of Beaver
Falls, PA. (Dori Miles, pattern glass expert pers. comm. 2008 -
www.eapgpatterns.com). (Note:
Although the glassmaker name included Flint Glass Co. this item is not
true flint glass, but instead colorless glass made that way with the addition of
manganese dioxide in the batch. See the colorless glass discussion on the
Bottle/Glass Colors page for more information.) The pictured item has three vertical mold seams from the heel to the roughly
cracked-off lip surface, and a cup mold base. One vertical seam can be
seen in the middle of the bottle; the other two vertical seams are not visible
but in the vicinity of where the lines point to in the picture. As this
picture shows, the mold engraved pattern is quite elaborate and integrates well
around the mold seams. (Note: Some highly decorative
"specialty" bottles (e.g., salt shakers, perfume, cruets)
were occasionally made with four mold "leaves" resulting in four sides
seams; more parts are conceptual possible but have not be noted by the author of
this website.)
This
early method of molding was used primarily to produce what is termed "blown three mold glass"
and other highly decorative type bottles. A benefit of this mold
conformation was the ability to engrave much more elaborate designs than could
be produced with conventional two-piece molds; designs that covered the entire
bottle right up to the mold seams (McKearin & McKearin 1941; Toulouse
1969b). A typical example of an item produced in a three-piece "leaf" mold is the
late 19th century salt shaker pictured above right. This is 1896 pattern
was called the "Imperial" (also known by collectors as the "Jeweled Moon & Star"
pattern) by the producer - the Co-operative Flint Glass Co. of Beaver
Falls, PA. (Dori Miles, pattern glass expert pers. comm. 2008 -
www.eapgpatterns.com). (Note:
Although the glassmaker name included Flint Glass Co. this item is not
true flint glass, but instead colorless glass made that way with the addition of
manganese dioxide in the batch. See the colorless glass discussion on the
Bottle/Glass Colors page for more information.) The pictured item has three vertical mold seams from the heel to the roughly
cracked-off lip surface, and a cup mold base. One vertical seam can be
seen in the middle of the bottle; the other two vertical seams are not visible
but in the vicinity of where the lines point to in the picture. As this
picture shows, the mold engraved pattern is quite elaborate and integrates well
around the mold seams. (Note: Some highly decorative
"specialty" bottles (e.g., salt shakers, perfume, cruets)
were occasionally made with four mold "leaves" resulting in four sides
seams; more parts are conceptual possible but have not be noted by the author of
this website.)
The heavily embossed bottle pictured to the above left is a much earlier three-piece 'leaf' molded bottle or decanter. This early American bottle was produced by the Keene Marlboro Street Factory, Keene, NH. in the 1820s or 1830s and is classified as GIII-16 by McKearin & McKearin (1941). The three vertical mold seams on this bottle are well disguised by the elaborate body pattern and are only obvious where a horizontal or diagonal line intersects the mold seam. The side mold seams end just below the constricted area just below the flared finish.
Dating notes: Since typical three-piece mold bottles were made for close to a century (1821 through the 1910s) other diagnostic features unrelated to the body seams must usually be used. One exception, as noted above, is that the earliest three-piece mold bottles (1821 to about 1840) will have the vertical side mold seams ending at the base of the neck since the neck was not molded (Jones 1986). The vast majority of these earlier three-piece mold bottles are olive green, olive amber, black glass, or similar colors. Three-part "leaf" molded bottles can date from as early as the 1820s into the early portions of the 20th century, ending as mouth-blown manufacture disappeared. Specific bottle dating would have to use a variety of other diagnostic features to narrow the manufacturing date range.
For additional information, see the discussion of three-piece molds on the Bottle Bases page. Also, click on pages 578-579, pages 580-581 to view the section of Toulouse's 1969 article 'A Primer on Mold Seams' that deals with both types of three-piece mold formed bottles.
 Notes on
four-piece molds:
The term four-piece mold refers to a mold that has four main body parts - two
for the shoulder and neck (and sometimes extreme upper body) and two for the majority (or all) of the
body. Four-piece molded bottles are very similar to the three-piece molded
bottles in
that there is a horizontal seam on or just below the shoulder with the side
mold seams running vertically up the shoulder and neck from this horizontal
seam. However, four-piece mold bottles also have vertical body side
mold seams which run down from the shoulder seam to at least the heel of
the bottle. The picture to the left shows these shoulder/body seams.
Click
star base liquor bottle to see a picture of this entire bottle which
dates from the late 1870s to mid 1880s (applied finish, no air venting). Notes on
four-piece molds:
The term four-piece mold refers to a mold that has four main body parts - two
for the shoulder and neck (and sometimes extreme upper body) and two for the majority (or all) of the
body. Four-piece molded bottles are very similar to the three-piece molded
bottles in
that there is a horizontal seam on or just below the shoulder with the side
mold seams running vertically up the shoulder and neck from this horizontal
seam. However, four-piece mold bottles also have vertical body side
mold seams which run down from the shoulder seam to at least the heel of
the bottle. The picture to the left shows these shoulder/body seams.
Click
star base liquor bottle to see a picture of this entire bottle which
dates from the late 1870s to mid 1880s (applied finish, no air venting).Virtually all four-piece molds also had a fifth base plate portion which could have the conformation of either a "post-bottom" or a "cup-bottom" design. Review the descriptions for the post0-base mold and cup-bottom mold bases on the Bottle Bases page for more information. If one is dealing with just a fragment of the lower body and base of a four-piece mold bottle (utilizing either base plate type) it would be impossible to tell the difference between a four-piece and a two-piece molded bottle; one needs the shoulder intact to differentiate. The utility of four mold sections was to allow for the changing of various mold portions ) to either add embossing to the body of the bottle or to change the capacity of the bottle without the need for creating an entirely new mold. This type mold is called a "sectional plate mold" for that reason. Four-piece molds like this are fairly common with liquor cylinders, beer bottles, and Hutchinson and crown finish sodas made between the early 1880s and mid 1910s (Elliot & Gould 1988). A four-piece mold Hutchinson soda bottle from the early 1900s is pictured further down this page at the beginning of the "Embossing" section. |
Return to the top of this page.
 The
turn-mold is more of a process than a mold and could be produced in about
any full height cylindrical bottle producing mold. All turn-mold bottles (also called a "paste mold") are
round in cross section since no other shape could be turned or twisted in the
mold to produce the seamless body distinctive of these bottles. The inside
surface of a turn-mold (usually iron) was coated with a "paste" of organic fiber
composed of resins and linseed oil boiled down to a gummy consistency.
This was brushed onto the hot mold, then dusted with fine sawdust (sometimes
even flour!) which upon subsequent baking formed a carbon lining on the inside.
These molds were also wetted between each blowing to extend the life of the
coating. Upon
contact with the very hot glass (on the end of the blowpipe) some of the water
turned to steam. The steam formed a cushion that the bottle "rode" on
while the parison was expanded and rotated by the glassblower (Scholes 1952). The
following is from Skrabec (2007) and a brief
description of the materials and process:
The
turn-mold is more of a process than a mold and could be produced in about
any full height cylindrical bottle producing mold. All turn-mold bottles (also called a "paste mold") are
round in cross section since no other shape could be turned or twisted in the
mold to produce the seamless body distinctive of these bottles. The inside
surface of a turn-mold (usually iron) was coated with a "paste" of organic fiber
composed of resins and linseed oil boiled down to a gummy consistency.
This was brushed onto the hot mold, then dusted with fine sawdust (sometimes
even flour!) which upon subsequent baking formed a carbon lining on the inside.
These molds were also wetted between each blowing to extend the life of the
coating. Upon
contact with the very hot glass (on the end of the blowpipe) some of the water
turned to steam. The steam formed a cushion that the bottle "rode" on
while the parison was expanded and rotated by the glassblower (Scholes 1952). The
following is from Skrabec (2007) and a brief
description of the materials and process:
Paste molding used thin cast-iron molds with a carbonaceous paste baked into the surface. The paste could be a simple mix of wax resin and sawdust. The mold was then saturated with water prior to blowing the glass. The blower then gathered molten glass to be blown. Once the gather was put in the mold, it was closed by the mold boy. The blower blew into the mold as he twirled the blowpipe. The wet surface contacting the hot glass formed a vapor layer (steam cushion), allowing the piece to be twirled and eliminating the mold line at the part. (Skrabec 2007)
The combination of the steam cushion and bottle rotation produced the distinctively smooth and polished glass surface of a turn-mold produced bottle; a characteristic not seen on other types of bottles with the exception of fire polished and/or free-blown items (Atwater 1893; Toulouse 1969b; Munsey 1970). Turn-mold bottles will, however, be very symmetrical and even proportioned throughout whereas free-blown bottles are not typically symmetrical (Jones & Sullivan 1989).
Very frequently the granular texture of the paste on the surface of the mold, the presence of foreign particles (sand or grit), and/or imperfections on the mold surface - in conjunction with the bottle rotation - caused the formation of concentric horizontal rings on the body of the bottle. It is known that some turn-molds were made of apple or cherry wood at the Whitney Glass Works (Glassboro, NJ) as late as the early 20th century (Atwater 1893; Lohmann 1972). Wooden molds would also be more likely to have uneven inside surfaces due to the effects of the extreme heat of blowing bottles and had a limited lifespan resulting in iron molds being the standard for most all bottle production (Scholes 1952). The picture to the above left is of a turn-of-the-century (19th to 20th that is) "hock" wine bottle that shows these rings, which are usually - but not always - apparent on turn-mold bottles. Because of the rotation of the bottle in the mold and the wetted paste coating, whittle marks (discussed earlier) are rarely if ever seen on turn-mold bottles (Toulouse 1969b; Munsey 1970). The brilliant blue bottle below right is a turn-mold beer bottle with an applied mineral finish dating from approximately 1885-1895. Click on the picture to enlarge it as it exhibits the faint concentric rings on the body/neck and high gloss surface consistent with its turn-mold heritage.
 Because of the rotation of the bottle in
the mold (not the opposite as the name "turn-mold" would suggest) embossing on the body of
the bottle was impossible; paper labeling or the occasional
blob seal (covered later on this page) was the only way to notify the
product purchaser of what product the bottle contained (Toulouse 1969a). A
very large majority of
turn-mold bottles also have no embossing on the base, though some base embossed
examples are occasionally
observed. This would have entailed a
secondary molding base plate that replaced the original mold base
plate after the bottle was rotated in the mold but before it cooled/solidified
or a revolving base plate that spun with the bottle, most likely
immediately after detachment of the blowpipe (Toulouse 1971; Lockhart pers.
comm. 2004). In fact, William F. Modes (of Modes Glass Co.,
De Steiger Glass Co. and Streator Bottle
& Glass Co. fame) patented a "Mold for Blowing Turned Bottles" in 1887
which included such a revolving base plate feature. The following is quoted from that 1887
patent:
Because of the rotation of the bottle in
the mold (not the opposite as the name "turn-mold" would suggest) embossing on the body of
the bottle was impossible; paper labeling or the occasional
blob seal (covered later on this page) was the only way to notify the
product purchaser of what product the bottle contained (Toulouse 1969a). A
very large majority of
turn-mold bottles also have no embossing on the base, though some base embossed
examples are occasionally
observed. This would have entailed a
secondary molding base plate that replaced the original mold base
plate after the bottle was rotated in the mold but before it cooled/solidified
or a revolving base plate that spun with the bottle, most likely
immediately after detachment of the blowpipe (Toulouse 1971; Lockhart pers.
comm. 2004). In fact, William F. Modes (of Modes Glass Co.,
De Steiger Glass Co. and Streator Bottle
& Glass Co. fame) patented a "Mold for Blowing Turned Bottles" in 1887
which included such a revolving base plate feature. The following is quoted from that 1887
patent:
"The nature of the present invention consists, first, in a rotary bottom which has formed in relief on its top portion the characters or marks which are to be imprinted in the bottom of the bottle which is to be turned in the mold to give it an exterior finish. It is old to turn bottles in molds for polishing purposes, and it is old to imprint characters on the bottom of bottles which are not turned in the mold; but I claim to be the first one to employ a rotary bottom in the mold." (U. S. Patent Office 1887)
To view the entire patent click on the following link: Patent #364,840 - "Mold for Blowing Turned Bottles" - June 14, 1887. Toulouse (1971) noted in his write-up for Streator that "...by 1885, with 60 blowers (many of them German "twister blowers")..."; twister blowers being glassblowers producing turn-mold bottles. In any event, base embossed turn-mold bottles are very uncommon the most abundant observed by this author are German made turn-mold beer bottles base embossed variably with H. HEYE and BREMEN and/or HAMBURG . Click on the following links to see images of an H. HEYE base embossed beer/ale bottle that dates from the late 19th century most likely: full view of the bottle (9.5" tall); close-up of the neck and crudely applied mineral type finish that is typically seen on beer bottles of a late 19th century manufacture; base view showing the embossing BREMEN / H. HEYE / HAMBURG with typical rotation marks on the body of the bottle in evidence. These German produced bottles are quite commonly encountered in the American West (empirical observations) and probably throughout North America. In addition, some Japanese turn-mold beer bottles have been observed with base embossing. This is described on the Miscellaneous & Foreign Bottle page in the Chinese/Asian Bottles section.robably throughout North America (empirical observations).
 It
is possible that many or most of the turn-mold bottles sold by American glass makers
were imported and not actually produced in the U.S. May Jones, in the first
volume of her nine
volume bottle history booklets called collectively the The Bottle Trail, quotes a
Owens-Illinois Company provided history that notes that their predecessor (Illinois
Glass Company) imported the turn-mold bottles they sold and that "...in the
United States, turn mold bottles were not generally produced" (Illinois
Glass Company 1903, 1908, 1911; Jones 1961). As noted earlier, however, it is known
that the Whitney Glass Works (Glassboro, NJ) - a large producer of
bottles - did manufacture turn-mold bottles with wooden molds as late as the
early 20th century (Lohmann 1972). The Fairmount Glass Works
(Indianapolis, IN.) listed "turn mold round brandy" bottles in their 1910
catalog, though the actual source is unknown. In addition,
De Steiger Glass Co. also produced turn-mold bottles, likely some with
base embossing as William Modes was a major factor in this company. Toulouse (1969b)
notes that patents were granted in the U.S. in the 1870s and 1880s for
"seamless bottles." And finally, an
1892 letterhead for the Streator Bottle & Glass Company (Streator,
IL.) noted that they were "Manufacturers of Turned-Mould Bottles and Lettered
Ware in Amber and Light Green Colors" indicating probable U. S.
manufacture during the era of high popularity for these type bottles. So it appears certain that turn-mold bottles were produced
in the U.S. Although likely that a large percentage of turn-mold bottles
were not made in the U.S., they are ubiquitous on U.S. historic sites that date
from the 1880s through about World War I. It should be be noted that some turn-mold bottles have been
possibly identified
as early as the 1850s and 1860s (Switzer 1974; Beaudet 1981;
Boow 1991; Gerth 2006) although some of these may have been free-blown and/or
dip molded bottles which are often mistaken for turn-molds due to an absence
mold seams.
It
is possible that many or most of the turn-mold bottles sold by American glass makers
were imported and not actually produced in the U.S. May Jones, in the first
volume of her nine
volume bottle history booklets called collectively the The Bottle Trail, quotes a
Owens-Illinois Company provided history that notes that their predecessor (Illinois
Glass Company) imported the turn-mold bottles they sold and that "...in the
United States, turn mold bottles were not generally produced" (Illinois
Glass Company 1903, 1908, 1911; Jones 1961). As noted earlier, however, it is known
that the Whitney Glass Works (Glassboro, NJ) - a large producer of
bottles - did manufacture turn-mold bottles with wooden molds as late as the
early 20th century (Lohmann 1972). The Fairmount Glass Works
(Indianapolis, IN.) listed "turn mold round brandy" bottles in their 1910
catalog, though the actual source is unknown. In addition,
De Steiger Glass Co. also produced turn-mold bottles, likely some with
base embossing as William Modes was a major factor in this company. Toulouse (1969b)
notes that patents were granted in the U.S. in the 1870s and 1880s for
"seamless bottles." And finally, an
1892 letterhead for the Streator Bottle & Glass Company (Streator,
IL.) noted that they were "Manufacturers of Turned-Mould Bottles and Lettered
Ware in Amber and Light Green Colors" indicating probable U. S.
manufacture during the era of high popularity for these type bottles. So it appears certain that turn-mold bottles were produced
in the U.S. Although likely that a large percentage of turn-mold bottles
were not made in the U.S., they are ubiquitous on U.S. historic sites that date
from the 1880s through about World War I. It should be be noted that some turn-mold bottles have been
possibly identified
as early as the 1850s and 1860s (Switzer 1974; Beaudet 1981;
Boow 1991; Gerth 2006) although some of these may have been free-blown and/or
dip molded bottles which are often mistaken for turn-molds due to an absence
mold seams.
The bottle pictured to left is a labeled Vin Zymo Elixir Wine Tonic (San Francisco, CA.) that is a tall, olive green, turn-mold cylinder with a style shape typically used for red wine (e.g., Burgundy). The label on this bottle implies a dating to the early to mid-1910s based on the contents or capacity notation, which was not required (or used much) prior to the early teens and the high alcohol content (30%) with no mention of "medicinal use" which likely makes it a pre-Prohibition (pre-1920) product (Lockhart pers. communication 2003). This bottle could date from the same era as the label since turn-mold bottles were still being produced/sold at least as late as the early 1910s (Illinois Glass Company 1911; Toulouse 1969b). However, the bottle could possibly pre-date the label and have been reused or recycled for this product since the method of manufacture (turn-mold, tooled finish) was being used at least as early as the 1880s. It is likely the bottle was made at the time the label was made (mid-1910s) though there is no sure way to tell for certain at this point.
Dating notes: The very large majority of turn-mold bottles date between about 1880 and 1915, though they were being produced and imported into North America to a minor degree possibly as early as the 1850s and surely by the mid-1860s up until the early 1920s (Toulouse 1969b; Switzer 1974; Beaudet 1981; Deiss 1981; Jones & Sullivan 1989; Boow 1991; Gerth 2006; empirical observations). American-made turn-mold bottles with embossing on the base likely date after the noted 1887 patent. Turn-mold produced bottles were made for containing liquor, beer, mineral water, with barber bottles, and some bulk druggist bottles (i.e., "shop furniture" bottles) although the process was most commonly used for the production of wine and champagne bottles (Berge 1980; empirical observations). All turn-mold bottles are mouth-blown.
Be aware that dip mold produced bottles will often be mistaken for turn-molded bottles and vice versa. For example, all of the champagne bottles on the S. S. Bertrand, which sank in the Missouri River in April 1865, were noted by Switzer (1974) to be turn-molded. However, inspection of a large assortment of these bottles by this website's author in October 2015 found that they may have been mostly (or entirely...the entire assemblages could not inspected) dip molded. The key to differentiation is that a turn-mold bottle will almost always have numerous, perfectly horizontal though faint striations on the glass surface in many places on the body, shoulder and neck. In addition, dip molded bottles are very likely to exhibit some type of pontil scar whereas turn-molded bottles would be very rarely pontil scarred (even then usually on just two types of specialty bottles - druggist's "shop furniture" and fancy "barber bottles.") A dip molded bottle will usually have a horizontal line or glass discontinuity at the should interface or break between the upper body and lower shoulder, but will not have multiple, perfectly horizontal lines anywhere else on the bottle body, shoulder, or neck (empirical observations).
|
Mold engraving errors: Given that the engraving of lettering had to be as a mirror image to what the final bottle should read, mold engravers were amazingly accurate in their work rarely making errors in the orientation of the letters. Mistakes did occur on occasion with the most commonly observed engraving errors being the letters "N" and "S" reversed (empirical observations).
(Elam) Tilden & Co. was located in New Lebanon, NY. and in business from 1824 to 1963 producing a wide array of extracts, tinctures, syrups, sarsaparilla, and other medicinal products (Shimko 1969; Fike 1987). This particular "wide mouth prescription" style bottle (Whitall Tatum & Co. 1880) likely dates from the 1870s to early 1880s as it has a somewhat crudely tooled one-part finish and was blown in a cup base mold though lacks any evidence of mold air venting. It could have contained many of the Tilden's different liquid, powdered, or granular medicinal products. |
 Embossing
on a bottle consists of raised lettering, numbers, and/or designs which were intended
to inform the purchaser in some way, attract the eye, or to establish
ownership of the bottle in an era when re-use by others was common. Embossing
on a bottle was formed by the
engraving or cutting of the lettering or designs (reversed) into the inside
working surface of the mold by a die maker using various hand tools (e.g., hammer, chisels,
files and gravers) or in later years power tools (e.g., milling cutter, grinder)
(Kendrick 1968; Kaiser 2009). Purchasers of bottles had the glassmaker
add requested embossing to the mold or mold plate (next subject) in
order to individualize or personalize the final bottle. Glassmakers also
produced specific types of bottles for general sale from stock (not specific customer
orders) that incorporated embossed
lettering/numbers (e.g., capacity), designs, and/or
makers marks (Illinois Glass Company 1903, 1908, 1911, 1920).
Embossing
on a bottle consists of raised lettering, numbers, and/or designs which were intended
to inform the purchaser in some way, attract the eye, or to establish
ownership of the bottle in an era when re-use by others was common. Embossing
on a bottle was formed by the
engraving or cutting of the lettering or designs (reversed) into the inside
working surface of the mold by a die maker using various hand tools (e.g., hammer, chisels,
files and gravers) or in later years power tools (e.g., milling cutter, grinder)
(Kendrick 1968; Kaiser 2009). Purchasers of bottles had the glassmaker
add requested embossing to the mold or mold plate (next subject) in
order to individualize or personalize the final bottle. Glassmakers also
produced specific types of bottles for general sale from stock (not specific customer
orders) that incorporated embossed
lettering/numbers (e.g., capacity), designs, and/or
makers marks (Illinois Glass Company 1903, 1908, 1911, 1920).
The following is from Phil Perry, Senior Engineer with the Owens-Illinois Glass Company (Phil Perry pers. comm. 2006): The embossing on (bottles) are really just letters/symbols that are engraved into the metal. This is somewhat of an art as too deep a cut would create sharp edges and the glass would have trouble releasing. This would result in stress in the glass around that letter and possible delayed breakage on the customers filling line or later in their warehouse. If the cuts were too shallow, the lettering will not be easily visible as the hot glass will tend to blend it out.
The use of product or other proprietary mold induced embossing on bottle bodies goes back at least to the earliest portions of the period covered by this website and likely beginning in England about 1750 with the small Turlington Balsam of Life bottles (Richardson 2003). The first recorded use of mold induced proprietary embossing on an American made bottle body was around 1809 on a Dr. Robertson's Family Medicine bottle (McKearin 1970). From that point onwards, the use of embossing on bottles accelerated as the demand for bottled products increased with the increasing population of the country. In glass makers catalogs, embossed bottles were referred to as "lettered ware" (Obear-Nester Co. 1922). Even though some American-made bottles were embossed as early as 1809, if the experience in Illinois is a reasonable guide (and the author believes so), the use of product and/or proprietary lettered embossing on most utilitarian bottles (figured flasks excluded) was extremely uncommon until the late 1830s (Farnsworth & Walthall 2011). Even then - and for most of the remainder of the 19th century - most bottles and bottle types were labeled as to the product and/or purveyor (i.e., user of the bottle) information though embossing on bottles increased dramatically throughout that period, and particularly after the Civil War.
The four-piece molded, Hutchinson style soda to the above left was engraved particularly boldly, apparently at the request of the purchaser. The utility of a four-piece mold was that a larger amount of embossing could be engraved on the front of the bottle (as versus a regular plate mold) but still be cheaper than having an individual mold made just for this purchasers bottle order. This particular bottle (embossed with THE / DALLES / SODA / WORKS - from The Dalles, OR.) dates from 1901 to approximately 1910 (Fowler 1981). Note the uneven glass in the base of the bottle; a typical attribute of molded mouth-blown bottles.
The heavily embossed
bottle to the right is a "geometric" decanter produced in a
three-piece "leaf" mold (discussed earlier) by the Keene Marlboro
Street Factory, Keene, NH. in the 1820s and/or 1830s and classified as GIII-16 by
McKearin & McKearin (1941). Elaborate embossing like this greatly
enhanced the esthetics (and contemporary marketability) of a bottle. It also guaranteed
that the bottle would not be thrown away until broken, as these type decanters
are relatively common today. (Note: "Common" is a relative term here as no
American made bottles from the first third of the 19th century are truly "common" today.
Common here means that of the relatively small numbers of early American
bottles
surviving to the present day, these decanters are somewhat more frequently encountered
that than other types of the era. Similar geometric design bottles and
other glassware are also commonly found as fragments on early 19th century
historic sites.)
Dating/Typing notes: Since embossing was used on bottles for a very long time and is still fairly common today, there are no particular dating refinement opportunities based on the fact that a bottle has embossing or not, though there are some trends noted with utilitarian, American-made bottles:
 The
embossing on mouth-blown bottles produced in molds without air venting tends to be
more flattened and rounded with little "sharpness" to the high points of the
lettering. Mouth-blown bottles produced in molds with air venting
tend to have sharper and distinct embossing. With experience looking at a
variety of embossed mouth-blown bottles these characteristics can sometimes be differentiated.
It is of particular use if one only has a fragment of a bottle that includes
some embossing. This subject, including information on dating ranges, is
covered in more depth below in the "Air Venting" section.
One word of caution with this feature is that sometimes as molds wore out the
embossing would
become "flatter" and less distinct and was unrelated to whether the mold
was vented or not. It also appears at times that mouth-blown bottles were simply not fully blown - possibly when a glassblower had a
cold of some other illness limiting lung pressure (Elliott & Gould 1988; Thomas
2002). Specific reasons for faint embossing on both machine-made and
mouth-blown bottles include mold lubricant accumulating in the lettering, a cold
mold or cold glass (relatively speaking) not "stretching" into the lettering
properly, thin glass not fully filling the engraving, the wear of cleaning and
polishing the inside of the mold, and the natural abrasiveness of glass wearing
on the mold surface...or a combination of several of these reasons (Russ Hoenig
- Owens-Illinois Glass Co. engineer - pers. comm. 2008).
The
embossing on mouth-blown bottles produced in molds without air venting tends to be
more flattened and rounded with little "sharpness" to the high points of the
lettering. Mouth-blown bottles produced in molds with air venting
tend to have sharper and distinct embossing. With experience looking at a
variety of embossed mouth-blown bottles these characteristics can sometimes be differentiated.
It is of particular use if one only has a fragment of a bottle that includes
some embossing. This subject, including information on dating ranges, is
covered in more depth below in the "Air Venting" section.
One word of caution with this feature is that sometimes as molds wore out the
embossing would
become "flatter" and less distinct and was unrelated to whether the mold
was vented or not. It also appears at times that mouth-blown bottles were simply not fully blown - possibly when a glassblower had a
cold of some other illness limiting lung pressure (Elliott & Gould 1988; Thomas
2002). Specific reasons for faint embossing on both machine-made and
mouth-blown bottles include mold lubricant accumulating in the lettering, a cold
mold or cold glass (relatively speaking) not "stretching" into the lettering
properly, thin glass not fully filling the engraving, the wear of cleaning and
polishing the inside of the mold, and the natural abrasiveness of glass wearing
on the mold surface...or a combination of several of these reasons (Russ Hoenig
- Owens-Illinois Glass Co. engineer - pers. comm. 2008).
For the typing of a bottle (i.e. what a bottle contained) embossing is invaluable as it often tells a person exactly what the bottle held, like the soda bottle above, and where it originated (The Dalles, Oregon). Embossing can also provide the critical piece of information necessary to allow for the acquisition of more information from the historic record. For example, the embossing on the bottle pictured to the left (BLUMAUER & HEUBNER / PHARMACISTS / PORTLAND, OREGON) tells us that the bottle was made for a Portland, OR. pharmacist which implies that it likely contained some type of medicinal substance sold by druggists of the late 19th century. The embossed proprietor's names provides the opportunity to date the bottle via the Portland business directories, a check of which finds that these two individuals were in partnership in 1878 and 1879 and were not listed together prior to or after that time. (Note: the embossing on this bottle is in a "plate" and the bottle blown in a "plate mold"; the subject covered next.) The subject of typing bottles is covered in more depth on the Bottle Typing/Diagnostic Shapes page.
Return to the top of this page.

 The
term plate is used to describe an
interchangeable, typically iron or brass (picture below), engraved plate which was used in a bottle mold
to produce different embossing patterns for bottles blown in the same
mold. By
simply taking out one engraved plate and replacing it with another, differently
engraved plate, the same mold could produce many different uniquely embossed bottles of the same shape and design. Commonly called a "slug plate" by
collectors (somewhat redundant since the term "slug" is used to refer to a piece of metal), but more properly called simply a
"plate" or "lettered plate" and bottles from this type
mold referred to as having been produced in a "plate mold" (Whitall,
Tatum & Co. 1880; Munsey
1970; Jones & Sullivan 1989). Plate molds were significant in
that it made all kinds of proprietary bottles (i.e. uniquely embossed for a
specific customer) affordable since an expensive private mold did not have to be
made for each customer (Whitall, Tatum & Co. 1880a; Munsey 1970; Elliott & Gould
1988). For example, the Whitall Tatum & Co. 1880 catalog noted a
relatively nominal price of "one dollar and fifty cents to six dollars each
for engravings" versus the cost of an entire mold being $12 to $30
(Griffenhagen & Bogard 1999). On square or rectangular bottles the plates were sometimes
called a "panel" or "panels" (White 1978).
The
term plate is used to describe an
interchangeable, typically iron or brass (picture below), engraved plate which was used in a bottle mold
to produce different embossing patterns for bottles blown in the same
mold. By
simply taking out one engraved plate and replacing it with another, differently
engraved plate, the same mold could produce many different uniquely embossed bottles of the same shape and design. Commonly called a "slug plate" by
collectors (somewhat redundant since the term "slug" is used to refer to a piece of metal), but more properly called simply a
"plate" or "lettered plate" and bottles from this type
mold referred to as having been produced in a "plate mold" (Whitall,
Tatum & Co. 1880; Munsey
1970; Jones & Sullivan 1989). Plate molds were significant in
that it made all kinds of proprietary bottles (i.e. uniquely embossed for a
specific customer) affordable since an expensive private mold did not have to be
made for each customer (Whitall, Tatum & Co. 1880a; Munsey 1970; Elliott & Gould
1988). For example, the Whitall Tatum & Co. 1880 catalog noted a
relatively nominal price of "one dollar and fifty cents to six dollars each
for engravings" versus the cost of an entire mold being $12 to $30
(Griffenhagen & Bogard 1999). On square or rectangular bottles the plates were sometimes
called a "panel" or "panels" (White 1978).
Plates and plate molds seem to have originated in England with the Rickett's mold in 1821 where the base plate could be exchanged for another and the base embossing changed. In the U.S., the earliest obvious plate molded bottles appear to be soda/mineral water bottles like the one pictured to the left where the plate is located in the middle of one side. These type and shape of rectangular plate molded soda/mineral water bottles seemed to appear first in the late 1840s, were particularly popular throughout the U.S. during the 1850s and 1860s, and were gradually phased out in favor of other designs in the 1870s (McKearin & Wilson 1978; Markota 1994). Plate molds also began being used for the similar beer/porter bottles at least as early as 1850; the close-up image of a E. DUFFY & SONS plate to the above right is on a Philadelphia porter bottle that dates between 1854 and 1856 (von Mechow 2006). A couple of the earliest plate mold patents the author is aware of are viewable (pdf files) at the following links; both were issued to one James J. Christie (Baltimore, MD and Camden, NJ): Patent #72,368 - Improved Glass-Bottle Mold - December 17, 1867; Patent #132,897 - Improvement in Glass-Bottle Molds - November 12, 1872.
 The picture to the
right is of a cast iron mold plate dating from between 1915 and 1918. It
was used for producing prescription bottles for a Detroit (MI.) pharmacy which
was in listed in the Detroit business directories only during that time period
(Mark Hawkins pers. comm. 2006).
Engraving is reversed of course so that the embossing will read correctly on the
finished bottle. This plate would have fit in a mold like that which produced bottles
similar to the Blumauer & Heubner druggist bottle pictured above in
the "Embossing" section. This particular plate is likely one of a cache of
them salvaged many years ago from an old storage room at the Whitall, Tatum
& Company glassworks in Millville, NJ. The "look" of the plate
is very similar to the look of the bottles made by that company which was
probably the biggest supplier of druggist bottles in the U.S. between the 1870s and the
early 1920s (Bethman 1991). Note the air venting holes incorporated into the
embossing pattern (click to enlarge photo) which is an indication of a
post-1900 heritage. (Air venting is covered next.)
The picture to the
right is of a cast iron mold plate dating from between 1915 and 1918. It
was used for producing prescription bottles for a Detroit (MI.) pharmacy which
was in listed in the Detroit business directories only during that time period
(Mark Hawkins pers. comm. 2006).
Engraving is reversed of course so that the embossing will read correctly on the
finished bottle. This plate would have fit in a mold like that which produced bottles
similar to the Blumauer & Heubner druggist bottle pictured above in
the "Embossing" section. This particular plate is likely one of a cache of
them salvaged many years ago from an old storage room at the Whitall, Tatum
& Company glassworks in Millville, NJ. The "look" of the plate
is very similar to the look of the bottles made by that company which was
probably the biggest supplier of druggist bottles in the U.S. between the 1870s and the
early 1920s (Bethman 1991). Note the air venting holes incorporated into the
embossing pattern (click to enlarge photo) which is an indication of a
post-1900 heritage. (Air venting is covered next.)
 The
blue-green mineral water bottle pictured to the above left is
a California Gold Rush era soda/mineral water bottle (Lynde &
Putnam) from San Francisco, CA. that dates from between 1850 to 1851.
The address of the company indicates that it was in the area destroyed by one of
several "great fires" that occurred in San Francisco during the early 1850s;
specifically the one on June 22nd, 1851 (Markota 1994). As there were no
glass manufacturing facilities in the West prior to 1859, these bottles were
blown at a glassworks on the east coast and transported around the horn by
sailing ship to San Francisco. This is proven by the fact that the back of
this bottle is embossed (not in a plate) with UNION GLASS WORKS, PHILAD.A. (Toulouse
1971; Hinson 1995).
The
blue-green mineral water bottle pictured to the above left is
a California Gold Rush era soda/mineral water bottle (Lynde &
Putnam) from San Francisco, CA. that dates from between 1850 to 1851.
The address of the company indicates that it was in the area destroyed by one of
several "great fires" that occurred in San Francisco during the early 1850s;
specifically the one on June 22nd, 1851 (Markota 1994). As there were no
glass manufacturing facilities in the West prior to 1859, these bottles were
blown at a glassworks on the east coast and transported around the horn by
sailing ship to San Francisco. This is proven by the fact that the back of
this bottle is embossed (not in a plate) with UNION GLASS WORKS, PHILAD.A. (Toulouse
1971; Hinson 1995).
|
Glassmaker Plate Positioning Errors Like with the mold engraving errors discussed above, mold plate positioning errors were very far and few between, though they did occur.
This is a very rare example of a plate being inserted into the plate mold upside down. Click same flask with the plate inserted correctly to view an intact example of the same flask. This example has the exact same plate inserted correctly in the mold for this order (or portion of the same order?) from the noted glass works. |
The bottles pictured to the left are a pair of San Francisco, CA. whiskey bottles - Wolters Bros. & Co. (left) and Thos. Taylor & Co. (right) - that were blown in the same plate mold. This is confirmed by a base mold flaw (small mold surface line) that is present on the base of both bottles in the exact same location with the same precise conformation. The plates were inserted in the mold within the area outlined by the embossed box. The lettering inside the box is from the plate, but the box itself was engraved into the mold surface. This is called a "ridge slug plate" in the collector world. Click Wolters Bros. embossing for a close-up of the embossing of the left bottle. Both bottles date right around 1885 to 1886 based on company historic information (Thomas 2002). Both have true applied brandy finishes and very small pin-point air vent marks (2) on the shoulders. These bottles date from the end of the applied finish era and are also found with tooled finishes (Thomas 2002). They also date from the early days of air venting. The square plate style for Western (and Hawaiian) cylinder whiskey/liquor bottles was a fairly common occurrence during the 1880s and 1890s. They were most likely produced by the San Francisco & Pacific Glass Works (Elliot & Gould 1988; Thomas 2002).
Dating notes: Plate mold
produced bottles were made for a very long time did make the crossover from
mouth-blown to machine-made bottles. Given the wide span of use on
mouth-blown bottles (1840s to 1910s) there is little general diagnostic dating
information to be had from the presence (or absence) of plate induced embossing.
However, the presence of plate induced embossing does have some dating utility
for a few specific types of bottles like the green soda/mineral water pictured
above. See the
Bottle Typing/Diagnostic Shapes page for more information.
 Mold
air venting was at least a minor revolutionary progression in bottle
making technology during the last quarter of the 19th century. The
first (or one of the first) patents for this technology was granted to
Charles D. Fox in April of 1874. Click
Charles D. Fox's patent #149,461
to view this patent.
It appears, however, that the technique was not widely applied to bottle
making until the very early 1880s (Thomas 2002). Air venting consists of small holes drilled into the
forming part of the mold - often in conjunction with other mold air
passage chambers (see the Fox patent linked above) -
which allow for the air inside the mold to escape quicker while the bottle
was being blown and expanded. This resulted in bottles that meshed
closer to the inside shape of the mold with less glass distortion and
sharper design features and embossing. It also likely increased
production since bottle inflation would conceivably go faster with venting.
Prior to venting, the hot gases inside the mold had to escape from either
the top of the mold (where the blowpipe was attached to the neck portion
of the
parison) or the gaps where the mold sections came together
(Elliott & Gould 1988).
Mold
air venting was at least a minor revolutionary progression in bottle
making technology during the last quarter of the 19th century. The
first (or one of the first) patents for this technology was granted to
Charles D. Fox in April of 1874. Click
Charles D. Fox's patent #149,461
to view this patent.
It appears, however, that the technique was not widely applied to bottle
making until the very early 1880s (Thomas 2002). Air venting consists of small holes drilled into the
forming part of the mold - often in conjunction with other mold air
passage chambers (see the Fox patent linked above) -
which allow for the air inside the mold to escape quicker while the bottle
was being blown and expanded. This resulted in bottles that meshed
closer to the inside shape of the mold with less glass distortion and
sharper design features and embossing. It also likely increased
production since bottle inflation would conceivably go faster with venting.
Prior to venting, the hot gases inside the mold had to escape from either
the top of the mold (where the blowpipe was attached to the neck portion
of the
parison) or the gaps where the mold sections came together
(Elliott & Gould 1988).
The evidence of air venting is very small marks or bumps that can be found just about anywhere on the surface of a bottle but are most common on the shoulders, body corners, base, mold seams, and sometimes incorporated within the embossing pattern itself as indicated by the embossing plate pictured above. Air vent bumps are typically about the size or slightly smaller than a pin-head - though are sometimes bigger - and appear like embossed "period" dots as they are formed by the glass just slightly extruding into the vent holes when being blown. Air venting occurs on both mouth-blown and machine-made bottles. Machine-made bottle molds will sometimes have the vent holes incorporated into the joints of the mold, or otherwise obscurely located, making them sometimes difficult or impossible to detect. Often machine-made bottle mold venting marks are obvious like on this mid-20th century Coca-Cola® bottle which has copious numbers of venting marks scattered throughout the body and embossing pattern; only a few of the vent marks are pointed out in the image (Kendrick 1967, 1968).
Some of the earliest known venting marks were a larger, paper-punch sized "blob" on the shoulder of the bottle, which has been referred to as "open venting" (Elliott & Gould 1988). Click "blob" type air venting to view a close-up picture of this unusual venting method on an early to mid-1880s Peruvian Bitters bottle (San Francisco, CA). According to Thomas (1977), this style is believed to have been used during a narrow time frame of about 1883 to 1885 for at least Western American made bottles. Air venting was first placed in the shoulder area of bottle molds as this is the last place the bottle "fills" in the mold since bottles inflate or expand from the base upwards when blown and the neck portion of the mold also inflates quickly due to the narrowness and proximity to the end of the blowpipe (Kendrick 1967).
(Note: Some researchers believe that air venting holes may have been used much earlier than the 1880s - possibly as early as the 1850s on some early porter bottles. At least one mold used by the Dyottville Glass Works (Philadelphia, PA.) left paper-punch sized indented disk markings on one side of the body that some think are a venting mark (von Mechow, pers. communication 2006). However, this feature may have been related to certain aspects of mold construction and/or repair as the marks are indented into the finished bottle whereas venting marks typically protrude from the glass surface. This is consistent with the tendency of hot glass to extrude under blowing pressure into any opening or indentations in a molds inside surface, including the engraved embossing grooves. At this point in time - 150 years later - it may be impossible to say for sure.)
Most vent marks are small and hard to photograph - but easy to illustrate. Click on the photo to the left to view an illustration of the same bottle showing where the actual air venting marks are located. The places to look on a bottle in order of likely probability of being present are as follows: shoulders, vertical body edges (square or rectangular bottles), on the body, on the base (click on base venting for an illustration), incorporated into the side mold seam (often hard to determine), or integrated within the embossing pattern (variably noticeable). Air venting marks can often be found in several or even all of these locations on the same bottle. The picture below shows distinct venting marks on the shoulder of a three-piece mold liquor bottle that dates between 1900 and 1910. Two spaced bumps on the shoulder on each mold half are a very common orientation for venting marks on cylindrical bottles.
 Dating
notes: All mold air venting related dating trends relative to
bottle manufacturing known to the author are only relevant to
mouth-blown bottles.
Dating
notes: All mold air venting related dating trends relative to
bottle manufacturing known to the author are only relevant to
mouth-blown bottles.
Mouth-blown bottles: Air venting began being used significantly by the early to mid-1880s on mouth-blown bottles and appears to have been quickly accepted, becoming an industry standard by the early 1890s. A large majority of all types of mouth-blown bottles made from or after the early 1890s exhibit mold air venting marks somewhere on the bottle shoulder, body and/or base. Conversely, very few bottles made before 1880 will have mold air venting marks with the one speculative exception noted above (Thomas 2002; von Mechow 2006). Check the surface of the bottle carefully as air venting marks can be very difficult to see and are sometimes easier to feel. One clue to consider in your search for vent marks is that bottles made in molds with air venting usually have sharper, more distinct embossing and body design features (e.g., panel edges) and less distortion to the body glass than bottles without vent marks. Conversely, bottles produced in non-air vented molds tend to have more rounded and/or flattened embossing and body design features and more surface glass texture distortion than air vented bottles. These characteristics are highly variable and can be difficult to discern even to the experienced eye though should be considered in hand with other dateable, manufacturing related, diagnostic features.
As a general rule, the more air venting marks present on the surface of a mouth-blown bottle the later the bottle was produced. Specifically, just one or two very small air vent bumps on the front and back shoulders (cylindrical bottles) or the body shoulder corners opposite the vertical side mold seams (square or rectangular bottles) tend to be the earliest (mid to late 1880s through the 1890s) with multiple air venting marks scattered around the bottle, including those integrated into the embossing pattern, side mold seams, and/or on the bottle base, being the latest dating, i.e., mid to late 1890s to the end of regular mouth-blown bottle production in the early 1920s (empirical observations). Click South Carolina State Dispensary liquor flask to see an example where the venting is obviously incorporated in quantity into the embossing pattern, the venting made more obvious by the very light embossing (mediocre picture unfortunately). This flask dates firmly between 1899 - when the Dispensary ceased using bottles with a palmetto tree embossed - and 1907 when the South Carolina State Dispensary ceased operation (Teal & Wallace 2005). The 1915 to 1918 (Mark Hawkins pers. comm. 2006) produced mold plate shown above in the "Plate/Plate Mold" section has venting holes in almost every engraved letter on the plate. This ample venting helped insure that the embossing - and bottle shape - was as crisp and sharp as possible.
Machine-made bottles: There are no reliable mold air venting related dating trends known to the author for machine-made bottles made on semi-automatic or fully automatic machines. Air venting marks may or may not be visually present on machine-made bottles from the earliest 20th century machines to those produced today (take a look at the bottles in your pantry). The number and location of air venting marks appear to have no relationship to the age or type of bottle.
The following is mostly copied from the Bottle Dating: Machine-made bottles portion of the Dating Key page (attached to the "Bottle Dating" page) and includes some attributes that are not specifically bottle body related. However, it is useful to repeat the general characteristics of machine-made bottles together for continuity.
General Machine-made Diagnostic Features: Machine-made bottles will exhibit most or all of the diagnostic characteristics explained and illustrated below. (Note: the term "parison mold" and "blank mold" are synonymous for the first mold in the two mold machine process.):
 |
|
Click on the machine-made beer bottle picture above to see an illustration of this bottle showing the major diagnostic characteristics of a typical machine produced bottle. |
1. Vertical side mold seams which usually (see the Note box below point #3 for an exception) run up to the highest point of the finish and often onto the extreme top finish surface (i.e., onto the rim or lip). On many early (very early 1900s into the 1920s) and occasional later (1930s and later) machine-made bottles the vertical body/neck and finish mold seams are discontinuous and offset from each other; click offset seams for a picture of this attribute. These vertical seams - finish mold seams vis-à-vis the upper neck mold seams - may range from just slightly offset to 90 degrees offset (like shown at the linked image above). The offset is a function of the orientation of the parison relative to the two molds (parison and blow molds) used on the particular machine, or occasionally, to the hot parison "sticking" to the neck ring of the parison/blank mold when transferring to the blow mold (Ceramic Industry 1949:14-15). There are also no horizontal tooling marks present on the finish and/or upper neck as would be observable on the finish of mouth-blown bottles.
2. The side mold seams on most machine-made
bottles tend to be finer (narrower and lower) - though sometimes
sharper and/or visually distinct
than mouth-blown bottle mold
seams although many mouth-blown bottles have
very thick and distinct seams due to less precise mold construction or
fitting. The statement about machine-made bottles may seem
contradictory (finer but more visually distinct) but is a function of the
higher machine blowing pressure. Earlier machine-made bottles
(1905-1920s) tend to have somewhat thicker/higher mold seams than later
machine-made bottles due to the increasing precision in mold machining and
machinery in general as time progressed. Most machine-made bottles
have mold seams about the thickness of a hair
while most visible mouth-blown mold seams tend to be several times as thick,
higher, but more rounded. (Mold seam thickness and how high it
protrudes [height] is of only moderate use in telling a machine-made bottle
from a mouth-blown bottle, though if a bottle fragment has a hair fine mold
seam, it is highly likely to be from a machine-made bottle.)
3. There are at least two additional finish related mold seams
- one at the top of
the finish which encircles either the bore or sometimes the outside of
the upper lip portion of the finish (sometimes both of these seams
are present) and a horizontal seam
immediately below the finish which circles the extreme upper neck (called a "neck ring
parting line"). Click on the picture to the left to view an
illustration which shows both of these seams or click
machine-made finish to view an image which shows well the seam below the
finish. Both seams are quite diagnostic of machine manufacture and are
usually visible, though the seam at the top of the finish can be hard to see
on some bottles - especially if the finish was
fire polished. In the glassmaking trade, these seams along with the
side mold seams within the finish or just below are referred to as "neck ring"
or "neckring" seams since they
were formed by the separate
neck ring portion of a machine mold (Tooley
1953).
|
Note: There are a few machine-made bottle types (milk, shoe polish and small ink bottles) or post-production processes (fire polishing) which exhibit mold seams in the finish/upper neck that deviate from the descriptions in points #1 and/or #3 above; these bottles may appear to be of mouth-blown manufacture. These deviations are discussed on the main Bottle Dating page in a box under Question #2. Click Exceptions to Question #2 to view this discussion. |
4. "Ghost" seams are usually present on the neck,
shoulder, and/or body of the bottle
if made by a
blow-and-blow machine (like the Owens Automatic Bottle Machine).
These are faint, somewhat wandering, hairline seams which if present
(usually) are sporadically visible on the sides of machine-made bottles.
The ghost seams are caused by the parison mold parts and if visible enough will be
"attached" to the vertical seams in the finish. Click on
ghost seam to view a close-up explanatory picture of this attribute.
Be aware that bottles and jars made by early to mid-20th century
press-and-blow machines do not usually have ghost seams, since the
parison mold was usually one-piece, but will
typically have a
valve mark on the base
(see #6 below).
5. A suction scar is present on the base of Owens Automatic
Bottle Machine produced
bottles. This distinctive base scar is easier to illustrate than
describe; click on
suction scar for a picture of a typical scar which exhibits the
diagnostic "feathering" that surely indicates Owens machine production
(same image is below left).
This mark is distinctive to the suction process which feeds glass into the
bottom of an Owens machine's parison mold. (Note: A movie clip showing
this process in action is linked at the bottom of this box.) Suction
scars can not be produced by
feed and flow automatic machines (i.e. "gob feeders") though a similar type
mark without the feathering is induced by the parison/blank mold of most
other
blow-and-blow machines - including up to the present day.
Press-and-blow
machines usually have a round valve mark on the base but lack either the suction
or parison scars. In any event, the suction scar is never
found on mouth-blown bottles though suction scars are sometimes referred to as a
pontil
scar by the unfamiliar. See the machine-made section of the
Bottle Bases page for more information on these scars. (Note:
It is likely that other types of suction based automatic bottle machines
made in Europe in the 1920s - and possibly later - also produced a suction
scar on the base of their products [Pearson 1928]. However, a large
majority of bottles in the U. S. with distinct suction scars were likely
Owens machine produced.)
6. The presence of a circular valve mark on the base of a bottle (typically a wide mouth bottle or jar) is sure evidence of machine-made manufacture by a press-and-blow machine.
7. Machine-made bottles tend to have few if any bubbles in the glass and the thickness of the glass is usually more uniform throughout the bottle as compared to mouth-blown bottles. This is especially true of later machine made bottles, i.e. from the late 1920s on. (Note: The presence or absence of bubbles in the glass and relatively even distribution of the glass throughout the characteristic is not a primary feature of either machine-made or mouth-blown bottles, though there are strong trends .
Dating notes: The above diagnostic features - body and base - are typical of machine-made bottles made from the beginning of the automatic bottle machine era (1905) to the end of the period covered by this website - the 1950s (Miller & McNichol 2002). Only #2 and #6 allow for any body related dating opportunities and they are somewhat general - thicker mold seams (#2) and bubbles in the glass (#6) generally means an earlier manufacture (pre-1930).
Return to the top of
this page.
C. Post (after) Molding Body Features
Introduction
Numerous processes can be effected to the body of the bottle after it is completely molded or free-blown and finished (i.e. the lip produced) in order to make the bottle more proprietary and/or decorative, including blob seals, applied color labeling, engraving, and applied handles. One process (patination) is nature itself in the form of water, minerals, and time weathering the glass surface. The following sections cover these post-molding features (i.e. after molding is completed, not to be confused with a post-bottom mold).
 A
blob seal, which is often simply called a "seal" is
typically a round or oval (other shapes possible) disk of glass on the body, shoulder, or sometimes neck
of a bottle. The blob of glass itself was lightly applied to the bottle with some
type of tool. The embossing was formed by pressing a small
metal or clay seal with an intaglio design onto the applied blob of glass
while still hot, much like the traditional process of sealing a letter with hot
wax. The inscriptions on blob seals were marked with a variety of words,
numbers, or images including a persons personal mark, crest, or initials, kings, company names,
products, and/or a year. Blob seals were applied to a bottle after the
blowing and finishing was completed. Blob seals are also referred to as a
"prunt" or "prunts" which is generic term for small blobs of glass applied to the
surface of a glass item (White 1978; Jones & Sullivan 1989; Van den Bossche 2001).
Blob seals were also called "drop seals" by some glass manufacturers (IGCo
1906).
A
blob seal, which is often simply called a "seal" is
typically a round or oval (other shapes possible) disk of glass on the body, shoulder, or sometimes neck
of a bottle. The blob of glass itself was lightly applied to the bottle with some
type of tool. The embossing was formed by pressing a small
metal or clay seal with an intaglio design onto the applied blob of glass
while still hot, much like the traditional process of sealing a letter with hot
wax. The inscriptions on blob seals were marked with a variety of words,
numbers, or images including a persons personal mark, crest, or initials, kings, company names,
products, and/or a year. Blob seals were applied to a bottle after the
blowing and finishing was completed. Blob seals are also referred to as a
"prunt" or "prunts" which is generic term for small blobs of glass applied to the
surface of a glass item (White 1978; Jones & Sullivan 1989; Van den Bossche 2001).
Blob seals were also called "drop seals" by some glass manufacturers (IGCo
1906).
Although the general process dates back to Roman times, the earliest known impressed glass seal on the European continent is from a German wine glass dating to about 1640. The practice of attaching glass seals to the body/shoulder of wine bottles apparently began in the mid-1600s in England and were made for gentlemen or taverns; the earliest known seal is from an English "globe and shaft" bottle (bulbous body and long skinny neck) dated 1650 (Munsey 1970; Hume 1991; Van den Bossche 2001). From this point, through the 18th century to the early 19th century, blob seals were the primary method of providing physical product or ownership identification on a bottle (outside of paper labeling) and era when bottles were a valuable possession which was typically not discarded until broken and unusable (Toulouse 1971).
The
shoulder sealed bottle pictured above is an
early to mid-19th century French
free-blown wine bottle that the seal indicates contained MUSCAT - a
sweet wine made from the grape of the same name which is one of the oldest grape
varieties in the world. This seal also has a bunch of grapes embossed and
the word FRONTIGNAN which is a specific region of France. The shoulder of a
bottle was the most common location for seals from the mid-19th century on, most likely
because it left the body open for a label (empirical observations).
The body sealed bottle to the right is impressed with I. F. / 1822. This English-made bottle was produced in an early Rickett's mold and was addressed earlier on this page under the three-piece mold section. Seals located on the bottle body tends to be a more consistently older placement location that seals on the shoulder, though there was a lot of variety through the years. Seals on the body of bottles seem to disappear after about the first third of the 19th century. Although it is likely that this bottle was made around the date of the seal, seal dates do not always relate to the actual date of the bottles manufacture. The date sometimes would indicate a wine vintage or some other date important to the person having the bottles made. One noted example, which was known to have been made in the mid-19th century, was dated 1643 - a date that pertained to the implementation of certain wine production laws (Jones 1986; Van den Bossche 2001).
Dating notes: Blob seals are
most common (as a percentage of the bottles produced at the time) on 17th through mid 19th century wine
and liquor bottles,
with some use on olive oil, mineral water, large demijohns, and other bottle
types much less frequently. Seals were used commonly, however, as late as the early 20th century
- particularly on wine bottles and are much more common on European made bottles, though
there are numerous examples produced in and/or used by businesses in the U. S. in
the 19th to early 20th centuries. (To view a couple interesting internet
articles from Antique Bottle & Glass Collector magazine that discuss
early American blob seal bottles, click on the following links:
http://www.glswrk-auction.com:80/034.htm and
http://www.glswrk-auction.com/033.htm.) Although some authors have noted that seals are most common on bottles dating before 1840
- true relative to the percentage of bottles made at the time - there were many sealed bottles made after that time (Jones
& Sullivan 1989). In fact, blob seals are relatively common on imported bottles made
up until the end of the mouth-blown bottle era, i.e. into at least the 1910s, being
particularly common on imported wine, gin, and other
liquor or liqueur bottles. Many late 19th and early 20th century
case gin bottles from Europe will have a shoulder blob seal and body
embossing (Van den Bossche 2001; empirical observations). Click
A. Van Hoboken case gin to view a late 19th century example of a sealed and
embossed Dutch gin. Seals can even still be found
on some modern decorative glass
decanters.
Patination (weathering, staining)
 The surface of
a glass bottle
(internal and external) will react variably, albeit slowly, to the natural
chemical processes of decomposition in both water and the earth. This process of weathering is called "patination"
in the archaeological world (Jones & Sullivan 1989). The results of this
decomposition is a crust or other glass surface alteration with is referred to
also as a "devitrification," "patina," "sick glass," or simply "stained" glass. The term sick
glass is descriptive in that the glass is sick - it is slowly dissolving back to
its original elements (Munsey 1970; Dumbrell 1983). This effect is also called
by some "opalized", "iridescence", or "opalescence" (Tooley 1953; Kendrick
1963). There seems to be no one term that is widely accepted; on this
website it may be referred to as patination or staining/stained glass.
The surface of
a glass bottle
(internal and external) will react variably, albeit slowly, to the natural
chemical processes of decomposition in both water and the earth. This process of weathering is called "patination"
in the archaeological world (Jones & Sullivan 1989). The results of this
decomposition is a crust or other glass surface alteration with is referred to
also as a "devitrification," "patina," "sick glass," or simply "stained" glass. The term sick
glass is descriptive in that the glass is sick - it is slowly dissolving back to
its original elements (Munsey 1970; Dumbrell 1983). This effect is also called
by some "opalized", "iridescence", or "opalescence" (Tooley 1953; Kendrick
1963). There seems to be no one term that is widely accepted; on this
website it may be referred to as patination or staining/stained glass.
The following information about patination is from the "Surface Features" section of Jones & Sullivan's "Glass Glossary" (1989): Patination - Layered crust that is produced by decomposition of the glass (weathering) and is quite distinct from the unaffected glass itself. Patination should be regarded as a natural process of decomposition of glass buried in the ground or in water and except for unusual circumstances no particular notice should be taken of it. The presence of patination (or its absence) is no guarantee of age. Some glass is more prone to decomposition and some environments tend to accelerate the process. In slightly different burial locations different parts of the same bottle may be affected quite differently.
 As noted, staining is highly variable and unpredictable.
Though glass is seemingly a highly resistant substance (and it is) it is still
subject to the slow corrosion by water and chemicals. This is a function
of the specific composition of the glass as it relates to the chemistry of the
soil/water that the glass resides in, as influenced by amount of exposure or
contact time (Munsey 1970). Patination is more common in
bottles with a high soda (and low lime) content. Water will gradually
dissolve or leach out the soda component of the glass leaving a coating of sodium carbonate and
eventually silica behind. This process continues year after year resulting
in a build-up of layers, like the rings of a tree (though without the dating
opportunity that tree rings allow). Particularly
susceptible bottles or those that have been in contact
with water/soil for a very long time will
exhibit pitting, which is the extreme corrosion of the glass surface.
Eventually glass will corrode completely away in any environment given enough
time (Kendrick 1963; Elliott & Gould 1988).
As noted, staining is highly variable and unpredictable.
Though glass is seemingly a highly resistant substance (and it is) it is still
subject to the slow corrosion by water and chemicals. This is a function
of the specific composition of the glass as it relates to the chemistry of the
soil/water that the glass resides in, as influenced by amount of exposure or
contact time (Munsey 1970). Patination is more common in
bottles with a high soda (and low lime) content. Water will gradually
dissolve or leach out the soda component of the glass leaving a coating of sodium carbonate and
eventually silica behind. This process continues year after year resulting
in a build-up of layers, like the rings of a tree (though without the dating
opportunity that tree rings allow). Particularly
susceptible bottles or those that have been in contact
with water/soil for a very long time will
exhibit pitting, which is the extreme corrosion of the glass surface.
Eventually glass will corrode completely away in any environment given enough
time (Kendrick 1963; Elliott & Gould 1988).
The small (3" tall) Roman bottle to the right dating from the Judea Period, i.e., first to second century A.D. This large class of variable shaped though typically small bottles are often referred to as "unguentarium bottles" (for unguents, i.e., scented oils for the body or hair) although they were also commonly used for perfumes. The bottle is free-blown, a light greenish color glass, a finish that was flared with some primitive tool and has evidence of a sand type pontil scar on the base. Click the following links to see more images of this ancient bottle: side view, base view, and top view. It is heavily patinated with moderate pitting to the glass surface from the chemical reaction with the soil it resided in for almost 2000 years - an amazing testament to the resilience of glass!
The amber bottle pictured to the left at the top of this section is an early 20th century, machine-made, export style beer bottle used by the A. Gettelman Brewing Company (Milwaukee, WI.). The bottle exhibits the colorful type of patination that collectors refer to as opalescence or iridescence. These colors are a result of the way light waves are broken up by the layers of corrosion and reflected to the eye (Munsey 1970). This patination of this bottle is a result of its unique glass composition (unknown) and its reaction to the alkaline (basic) soils in Arizona where this particular bottle was excavated. It is embossed on the base with W. F. & S. / MIL. which indicates the bottle was made for Gettelman by William Franzen & Sons who operated the Northern Glass Works of Milwaukee, WI. and used this particular mark between about 1900 and 1926 (Toulouse 1971; Lockhart 2004c). This bottle, being machine-made (non-Owens machine) and with National Prohibition beginning in early 1920, would likely date between about 1910 and 1919.

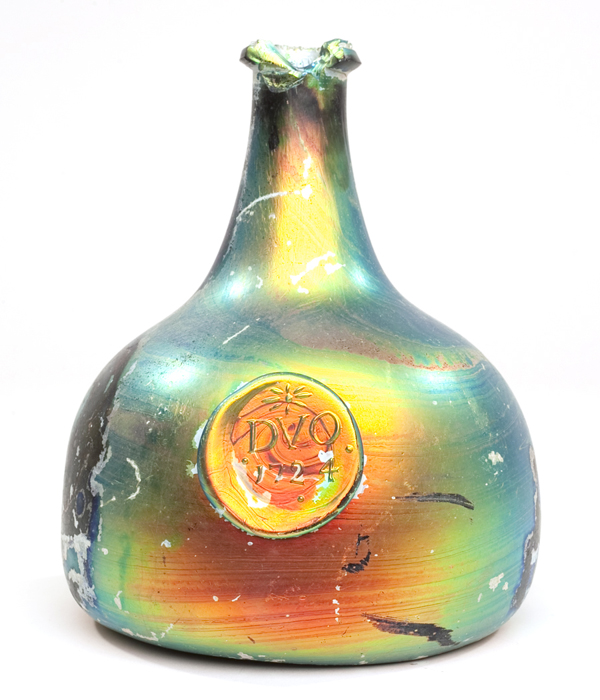 The bottle pictured to the right has a
more common type of patination - a milky white, opaque coating - that justifies
the term "sick glass." This particular bottle is an
Original Budweiser used by the C. Conrad & Company (St. Louis, MO.).
These bottles date from between 1876 and 1882 (Toulouse 1971; Lockhart pers.
comm. 2004). This type of staining is very common on the outside and
inside surfaces of bottles that have been buried. Often when this type
staining is just on the inside of the bottle, it is referred to as "content
staining." Internal staining can be a result of the original contents, but
often it results from the bottle collecting and retaining water if buried
upright. This will result in a "water stain" to the interior of the
bottle.
The bottle pictured to the right has a
more common type of patination - a milky white, opaque coating - that justifies
the term "sick glass." This particular bottle is an
Original Budweiser used by the C. Conrad & Company (St. Louis, MO.).
These bottles date from between 1876 and 1882 (Toulouse 1971; Lockhart pers.
comm. 2004). This type of staining is very common on the outside and
inside surfaces of bottles that have been buried. Often when this type
staining is just on the inside of the bottle, it is referred to as "content
staining." Internal staining can be a result of the original contents, but
often it results from the bottle collecting and retaining water if buried
upright. This will result in a "water stain" to the interior of the
bottle.
The early bottle pictured to the left, which is blob seal dated at 1727 (click 1727 seal to see a close-up of the seal), is heavily - and beautifully - patinated from several centuries of burial. It also, upon close inspection of the image (click image to enlarge), displays what appears to be swirling "straw marks" imbedded in the patination (see the straw marks discussion earlier on this page). This is an English bottle that is referred to as an "onion" bottle based on the squatty, bulbous shape. This bottle was free-blown, has an applied "string rim" type finish, and a sand or disk type pontil scar (click base view to see the bottle base). This style is briefly covered on the Liquor/Spirits Bottle Typology page, although it pre-dates the coverage time range of this website. (Photos from eBay®.)
Dating notes: As noted above, staining is not a reliable indicator of age except that bottles with high soda content - particularly machine-made items - will stain faster than those with less soda. Black glass and some other types which are apparently low in soda and high in lime will weather for a hundred years or more with little change to the glass surface (Kendrick 1963). Staining is often accelerated on bottles in contact with ashes and alkaline soils and almost non-existent, of course, with bottles that have never been buried.
 "Applied
color labels" or "applied color lettering" (both are correct) - universally
called "ACL" - was a type of more or less permanent labeling that eventually
replaced embossing on most soda and milk bottles. ACL is a
method of labeling, lettering, or decorating a bottle by applying a mixture of
borosilicate glass and mineral or organic pigments (and other substances) with a
low melting point to a bottle through a metal screen and then baking it in a
furnace to form what can appear to be a "painted label."
In later years
(mid-1950s on) a thermoplastic wax medium was used and resulted in more
versatility and durability. ACL's are also referred to as
"pyroglazing" (a copyrighted name of the Thatcher Manufacturing Co.), "pyro", "enameling", "baked enamel labeling", "silk screening",
"fire fused" (used by the Universal Glass Products Co.), "painting", and
"printing" (Giarde 1989; Sweeney et al. 2002; Tutton 2003; Lockhart et al. 2007c).
Although invented in the 1920s, the American glassmaking industry apparently first began
offering ACL on milk and soda bottles in 1933 with widespread acceptance
occurring by about 1935 (Giarde 1989; Tutton 2003; Lockhart et al. 2007c).
The huge Owens-Illinois Glass Co. called their process "applied color
lettering" in the 1930s (Griffenhagen & Bogard 1999).
"Applied
color labels" or "applied color lettering" (both are correct) - universally
called "ACL" - was a type of more or less permanent labeling that eventually
replaced embossing on most soda and milk bottles. ACL is a
method of labeling, lettering, or decorating a bottle by applying a mixture of
borosilicate glass and mineral or organic pigments (and other substances) with a
low melting point to a bottle through a metal screen and then baking it in a
furnace to form what can appear to be a "painted label."
In later years
(mid-1950s on) a thermoplastic wax medium was used and resulted in more
versatility and durability. ACL's are also referred to as
"pyroglazing" (a copyrighted name of the Thatcher Manufacturing Co.), "pyro", "enameling", "baked enamel labeling", "silk screening",
"fire fused" (used by the Universal Glass Products Co.), "painting", and
"printing" (Giarde 1989; Sweeney et al. 2002; Tutton 2003; Lockhart et al. 2007c).
Although invented in the 1920s, the American glassmaking industry apparently first began
offering ACL on milk and soda bottles in 1933 with widespread acceptance
occurring by about 1935 (Giarde 1989; Tutton 2003; Lockhart et al. 2007c).
The huge Owens-Illinois Glass Co. called their process "applied color
lettering" in the 1930s (Griffenhagen & Bogard 1999).
(Note: There is some evidence that Owens-Illinois began at least experimental - possibly commercial? - use of the ACL process in 1931. Russ Hoenig, a now retired engineer with the company, noted the following: "In the 1931 end of year report, under new products (it was noted that): "A new decorating lehr has been added at the Huntington, W.V. plant, and colors and designs are being applied to various glass containers." (emphasis added; Hoenig pers. comm. 2/2019). This certainly brings into question the 1933 or so begin date.)
The following is quoted from the book Collecting Applied Color Label Soda Bottles - Third Edition and explains the ACL process in more depth (Sweeney 2002):
After the annealing process is completed, the soon-to-be ACL bottle would be hand packed into wooden containers and then sent to the decorating department to be printed...In the early days of ACL printing, pine oil mediums were used to carry the pigments through the printing screens onto the bottle's glass surface. Because this medium was used, five to ten minutes of drying time had to elapse before another color could be applied. Bottles would be printed with one color, allowed to dry, and then manually taken to another machine where they would then undergo the same process for a second color. A third color would yet again require the same process....This process was time consuming and the yield was only 25-35 bottles per minute depending on the number of colors printed. It is no wonder that early specimens of 3 color labels are so rare!
In
the 1950s, automatic machines were developed that improved printing capacities
up to 70 bottles per minute. Bottles no longer had to be hand loaded from
one machine to another with each new color application. Instead, bottles
were automatically fed from one printing station to another. Because pine
oil was still in use, however, drying time between each color application was
still necessary.
Finally, in the mid-1950s, a thermoplastic wax medium was introduced. This new agent, used to carry the pigments through the screen to the bottle's surface, eliminated the need for drying time between colors, increasing the output to 130 per minute.
The use of thermoplastic wax colors was a great advancement in ACL technology and completely different in nature form the original oil based printing methods. This new color compound took the form of a solid rather than the liquid base of pine oil mediums. The screen through which this new compound was forced was made of a fine metal mesh. The thin wires of this mesh were electrically charged and became superheated. As the thermoplastic labeling glass compound passed through this heated screen mesh, it too became superheated and "flash dried" as it came into contact with the cooler bottle surface. The bottle would then be automatically deposited at the next printing station for a second, third or fourth color.
Because the ACL process did not significantly add to a bottle's manufacturing time, it was relatively inexpensive and yielded a permanent, brightly colored label, becoming instantly accepted within the bottling industry. With the ACL label, a soda bottler had the best of both worlds. Bright, colorful labels once attained only through paper labeling were now combined with the permanence an embossed bottle offered.
The ACL process was by far most widely used on returnable soda and milk bottles, though there was some use on other types of bottles like beer and even druggist bottles (Griffenhagen & Bogard 1999). Another benefit of the ACL is that it also solved the problem of one companies bottles being easily re-used by another company (Riley 1958; Sweeny 2002). The bottle pictured is a ACL soda bottle made in 1946 by the Owens-Illinois Glass Company. The particular bottle is used as one of the dating examples on the "Examples of Dating Historic Bottles" page; click Examples Page to view Example #1 which uses this bottle as an example to run through the Dating Key.
The following recent article - available only on this website - is highly recommended for those wanting to know just about everything about ACL's:
Lockhart, Bill and Bob Brown (with contributions by Chris Weide and Russ Hoenig). 2019. The Glamorous Applied Color Labels. Historic Glass Bottle Identification & Information Website, E-published September 2019. A comprehensive article on the history, processes and use of ACL beginning in the early 1930s. This article is available on this site at: http://www.sha.org/bottle/pdffiles/ACLArticle2019.pdf
Dating notes: This style of marking bottles was
most commonly found on soda, milk, and beer bottles made from about 1933 (there
are slight differences of opinion on when the
process was first implemented in the U.S.; see above linked article) up to the present, e.g., Corona™
beer bottles. There are likely some subtly different physical
characteristics to the products of the different ACL processes (i.e., natural
pigments versus the later thermoplastics) but are not relevant to the goals of
this website and not covered.
 Engraving/Etching:
As an alternative to embossing or molded designs, bottles could be engraved or
etched. Both processes were not commonly utilized on utilitarian bottles,
with a few exceptions, but used enough to warrant mention here.
Engraving/Etching:
As an alternative to embossing or molded designs, bottles could be engraved or
etched. Both processes were not commonly utilized on utilitarian bottles,
with a few exceptions, but used enough to warrant mention here.
Engraving entailed the use of a diamond-tipped tool or small copper wheels (one-eight of an inch to two inches in diameter) to cut into the surface of the bottle. An abrasive agent like pumice was used with the wheels in a mixture of water and oil (Munsey 1970). Engraving was used very frequently with decorative glassware, i.e. "cut glass." With bottles, engraving was usually utilized to create a design in the surface of specialty items like druggists' "shop furniture" (large druggist display and dispensing bottles and globes), to label decanters and cruets, some fancier perfume and cologne bottles, to mark graduations on cylinders and beakers, or designer signatures (Whitall, Tatum & Co. 1880, 1892, 1902; Jones & Sullivan 1989).

 At
least on the West Coast, there were an assortment of returnable export and
champagne style beer bottles which were either engraved or etched and used
alongside or in addition to their embossed brethren during the late 19th to
early 20th centuries (Kendrick 1963:74). An example of a bottle
used for beer that was likely engraved (there is some "depth" to the lettering
but it could be acid etched as described below) instead of embossed see the
images to the right of an "Apollinaris" style mineral water bottle which was
likely used for beer. It is essentially identical to the "champagne" style
beer bottle covered else where on this website; click
Beer & Ale Typology page to see such. (That linked section also
includes a write-up on an identically shaped, though body embossed, beer bottle
used by the same company around the same time.)
At
least on the West Coast, there were an assortment of returnable export and
champagne style beer bottles which were either engraved or etched and used
alongside or in addition to their embossed brethren during the late 19th to
early 20th centuries (Kendrick 1963:74). An example of a bottle
used for beer that was likely engraved (there is some "depth" to the lettering
but it could be acid etched as described below) instead of embossed see the
images to the right of an "Apollinaris" style mineral water bottle which was
likely used for beer. It is essentially identical to the "champagne" style
beer bottle covered else where on this website; click
Beer & Ale Typology page to see such. (That linked section also
includes a write-up on an identically shaped, though body embossed, beer bottle
used by the same company around the same time.)
The pictured example is body engraved/etched with FREDERICKSBURG / BOTGCo / S.F. CAL. It is 11.5" tall, mouth-blown using the turn-mold process and has a narrow applied blob type finish. It likely dates from the 1890s or early 1900s (ca. 1890 to 1910) during the period (1889-1920) when the parent company was doing business as the Fredericksburg Brewing Co. (Van Wieren 1995). The "Bottling Company" - which has to be what the BOTGCo stood for - likely being an associated business or alternative name for use with other products, which may have included mineral water as that was what this style of bottle was typically used for. See the Apollinaris mineral water discussion on the "Soda & Mineral Water Bottles" typology page. This bottle also has substantial wear on the base as well as the body indicating it was reused many times - something that was common with beer bottles.
Etching of the bottle surface was done by various means. Typically the etching itself was done with hydrofluoric acid and resulted in a frosted appearance to the glass surface. Acid etching is accomplished by covering the portions of the bottle that were to be etched with beeswax, paraffin, or rosin with the area desired for etching having the design cut through the protective covering. Alternatively, a copper plate with the design cut into it was used; the uncut portions of the plate protecting the portions that were not to be etched (Munsey 1970). Other etching methods involved the use of corrosive gels in a process similar to silk-screening and even sandblasting (Elliott & Gould 1988). However it was accomplished, etching was used infrequently with bottles in general though did find a particular niche with seltzer or siphon bottles from the 1890s through at least the 1930s.
The very heavy/thick glass bottle pictured to the above left is of an early 1930s siphon bottle used in Klamath Falls, Oregon. The base of has an Owens-Illinois Glass Company marking indicating a 1931 production by the company which was formed in 1929 (Lockhart & Hoenig 2015, 2018t & 2018u). Click White Pelican Bottling Co. to see a close up of the etched lettering on this bottle. Etching was also used for druggists' "shop furniture" (large druggist display and dispensing bottles and globes) and infrequently for beer and soda bottles (Kendrick 1963; Elliott & Gould 1988; Jones & Sullivan 1989).
Dating notes: Engraving and etching by various methods are still in use today for a few bottles and other glassware so there is little dating utility to be had with either. Other diagnostic features of the bottles manufacturing or use must be used. Engraving is a centuries old method that was introduced into the U.S. by German artisans in the 17th century (Munsey 1970). Etching is mostly a product of the late 19th century through the 20th century.
 Applied handles: Applied handles were a somewhat unusual body related feature used on a few types
of mouth-blown bottles, primarily specialty items that were intended to be kept and reused.
In particular, handles were used on a myriad of different American made liquor bottles made
during the middle of the 19th century (McKearin & Wilson 1978). After the
bottle was completely blown (free-blown, dip molded, or fully molded) the handle
was applied using some type(s) of glassmaker tools. Usually, one end of
the handle was attached just below the finish or upper neck with the other end
attached somewhere on the shoulder. Most of these bottles were not
embossed but labeled with the product type and producer, like the handled bottle
below. Occasional handled bottles were user identified with a blob seal
while others were molded and embossed, like the bottle to the left.
Applied handles: Applied handles were a somewhat unusual body related feature used on a few types
of mouth-blown bottles, primarily specialty items that were intended to be kept and reused.
In particular, handles were used on a myriad of different American made liquor bottles made
during the middle of the 19th century (McKearin & Wilson 1978). After the
bottle was completely blown (free-blown, dip molded, or fully molded) the handle
was applied using some type(s) of glassmaker tools. Usually, one end of
the handle was attached just below the finish or upper neck with the other end
attached somewhere on the shoulder. Most of these bottles were not
embossed but labeled with the product type and producer, like the handled bottle
below. Occasional handled bottles were user identified with a blob seal
while others were molded and embossed, like the bottle to the left.
 The
unusual bottle with a pour spout and applied "solid loop" handle to the left is
embossed with WHARTON'S / WHISKEY / 1850 / CHESTNUT GROVE
(Philadelphia, PA.) and was blown at the Whitney Glass Works (Glassboro,
NJ) around 1860; the base is embossed with the name of the glassworks.
Many different shapes were produced during the heyday of the handled
liquor bottle style which peaked in popularity from the late 1840s into the
1870s, though handled bottles were made to some extent before and after this
period (McKearin & Wilson 1978).
The
unusual bottle with a pour spout and applied "solid loop" handle to the left is
embossed with WHARTON'S / WHISKEY / 1850 / CHESTNUT GROVE
(Philadelphia, PA.) and was blown at the Whitney Glass Works (Glassboro,
NJ) around 1860; the base is embossed with the name of the glassworks.
Many different shapes were produced during the heyday of the handled
liquor bottle style which peaked in popularity from the late 1840s into the
1870s, though handled bottles were made to some extent before and after this
period (McKearin & Wilson 1978).
The smaller liqueur bottle to the right is a later production - late 1800s - and is probably of European manufacture. It has a small "D" shaped handled and was blown in a two-piece cup mold. It also has a handmade silver collar that totally covers the finish. (This example is still sealed with some of the partially evaporated contents still inside.) This general shape and design was a relatively common late 19th century type that is believed to be largely imported from Europe. These bottles pretty much mark the end of handled mouth-blown liquor bottles.
During the 20th century a wide array of machine-made bottles were made with molded - not applied - handles. This includes wine, liquor, bleach, and other types of bottles. Click machine-made handled jug to view a close-up picture of a handled wine jug that was manufactured in 1960 based on the Owens Illinois Company makers mark on the base. These type machine-made handled bottles have molded handles with mold seams running the entire length of the handle on the handles inside and outside edges (pointed out in the picture). Click handled jug to view a picture of the entire bottle.
Dating notes: Applied glass handles on mouth-blown bottles were an unusual feature added to some fancy liquor bottles primarily during the mid-19th century (1850s to 1870s), though a few were made to at least as late as the 1890s and at least as early as the 1820s (Wilson & Wilson 1968; McKearin & Wilson 1978). Handles on machine-made bottles were not applied but molded with the rest of the bottle. Handles are relatively common on bottles made throughout the 20th century and are still commonly observed today on large capacity wine bottles (i.e. "jug wine").
SEARCHING THIS WEBSITE:
To do a word/phrase
or image search of this website
one must use the following Google search link:
Search the SHA/BLM Historic Glass Bottle Identification & Information
Website
(Note: Search results for this website will be just below the
final top-of-the-page Google paid ads.)
4/6/2022
Return to the top of this page.
This website created and managed by:
Bill Lindsey
Bureau of Land Management (retired) -
Klamath Falls, Oregon
Questions? See
FAQ #21.
Copyright © 2022 Bill Lindsey. All rights reserved. Viewers are encouraged, for personal or classroom use, to download limited copies of posted material. No material may be copied for commercial purposes. Author reserves the right to update this information as appropriate.


