

Glassmaking & Glassmakers
|
|
| Main Subject Pages |
| Home |
| Dating |
| Typing/Shapes |
|
Glassmaking ▪Makers Marks |
| Colors |
| Finishes & Closures |
| Body & Seams |
| Bases |
| Fragment ID |
| Glossary |
| References |
| Links |
| FAQ's |
| About this site |
| Website Map |
 HOME:
Glassmaking & Glassmakers
HOME:
Glassmaking & Glassmakers
Click here to move directly to the Organization & Structure summary for this page.
INTRODUCTION
The following is quoted from Munsey (1970):
"Knowing the techniques of glassblowing, including how to identify bottles made by hand, either free-blown or mold-blown, and by automatic methods, is a valuable help in dating bottles."
The purpose of this page is do just what Dr. Munsey notes - describe the different basic techniques used in producing bottles during the time period covered by this website, i.e., the 19th through mid 20th centuries. Simply stated, an understanding of how bottle making processes worked enhances ones understanding and ability to identify the different manufacturing based diagnostic features that are discussed and used on this website to date bottles. This begins with the era of mouth-blown bottles - a process depicted in the late 19th-century trade card pictured above - through the conquest of the bottle manufacturing world by fully automatic bottle making machines during the first few decades of the 20th century. This page is not intended to be a complete history or overview of the glassmaking in America and in fact, does not specifically cover the actual glass making process at all. Instead, it attempts to cover the basic bottle making processes that are pertinent to the goals of this website as stated on the Homepage, with some anecdotes and related information here and there for interest and illumination. (The subject of the history of glassmaking in America is well covered by a couple out-of-print, but widely available used books: American Glass (McKearin & McKearin 1941) and American Bottles and Flasks and Their Ancestry (McKearin & Wilson 1978).)

 The
era from the third quarter of the 19th century through the first quarter of the 20th century was
a time when change was rampant within the bottle making industry (Barnett
1926). Up
until the mid-19th century, bottle and glass making followed virtually the same
craft-based processes that had been used for many centuries. Bottles made in the 1630s (or even the 1030s for
that matter) were made in an virtually identical fashion to many bottles
made in the 1830s, with some stylistic shape differences of course.
The
era from the third quarter of the 19th century through the first quarter of the 20th century was
a time when change was rampant within the bottle making industry (Barnett
1926). Up
until the mid-19th century, bottle and glass making followed virtually the same
craft-based processes that had been used for many centuries. Bottles made in the 1630s (or even the 1030s for
that matter) were made in an virtually identical fashion to many bottles
made in the 1830s, with some stylistic shape differences of course.
For example, the American made free-blown bottle pictured to the left which is commonly called a "New England chestnut" could have been - from purely a manufacturing technique perspective - blown in Europe several hundred years earlier or in ancient Rome two thousand years ago (bottle to the right ca. 100 A. D.). The actual production date range for these bottles was 1780 to the 1820s (Scoville 1948; McKearin & Wilson 1978; Cable 1999; Griffenhagen & Bogard 1999; Van den Bossche 2001). (This "chestnut" bottle is described further on the Examples of Dating Historic Bottles page.) Although the shapes are different, both pictured bottles were produced with identical methods - free-blown, pontil scarred, with applied finishes.
After automation dominated the bottle making industry during the first quarter of the 20th century, change as evidenced by the manufacturing related diagnostic features physically apparent on a bottle was also limited. For example, a 12 oz. crown finish, micro-brew beer bottle produced today shares virtually the same manufacturing induced physical features- including the location of mold seams - as a beer bottle produced by an early machine in 1918. The same is true of all types of bottles, although styles (shapes) have changed somewhat over that time depending on the use of the bottle. (Note: Undoubtedly, there have been major behind the scenes advances in machine efficiency and design, but these changes are little reflected in the physical features found on most bottles with the exception that more modern bottles (World War II and later) tend to be of thinner glass than earlier machine-made bottles. The primary change during the last third of the 20th century has been the displacement of glass in favor of plastic containers.)
|
Glassmaking & Glassmakers Webpage This page contains an extensive but loosely structured amount of information on the subject of glass/bottle making. The purpose of the page is to draw together all of the scattered glassmaking related information found on this website into one place for ease of use. A user may find the glassmaking information they are seeking checking the major headings in the "Organization & Structure" section just below or by simply scrolling down the page. Users may also check the Website Map page which has a listing - and links to - every page within the Historic Bottle Website. Additional specifics about dating bottles via the manufacturing based features noted below are found within the assortment other "specialty" pages (e.g., Bottle Bases, Finishes, etc.) shown on the Website Map. |
To describe this a different way picture in your mind a bell curve graph with the amount of technological change in the bottle making industry as evidenced by the physical appearance of the bottle on the left vertical axis (change increasing upwards) and time on the lower horizontal axis beginning with 1750 on the left moving right to 2006. Most of the "bell" would lie in the area between 1840 and 1920 with the peak of the bell most likely being around 1905-1910 when the widespread licensing of the Owens Automatic Bottle Machine began. Before 1840 (and to a large degree before 1870) and after 1920, the lines would be relatively flat and very low on the "change" axis. The point here is that bottles made before the mid-19th century and those made after about 1920 share very similar manufacturing induced physical features with other bottles within those respective age groups (Scoville 1948; McKearin & Wilson 1978; Van den Bossche 2001).
One additional subject is also briefly covered via
this webpage: bottle/glass makers markings. The subject of bottle/glass
makers is important because the embossed markings that bottle makers placed on
their wares, if present, are often excellent tools to assist a person in narrowing down a date range that a
particular bottle was most likely produced, when used along with the
manufacturing based diagnostic features. This subject is explored in Part C.
Bottle & Glass Makers Marks at the bottom of this page, though most of
the information is found on a separate webpage at the following link:
Bottle & Glass Makers
Markings page.
|
"Glassmaking & Glassmakers" Related Pages
A. Mouth-blown Manufacturing - This section addresses the manual processes for making bottles, used prior to automation of the industry, where the bottle was blown/expanded with the power of human lungs; thus the term "mouth-blown."
C.
Bottle & Glass Makers Marks - This
section is only introduced on this page, the bulk of the information being located on a
separate webpage. This page briefly the
complex subject of the makers marks that bottle producers
often placed on bottles for various reasons. |
 The
earliest utilitarian bottles made in the U.S. were almost certainly free-blown. Free-blown
bottles were produced without the aid of a containment mold being instead formed and shaped
by the skills of the glassblower using manipulation of the blowpipe (the use of
which dates back to the 3rd century B. C.), various
simple hand tools, and usually a hollowed out
block and a flat table called a marver
(Hunter 1950).
Free-blown utilitarian bottles found or made in the U.S. typically date from
or before the American Civil War (early 1860s and prior) and can be, of course, much
older than that. They were rarely produced after the 1860s by American
glass companies producing utilitarian bottles though the technique is still
being used to some degree for specialty or artistic bottles (Toulouse 1969a;
empirical observations).
The
earliest utilitarian bottles made in the U.S. were almost certainly free-blown. Free-blown
bottles were produced without the aid of a containment mold being instead formed and shaped
by the skills of the glassblower using manipulation of the blowpipe (the use of
which dates back to the 3rd century B. C.), various
simple hand tools, and usually a hollowed out
block and a flat table called a marver
(Hunter 1950).
Free-blown utilitarian bottles found or made in the U.S. typically date from
or before the American Civil War (early 1860s and prior) and can be, of course, much
older than that. They were rarely produced after the 1860s by American
glass companies producing utilitarian bottles though the technique is still
being used to some degree for specialty or artistic bottles (Toulouse 1969a;
empirical observations).
The following excerpt is from Munsey (1970) and is a very good overview of the relatively complicated and skill intensive glassblowing process. It also pertains to mouth-blown molded bottles with the addition of the molding process instead of the extensive hand manipulation noted. (Molded bottles are covered in the next section.) See the Glossary page for a description of some of the glassmaker jargon noted (e.g., gaffer, battledore, chair):
Hand-blown bottles can be either free-blown or mold-blown. Taking a warmed blowpipe, several feet in length, the gaffer's assistant, the gatherer, inserts its tip through the bocca into the hot glass and turns it until a sufficient amount of glass has accumulated on the blowpipe. (Authors note: The late 19th century European trade card below shows glassworkers making gathers via the bocca - or opening - in the glass furnace.) The gatherer then passes the blowpipe with the gather (hot glass on the tip of the blowpipe), sometimes called the post, to the servitor, who is the master blower's first assistant; the servitor then rolls the gather on a marble or metal slab called a marver. (Click marvering to view an illustration of this process.) This action gives the gather its basic bottle shape. The servitor then passes the blowpipe to the gaffer. If the bottle is to be hand-blown, the gaffer constantly rotates the gather to keep it from drooping while he makes the initial blow which introduces an air pocket into the gather. From this point the gather is called a parison. The parison is then rolled in a block (a wooden dipper-like device cut out on one side) which forces the glass into the shape of a sphere; he also blows at the same time to increase the size of the parison. The block is kept from burning by an occasional splashing with water; the relatively cool block also cools the glass surface which helps retain the desired shape.
At this point the servitor puts the parison back in the furnace for reheating (by the mid-1800s he used a smaller and hotter furnace called the glory hole) and then returns it to the gaffer. Through various manipulations and continued blowing the gaffer completes the shape of the bottle. Spinning the blowpipe rounds the parison out like a ball, providing the basic shape of globular bottles. By swinging the blowpipe back and forth or in a complete circle the parison is elongated, providing the basic shape of long cylindrical bottles. Square free-blown bottles are obtained by slapping the parison on the marver and/or paddling it with a wooden paddle called a battledore. To make the bottom of the bottle flat, the gaffer may bang the plastic parison on the marver.
To take the final steps necessary in forming a free-blown bottle the gaffer sits at a workbench called a chair. The blowpipe is placed across the arms of the chair, which are tilted downward away from the gaffer, and is gently rotated during the completion period. The most important tool the gaffer uses at this stage is the pucellas, a tong-like instrument more often called a tool. (Click chair use to view an illustration of these processes; click "chair" used for modern day art glass production to see a modern example of a chair in use by a Canadian glassblower. [Photo courtesy of Bill Lockhart]) As the blowpipe is rotated the tool is sometimes used to narrow the neck of the bottle in preparation for finishing (completing the neck and mouth). Shears resembling tin snips are sometimes used to cut the plastic metal - for example, glass to be made into handles. At this stage the bottle is ready for the final manipulations of finishing...
Before either a free-blown or mold-blown bottle can be removed from the blowpipe some arrangement must be made to hold it during the finishing of the neck and lip. The holding process is properly called empontilling. Until around the mid-1800s the prevalent method was to take a separate rod or blowpipe tipped with hot glass and stick it to the bottom of the bottle. With the pontil holding the bottle, the blowpipe used for the development of the bottle could be removed to allow finishing... (Click empontilling and cracking off to see an illustration of these processes.)
By far the best, and as a result the most popular, method of severing the blowpipe from the bottle is a process known as wetting off. Wetting off is merely marking with a wet wooden paddle around the neck of the hot bottle where it is attached to the blowpipe. The cold water weakens the glass in the desired spot and a sharp tap by the gaffer breaks the bottle free from the blowpipe. Another popular method of severing the blowpipe from the bottle is by cutting the neck with shears... (Munsey 1970)
At this point in the glassblowing process the bottle is now "finished," which is usually the application and/or manipulation of glass at the bore/throat of the bottle to form a lip and/or collar of some type. Finishing and many related issues, including wetting or cracking-off (an example pictured to the right on a mold-blown bottle), are covered in depth on the main Bottle Finishes & Closures page and will not be extensively covered here. The primary physical characteristics of a free-blown bottle are found on the Bottle Body Characteristics & Mold Seams page.
One of the better books covering the process of blowing bottles and glass, with scores of pictures, was Grace Kendrick's (1968) "The Mouth-Blown Bottle." For an in-depth coverage of all aspects of glassmaking, including glass mixing, annealing, tools, furnaces, and glassblowing see Frank Kulasiewicz's (1974) "Glassblowing" which is an excellent source of information.
Empontilling: A pontil mark is a variable size and type of scar left on the base of a bottle by a pontil rod. A typical pontil rod or "punte" ("punty") was a long (4-6 feet) rod which was securely attached to the base of the just blown hot bottle. The rod had to be long enough so that the heat transference from the extremely hot (2000°+ F.) bottle did not reach the hands of the pontil rod holder. A pontil rod held the bottle during the steps in the bottle blowing process where the blowpipe is removed (cracked-off) from the bottle and that break-off point is "finished", i.e., the lip or finish is completed. Once the bottle is "finished", the pontil rod is sharply tapped which breaks it free of the bottle. The base of a bottle which was held with a pontil rod will almost always retain some evidence of the pontil rod attachment.
The following description of this process is from an 1865 patent (U. S. Patent #51,058) for an "Improved Clamping-Punty" - a patent for one of many improved grasping devices which replaced the pontil rod and were a much quicker method of holding a bottle by its base for finishing. It is the most succinct period description of the use of a pontil rod the author has run across. As discussed later, various non-fusing, bottle base grasping tools (snap or snap-case tools) were already in use by glassmakers in the U.S. by the early 1850s (if not a bit before) to some degree and were dominant by the time of this patent was granted in November 1865; a patent for the refinement of such tools not for the concept itself:
In the manufacture of glass bottles great difficulty has been experienced in holding the bottles in a proper manner for finishing the necks. The common mode heretofore employed has been to use a straight bar or rod of iron with a head or ball upon one end, to which, when it is dipped into the melted glass, a quantity of glass adheres. While in a semi-fluid or plastic state, and while the bottle is also in a plastic state, immediately after being withdrawn from the mold, the glass upon the rod or punty is brought in contact with the base or bottom of the bottle and immediately it adheres thereto, and the glass soon chilled, the bottle is made fast to the punty, so that the operator may finish the neck of the bottle in any desired form.
It will be recollected that during the process of uniting the punty to the bottle the bottle is in a plastic or flexible state in consequence of the heat it still retains after having been withdrawn from the mold, thus rendering it liable to get out of shape. Another objection to the old method is that when the bottle is completed the portion of the glass adhering or connecting the bottle to the punty is broken by a sudden jar by the operator, which leaves a rough place on the bottom of the bottle. By our invention we obviate all the difficulty attending the old method for finishing the necks of bottles.
Pontil rods and the resultant pontil scars go back to antiquity, having been used for bottle making as early as Roman times (McKearin 1941). All of the different pontil scars noted below are usually (but not exclusively) found on American made utilitarian bottles that date to or before the American Civil War (mid-1860s or earlier). Pontil scars on all types of "utilitarian bottles" (discussed below) became ever increasingly unusual as the 1860s progressed and largely disappeared by the late 1860s or early 1870s as various "snap" or snap case tools dominated the task of grasping the hot bottle for finishing (the snap case is covered later on this page).
For example, this author in 2015 inspected examples of a large majority of the wide array of bottle types recovered from the S. S. Bertrand, which sank in the Missouri River on the present day DeSoto National Wildlife Refuge (IA.) in April 1865, observing that a large majority of the bottles/bottle types were not pontil scarred. These bottles were undoubtedly made by a dozen or more different glass makers in the Eastern U.S. In addition, the bottles from the S. S. Republic, which sunk off the eastern U. S. coast later in 1865, also showed that a large majority of the bottles were not pontil scared (Ellen Gerth pers. comm. 2010). And finally, in 2022 this author inspected examples of numerous types of bottles recovered from the S. S. Arabia, which also sank in the Missouri River just upstream from Kansas City, MO. in September 1856. A distinct majority of the bottles were pontil scarred although a significant number were not varying widely depending on the bottle type. Even within a specific bottle type - some of which appeared to have been blown in the same mold - some examples were pontil scarred but others were not. This author speculates that in those instances, some (older?) glass blowers continued to use of the older methods while others (maybe younger?) switched to using the newer grasping snap tools for holding the bottle while finishing. (This subject is discussed where pertinent and useful for bottle type dating in the Bottle Typing (Typology) & Diagnostic Shapes pages within this website.)
|
The following outlines the basic types of pontil scars and how they were formed. For much more information consult the Pontil Marks or Scars page. |
 Glass
tipped Pontil: This type pontil scar was formed by the use of a solid iron bar as the
pontil rod. One slightly widened end of the bar was tipped with
molten glass then applied and fused to the base of the bottle. A glass tipped pontil rod made
contact with most or all of the bottle base within the confines of the
diameter of the pontil rod tip. Click
HERE to view an illustration of a glass tipped pontil in action. Glass tipped pontil scars can be
found on a virtually any type of bottle made in the US from the beginning
of glassmaking in the New World and actually dates back to antiquity (Jones &
Sullivan 1989:45).
Glass
tipped Pontil: This type pontil scar was formed by the use of a solid iron bar as the
pontil rod. One slightly widened end of the bar was tipped with
molten glass then applied and fused to the base of the bottle. A glass tipped pontil rod made
contact with most or all of the bottle base within the confines of the
diameter of the pontil rod tip. Click
HERE to view an illustration of a glass tipped pontil in action. Glass tipped pontil scars can be
found on a virtually any type of bottle made in the US from the beginning
of glassmaking in the New World and actually dates back to antiquity (Jones &
Sullivan 1989:45).
When the rod was broken free of the bottle, a generally round but fragmented scar was left behind on the base of the bottle. This is usually manifested primarily by an assortment of glass fragments protruding above the base of the bottle. In addition, the rod would usually take with it some small glass fragments from the base of the bottle leaving a scar which is a round scattering of "bumps and gouges" without a distinctly unmarred center - like the blowpipe pontil scar described below. Click on the picture to the left to see an enlarged version of a typical glass-tipped pontil scar that shows the detail better. (Click sauce bottle to view a picture of the entire bottle.) The glass tipped pontil scars are usually about the same diameter of the orifice or upper neck of the bottle - like the blowpipe pontil scar which is discussed next - but for reasons unknown (unlike the blowpipe pontil scar which is explained next). For more information click glass-tipped pontil.
 Blowpipe
("Open") Pontil: This type of pontil mark - which was also called the "ring pontil"
- was formed when a hollow blowpipe was used
as the pontil rod, is at least as common on American made bottles as the glass tipped pontil mark
(Boow 1991).
The use of a blowpipe doubling as a pontil rod dates back at least to the
mid-18th century in Europe (McKearin 1970). This was likely done
to both save on the number of tools used by the glass blower and to save
time. Blowpipe pontil scars were likely formed by two slightly
different processes which would each be indistinguishable on the finished bottle:
Blowpipe
("Open") Pontil: This type of pontil mark - which was also called the "ring pontil"
- was formed when a hollow blowpipe was used
as the pontil rod, is at least as common on American made bottles as the glass tipped pontil mark
(Boow 1991).
The use of a blowpipe doubling as a pontil rod dates back at least to the
mid-18th century in Europe (McKearin 1970). This was likely done
to both save on the number of tools used by the glass blower and to save
time. Blowpipe pontil scars were likely formed by two slightly
different processes which would each be indistinguishable on the finished bottle:
Click HERE to view an illustration of a blowpipe pontil in action. When a blowpipe was used as a pontil, it left behind a distinctive ring shaped scar that is usually sharp edged, round to slightly oval, with a hollow in the middle that is roughly the size of the bottles orifice (circumstantial proof that one blowpipe was usually used for both blowing and empontilling). The picture to the above right shows a very distinct, protruding, and sharp blowpipe pontil on a calabash shaped flask that was made by a New Jersey glassworks for Samuel Huffsey, a Philadelphian merchant in the early to mid-1850s (McKearin & Wilson 1978). Click HERE to view a picture of this entire bottle. For more information click blowpipe pontil.
 Sand Pontil: The
sand pontil scar was also a common method of empontilling a bottle for
finishing, though somewhat less common on American made bottles than the other three
primary methods described here.
This mark was formed when the hot glass on the tip of an iron pontil rod
with a flared end was dipped in sand (or glass chips) prior to application to the bottle
base. The sand was apparently intended to keep the pontil rod from
adhering too closely to the bottle, facilitating easier removal.
However, a
larger connecting surface at the end of the pontil rod was necessary with
this method in order to ensure an adequate adherence to the bottle base
(Jones 1971). The picture to the left is of an English made spirits
bottle with a typically diffuse sand pontil, which are the multitude of small
scattered specks outlining a rough circle within the middle portion of the base.
Click
HERE
to view the entire bottle. Click
sand pontil base to view another
picture of a sand pontil on the base of a ca. 1850s American made liquor bottle. For more information click
sand pontil.
Sand Pontil: The
sand pontil scar was also a common method of empontilling a bottle for
finishing, though somewhat less common on American made bottles than the other three
primary methods described here.
This mark was formed when the hot glass on the tip of an iron pontil rod
with a flared end was dipped in sand (or glass chips) prior to application to the bottle
base. The sand was apparently intended to keep the pontil rod from
adhering too closely to the bottle, facilitating easier removal.
However, a
larger connecting surface at the end of the pontil rod was necessary with
this method in order to ensure an adequate adherence to the bottle base
(Jones 1971). The picture to the left is of an English made spirits
bottle with a typically diffuse sand pontil, which are the multitude of small
scattered specks outlining a rough circle within the middle portion of the base.
Click
HERE
to view the entire bottle. Click
sand pontil base to view another
picture of a sand pontil on the base of a ca. 1850s American made liquor bottle. For more information click
sand pontil.
 Bare Iron Pontil:
This
type of
pontil mark is the result
of using a bare iron pontil rod with an appropriate shaped tip or head which was
heated red hot and directly applied and fused to the base of the bottle to
be held. There was no glass added (like a glass tipped iron pontil rod) or
remaining (like using the blowpipe for a pontil) on the iron tip of this
type pontil rod. Click
HERE to view an illustration of a bare iron pontil attached to a
bottle base. Like the other pontil rod types, this one was probably
removed by sharply tapping the rod near the attachment point. The
iron deposits which form the iron pontil mark are very small fragments or
residue from the tip of the bare iron pontil rod itself. The picture
to right is a particularly distinct iron pontil mark with ample residual
iron left imbedded in the bottle base. Click
HERE
to see a picture of the entire bottle which were referred to in glass
maker catalogs as a "Gothic peppersauce" due to the ornate panels on the
sides of the bottle (Whitall Tatum & Co. 1880). For much more
information click
iron pontil.
Bare Iron Pontil:
This
type of
pontil mark is the result
of using a bare iron pontil rod with an appropriate shaped tip or head which was
heated red hot and directly applied and fused to the base of the bottle to
be held. There was no glass added (like a glass tipped iron pontil rod) or
remaining (like using the blowpipe for a pontil) on the iron tip of this
type pontil rod. Click
HERE to view an illustration of a bare iron pontil attached to a
bottle base. Like the other pontil rod types, this one was probably
removed by sharply tapping the rod near the attachment point. The
iron deposits which form the iron pontil mark are very small fragments or
residue from the tip of the bare iron pontil rod itself. The picture
to right is a particularly distinct iron pontil mark with ample residual
iron left imbedded in the bottle base. Click
HERE
to see a picture of the entire bottle which were referred to in glass
maker catalogs as a "Gothic peppersauce" due to the ornate panels on the
sides of the bottle (Whitall Tatum & Co. 1880). For much more
information click
iron pontil.
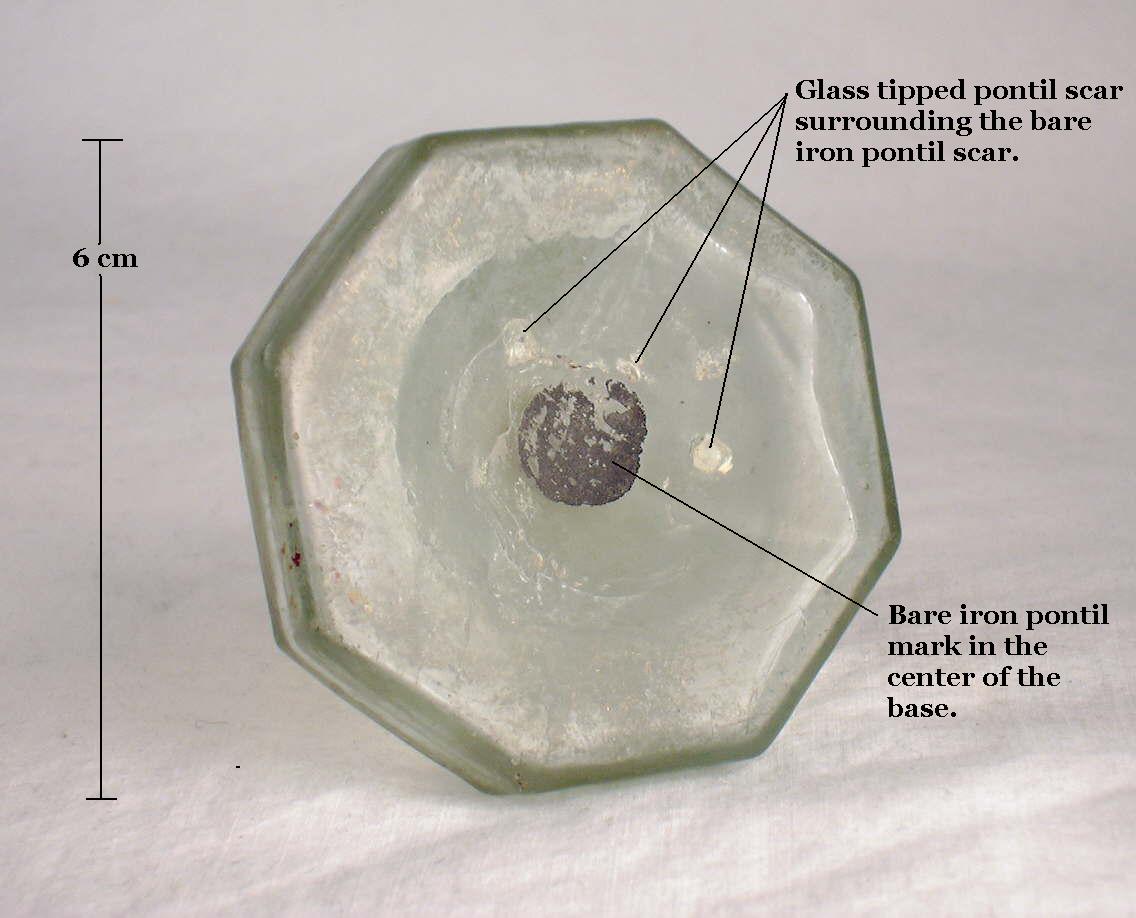 "Combination" Pontil: Occasionally
found are bottles which appear to have two types of pontil
scars on the base. For lack of any previously defined term, it is
being called here a
"combination" pontil scar. Only a small minority of pontil
scarred bottles have "combination" pontil scars. The bottle pictured to the left has an
obvious bare iron pontil mark surrounded by a distinct glass tipped pontil
scar (click on picture to enlarge for detail). Click
umbrella ink
to view a picture of the entire bottle.
"Combination" Pontil: Occasionally
found are bottles which appear to have two types of pontil
scars on the base. For lack of any previously defined term, it is
being called here a
"combination" pontil scar. Only a small minority of pontil
scarred bottles have "combination" pontil scars. The bottle pictured to the left has an
obvious bare iron pontil mark surrounded by a distinct glass tipped pontil
scar (click on picture to enlarge for detail). Click
umbrella ink
to view a picture of the entire bottle.
The reasons for this phenomena are unknown since the bottle only needed to be held by one rod for finishing. The most likely answer is that the center of the glass tipped pontil rod fused to the hot base of the bottle leaving behind the iron oxide typical of a iron pontil scar along with scattered fragments of glass typical of a glass tipped pontil scar. There is at least one other combination pontil variation; for more information click combination pontil.

 Snap-case
& Sabot: The sabot and snap case were
innovative and possibly revolutionary tools
that replaced the pontil rod almost entirely
during the 1850s and to mid-1860s (Scoville 1948; Munsey 1970; Innes 1976; McKearin
& Wilson 1978). Many different designs of
these tools were used though the tool illustrated to the right
would be typical of the general snap case design. (Click on each picture to
enlarge to a better quality version.)
Snap-case
& Sabot: The sabot and snap case were
innovative and possibly revolutionary tools
that replaced the pontil rod almost entirely
during the 1850s and to mid-1860s (Scoville 1948; Munsey 1970; Innes 1976; McKearin
& Wilson 1978). Many different designs of
these tools were used though the tool illustrated to the right
would be typical of the general snap case design. (Click on each picture to
enlarge to a better quality version.)
Instead of affixing a pontil rod in some fashion to the base of the hot, now molded bottle (as described above) the handler (or servitor) used one of these non-empontilling tools to hold the bottle. These tools usually left little or no markings on the bottle base or sides. Sometimes a bottle will appear to have the surface texture of the body sides indented or roughed up by the tool or the sides slightly flattened by over-compression. It is usually difficult or impossible to conclusively differentiate the subtle markings of a snap case or sabot from the array of possible mouth-blown mold or glass making imperfections.
The sabot (also called a "spring cradle") was the earliest version of a non-empontilling (i.e., non-bottle scarring) bottle holding tool and was developed in Europe possibly as early as the 1697, though probably not much used until the early 19th century (McKearin & Wilson 1978; Van den Bossche 2001). This four-pronged tool was sized to closely fit the diameter of the base and lower sides of the bottle with different sized sabots apparently necessary for different diameter bottles. The sabot likely made its way to the U.S. by the mid-1850s (Toulouse 1968). An illustration of the sabot can be found in the book Antique Glass Bottles - Their History and Evolution (1500-1850) by Willy Van de Bossche (2001) which is still widely available.
However, the sabot was likely quickly replaced by the more versatile and easy to use snap case tool which could hold different diameter bottles due to moveable and/or interchangeable parts (McKearin & Wilson 1978). A snap case was also known simply as a "snap" or as a "spring punte." A common snap case tool had a center post which cupped the base of the bottle and at least two bars or flanges that grasped the sides of the bottle. The three separate pieces were held together by a tubular sheath which when pushed up towards the bottle "snapped" closed onto the sides and base (see illustrations above). A collateral benefit of the snap case is that it more securely held the hot bottle than any of the other methods allowing for the development of more sophisticated finishing tools (Deiss 1981).
Various types of snap case tools were used in the manufacture of mouth-blown bottles up until semi-automatic and automatic bottle machines effectively ended mouth-blown production and the need for such tools. An example of a relatively early patent (November 1865) for an "Improved Clamping-Punty" is viewable at the following link: U. S. Patent #51,058. This particular tool had a long handle with a spring on the inside which (apparently) opened and closed a "conical ring" at the business end of the tool. An 1884 patent granted to Joseph B. Wilson for a "Clamp for Holding Bottles" is available by clicking Patent No. 294,946 which illustrates another version of an adjustable snap-case tool and a description of how it worked (U. S. Patent Office 1884a).
For more information on the subject of snap case tools, consult the Bottle Bases page.
|
For more information on the
subject of pontil marks & snap case tools, |
Mold-Blown Manufacturing (and related)
Introduction
 This
section deals with mouth-blown bottles that were not fully free-blown, but
instead manufactured by processes where the bottle shape was formed
substantially or entirely by some type of single or multiple part containment
mold. (An example of a "two-piece" mold from a 1906 glassmakers catalog is
shown below left.) This section also discusses
various other mouth-blown bottle manufacturing methods, some of which (like
finishing) were also used with
the free-blown methods noted above.
This
section deals with mouth-blown bottles that were not fully free-blown, but
instead manufactured by processes where the bottle shape was formed
substantially or entirely by some type of single or multiple part containment
mold. (An example of a "two-piece" mold from a 1906 glassmakers catalog is
shown below left.) This section also discusses
various other mouth-blown bottle manufacturing methods, some of which (like
finishing) were also used with
the free-blown methods noted above.
To quote from Munsey (1970) once again, the following is additional molding specific information that notes the additional steps necessary in addition to the bottle blowing description noted in the free-blown section above (the following would be the fourth paragraph in the Munsey excerpt above):
If the bottle is to be blown in a mold, the gaffer receives the blowpipe with the gather on it from the servitor and stands in position over the specific mold to be used. He then lowers the parison into the open mold. If the mold is other than a dip or one-piece mold an apprentice will assist by opening and closing the parts of the mold at appropriate times. After the parison has been lowered into the mold, the gaffer blows steadily into the blowpipe until he feels resistance which signals him that the hot glass has assumed completely the shape of the mold. He immediately ceases blowing and after the mold is opened he removes the bottle from the mold, ready for finishing... (Munsey 1970) (Click molding a mouth-blown bottle to see an illustration of the described process.)
 One of the more concise descriptions of
the operation and work allocation within a typical late 19th to early 20th
century glass blowing "shop" producing mouth-blown molded bottles is found in
the book Machinery and Labor (Barnett 1926).
The following is quoted from the introduction to Chapter III, which is entitled
"The Introduction of Semi-Automatic Bottle Machinery" (pages 65-66):
One of the more concise descriptions of
the operation and work allocation within a typical late 19th to early 20th
century glass blowing "shop" producing mouth-blown molded bottles is found in
the book Machinery and Labor (Barnett 1926).
The following is quoted from the introduction to Chapter III, which is entitled
"The Introduction of Semi-Automatic Bottle Machinery" (pages 65-66):
The manufacture of bottles and jars by the method of mold blowing is carried on by working units known as "shops." In each of these there are seven persons - three skilled workmen and four boys. Two of the men blow and the third finishes. The blower takes a lump of glass from the pot or tank on his pipe, rolls and partially blows it. The mold tender, a boy, opens an iron mold and the blower lowers the glass into the mold. The mold having been closed, the blower inflates the glass to fill the mold. The pipe is cracked off from the bottle or jar, which is then carried by another boy - known as the "snapping-up boy" - to the finisher, who shapes with tools the neck and lip of the bottle. The third boy - the "carrying-in boy" - carries the ware to the annealing lehr. A "cleaning-off boy" cleans the blow pipes of the blowers in preparation for re-use. Variations in this arrangement are found. In making some kinds of bottles, for example, a gathering boy gathers the glass for the blower, but the rules of the union have severely restricted this form of the division of labor except on very heavy ware. (Barnett 1926)
The number of people involved in the organization of a "shop" was variable. The great 1908 image to the above right is from a West Virginia glass factory and shows a gaffer (blower) at work to the far left with his crew. This was also another typical mouth-blown shop crew working at the mold itself and included the mold tender boy (lower right) with a set of "tongs" in his right hand, the gatherer (behind gaffer) with the next gob of glass for the gaffer on a second blowpipe, and the "snapper up" (to the right standing) with a snap case tool in his left hand (Lewis Hine photo, Library of Congress). This crew may have also included one or all of the other workers noted in the above description (finishers, carrying-in boy, cleaning-off boy) but were not included in the image. The caption to the photo is: "Glass Blower and Mold Boy. Boy has 4 1/2 hours of this at a stretch, then an hour's rest and 4 1/2 more: cramped position. Day shift one week: night shift next. Grafton, W. Va. Location: Grafton, West Virginia" (Library of Congress).
|
The following link is to an amazing early 20th century film clip of a mouth-blown "shop" blowing bottles. It shows two gaffers and one mold boy in smooth and efficient action. The gaffer makes the gather from the glass pot/tank in the background, rolls and pre-forms the parison on the marver (table to the left), then quickly drops the parison into the mold which the mold boy efficiently snaps shut. The gaffer quickly inflates the bottle and efficiently bursts off the blowpipe while pulling the blowpipe away from the mold (this is very interesting to observe and shows that shearing or cracking off wasn't always used or necessary). The mold boy then removes the bottle from the mold with tongs while the gaffer knocks off the residual glass from the end of the blowpipe and then moves back to the glass pot/tank to make another gather. The second gaffer is doing all of this on a staggered timing sequence with the first gaffer which allows the team ("shop") to produce a bottle about every 20 seconds! Film clip is compliments of the Owens-Illinois Glass Company. (Many thanks to Phil Perry, engineer with that company.) |
The following is a loosely organized collection of information designed to orient a user in the various methods and equipment used for producing mouth-blown molded bottles. Most of the information found here is an abbreviated version of what is found in more detailed form on other pages; links to those pages are provided in each of the subsections.
 The large majority of bottles produced
within the time span covered by this website (early 1800s to the mid-20th century) were
produced in some type of metal mold (e.g., brass, iron, and later steel) though molds were
also made of various woods, ceramic, fired clay, clay lined wood, soapstone, and
likely other materials (Atwater 1893; Jones 1967; Lohmann 1972; Van den Bossche 2001).
One source noted that the changeover from cut brass molds to cast iron molds
occurred in England - and likely in the U.S. also - during the 1820s to 1830s (Bown
& Addams 2015). Molds could range from the most simple - a dip mold which could just be a bucket
or dug out hole in the floor of the glassworks (illustrated below on an old
trade card) - to the elaborate full
sized molds
with as many as 9 different mold sections (Toulouse 1969b). Molds
increased the production of bottles greatly since less skills and labor were needed to produce
a bottle with a mold than for a
free-blown bottle. While forming the
shape of the bottle, molds leave behind diagnostic "bread crumbs" that provide
information on the manufacturing techniques used which often allow help
facilitate age estimating of a bottle produced
(Kendrick 1968; Munsey 1970). An example of a "two-piece" iron mold from a
1906 glassmakers catalog is shown to the left.
The large majority of bottles produced
within the time span covered by this website (early 1800s to the mid-20th century) were
produced in some type of metal mold (e.g., brass, iron, and later steel) though molds were
also made of various woods, ceramic, fired clay, clay lined wood, soapstone, and
likely other materials (Atwater 1893; Jones 1967; Lohmann 1972; Van den Bossche 2001).
One source noted that the changeover from cut brass molds to cast iron molds
occurred in England - and likely in the U.S. also - during the 1820s to 1830s (Bown
& Addams 2015). Molds could range from the most simple - a dip mold which could just be a bucket
or dug out hole in the floor of the glassworks (illustrated below on an old
trade card) - to the elaborate full
sized molds
with as many as 9 different mold sections (Toulouse 1969b). Molds
increased the production of bottles greatly since less skills and labor were needed to produce
a bottle with a mold than for a
free-blown bottle. While forming the
shape of the bottle, molds leave behind diagnostic "bread crumbs" that provide
information on the manufacturing techniques used which often allow help
facilitate age estimating of a bottle produced
(Kendrick 1968; Munsey 1970). An example of a "two-piece" iron mold from a
1906 glassmakers catalog is shown to the left.
 Dip
molds:
The dip mold is a step up
technologically from
simple hand tool and
marver
manipulated free-blowing in the manufacture of bottles and was used for various
types of glass manufacturing back into antiquity, beginning long before the era
covered by this website. A dip mold is a simple open top mold that was
used to gain uniformity and consistency (and likely increased production) in the
shaping of the bottle body and base. A simple one-piece round bottle dip
mold is illustrated to the right showing its open top and the slight narrowing
taper from top to bottom necessary for the removal of the inflated bottle
(Toulouse 1969b). Click
modern art glass dip molds to see examples of such which - though not used
for bottle production - are identical in form and function to those used for
bottles in the 19th century and before. (Photo courtesy of Bill Lockhart.)
The illustration below shows late 19th century glassblowers using dip molds
(middle & right in image) that look like buckets, to help form their bottles.
Some dip molds were simply appropriately shaped holes dug into the floor of the
glassworks (Kendrick 1968). Dip molds were also used for shapes other than
round, e.g., square, hexagonal, and octagonal (Jones 1986). A square dip
molded bottle is pictured below right.
Dip
molds:
The dip mold is a step up
technologically from
simple hand tool and
marver
manipulated free-blowing in the manufacture of bottles and was used for various
types of glass manufacturing back into antiquity, beginning long before the era
covered by this website. A dip mold is a simple open top mold that was
used to gain uniformity and consistency (and likely increased production) in the
shaping of the bottle body and base. A simple one-piece round bottle dip
mold is illustrated to the right showing its open top and the slight narrowing
taper from top to bottom necessary for the removal of the inflated bottle
(Toulouse 1969b). Click
modern art glass dip molds to see examples of such which - though not used
for bottle production - are identical in form and function to those used for
bottles in the 19th century and before. (Photo courtesy of Bill Lockhart.)
The illustration below shows late 19th century glassblowers using dip molds
(middle & right in image) that look like buckets, to help form their bottles.
Some dip molds were simply appropriately shaped holes dug into the floor of the
glassworks (Kendrick 1968). Dip molds were also used for shapes other than
round, e.g., square, hexagonal, and octagonal (Jones 1986). A square dip
molded bottle is pictured below right.
One-piece
round dip molds would leave no classic raised mold seams on
the body of the bottle (more below). Two (or more) piece, shoulder height, round dip molds
could potentially leave fitting joint induced vertical mold seams on the body of the bottle,
though this was likely uncommon. Multi-sided dip mold bottles may likely have been made from multi-part dip molds, though side seams showing the interface between the
mold pieces are rarely seen, being either masked by the corner edges of the
bottle or the bottle body was
fire polished
to the point that seams are unrecognizable. Dip molds were made of a
variety of materials including wood and harder materials like various metals,
clay, and clay lined wood. One piece clay molds were particularly common
during the early days of American bottle making (Atwater 1893). Wooden dip molds
- another common pre-19th
century mold material - had to
be kept wet in order to survive long the intense heat of molten glass.
This allowed steam to form in between the hot glass and mold surface causing the
glass to "ride" on the steam cushion making the evidence of molding often very
difficult to distinguish from free-blown bottles. Sometimes the expanding
parison would touch the sides of wooden mold before the cushion of steam
formed leaving ripples, though this feature may be impossible to positively
distinguish the use of a wooden mold versus glass imperfections (e.g., whittle
marks) caused in metal
molds for other reasons (Atwater 1893; Tooley 1953; Kendrick 1968; Toulouse 1969b; Jones & Sullivan 1989;
Van den Bossche 2001; Deiss pers. comm. 2005).
In use, the parison of glass on the end of the blowpipe is placed into the open top of the dip mold then blown and expanded to form the body of the bottle and giving the base at least its diameter and sometimes shape. One-piece dip molds could produce about any cross section bottle shape - round, square, octagonal - but had to be designed to be removed from the top (i.e., slightly wider at the shoulder than base). Two (or more) piece dip molds could theoretically have about any body shape (or even embossing) since the expanded bottle could be removed by opening the mold segments. Though a dip mold could be made of multiple sections, according to Jones (1986) they were not designed to be open and shut. Apparently, dip mold bottles were not body embossed and even base embossing is uncommon but not unknown (discussed below). Once the body and base were fully expanded within the mold, the bottle was removed and the shoulder and neck formed to shape with glassblower skills and hand tools like a free-blown bottle. The base may or may not receive hand forming to shape it, though in early dip molded bottles the base was usually pushed inwards with a tool to form a "push-up" or kick-up" (Jones 1986; Jones & Sullivan 1989).
The body of a round dip mold bottle will be very similar in appearance to a free-blown bottle except that a dip molded bottle will tend to be more symmetrical in shape with little or no distortion. This includes the general lack of the flaring of the extreme lower body and heel that free-blown bottles will often (but not always) have. (Click free-blown lower body to view a picture showing base flaring on an early to mid-19th century free-blown bottle.) The body of a dip molded bottle will not have embossing. Because of the surface contact with the mold the sides of a dip molded bottle body from the shoulder to the heel usually have some distinctly "ruffled" or vaguely textured look to it as compared to the glossy smooth, fire-polished surface of the shoulder and neck. This type of surface glass discontinuity is a diagnostic feature of dip molded bottles, though it is not always obvious or apparent (Toulouse 1969b; Jones 1986).
 Another
method to often differentiate a dip molded bottle from a similar free-blown
bottle is to look at the junction between the body and shoulder. Dip
molded bottles will very often have a distinct discontinuity in the glass
appearance right at the break between the the body and shoulder due to the
"blow-over" effect induced by the mold ending at that point; i.e., essentially an
"end-of-the-mold" mark. This shoulder discontinuity could also
be considered as a type of mold seam, though not with the typical look of
regular mold seams where two parts of a mold come together (Shafer 1969; Jones 1986;
Deiss pers. comm. 2005). This shoulder discontinuity is easier to
see than describe and is shown distinctly in the picture at the
following link -
dip mold bottle shoulder - which is a close-up of the bottle to the left. This is a dip molded ale or liquor bottle
with a glass-tipped pontil scar that dates from the 1850s. The picture
also shows the glass surface texture difference between the body (slightly
wavy or rough) and the shoulder (smooth and glossy). This shoulder mold seam or
discontinuity can be observed on any shape of bottle that could be dip molded,
though on square bottles it is not usually as obvious as
on a round bottle (empirical observations).
Another
method to often differentiate a dip molded bottle from a similar free-blown
bottle is to look at the junction between the body and shoulder. Dip
molded bottles will very often have a distinct discontinuity in the glass
appearance right at the break between the the body and shoulder due to the
"blow-over" effect induced by the mold ending at that point; i.e., essentially an
"end-of-the-mold" mark. This shoulder discontinuity could also
be considered as a type of mold seam, though not with the typical look of
regular mold seams where two parts of a mold come together (Shafer 1969; Jones 1986;
Deiss pers. comm. 2005). This shoulder discontinuity is easier to
see than describe and is shown distinctly in the picture at the
following link -
dip mold bottle shoulder - which is a close-up of the bottle to the left. This is a dip molded ale or liquor bottle
with a glass-tipped pontil scar that dates from the 1850s. The picture
also shows the glass surface texture difference between the body (slightly
wavy or rough) and the shoulder (smooth and glossy). This shoulder mold seam or
discontinuity can be observed on any shape of bottle that could be dip molded,
though on square bottles it is not usually as obvious as
on a round bottle (empirical observations).
 The square, dark olive green bottle to the
right is a
dip-molded "case" or "tapered" gin that dates from the mid-19th century
(Shafer 1969). This particular bottle
was produced near the end of the dip mold era as it is not
pontil scarred and was found in western Oregon in the context of
post-Civil
War era items. It is possibly American made, though that is impossible to
say for sure. The body of this bottle was dip molded in a square mold
and has a faintly embossed cross on the base of the bottle - sure proof of
molding. Click
base embossed cross to view a picture of the embossing. Base embossed dip molded bottles
are unusual though obviously occurring. Click
case gin shoulder close-up to view a close-up picture of the
interface between the crudely dip molded sides and the "free-blown" shoulder.
This bottle does not show much of a texture difference between the mold formed
sides and the free-blown shoulders. The distinct taper to these type bottles
helped facilitate removal from the mold.
The square, dark olive green bottle to the
right is a
dip-molded "case" or "tapered" gin that dates from the mid-19th century
(Shafer 1969). This particular bottle
was produced near the end of the dip mold era as it is not
pontil scarred and was found in western Oregon in the context of
post-Civil
War era items. It is possibly American made, though that is impossible to
say for sure. The body of this bottle was dip molded in a square mold
and has a faintly embossed cross on the base of the bottle - sure proof of
molding. Click
base embossed cross to view a picture of the embossing. Base embossed dip molded bottles
are unusual though obviously occurring. Click
case gin shoulder close-up to view a close-up picture of the
interface between the crudely dip molded sides and the "free-blown" shoulder.
This bottle does not show much of a texture difference between the mold formed
sides and the free-blown shoulders. The distinct taper to these type bottles
helped facilitate removal from the mold.
Dip molded bottles were produced during (and before) the earliest part of the era covered by this website, being used at least as early as the early 1700s for bottles. The most common date range for English dip molded bottles is from the 1730s to 1820s, when the three-piece Rickett's mold came into widespread use. From the 1820s on, dip molded bottles were gradually displaced by full-sized multi-part molds to virtual disappearance by about 1865 (Jones 1986; empirical observations). It is likely that American made products roughly followed these same time lines with an end date maybe as late as 1870 (Wilson & Wilson 1968).
Be aware that dip mold produced bottles will sometimes be mistaken for turn-molded bottles and vice versa. For example, all of the champagne bottles on the S. S. Bertrand, which sank in the Missouri River in April 1865, were noted by Switzer (1974) to be turn-molded. However, inspection of a large assortment of these bottles by this website's author in October 2015 found that they may have been mostly (or entirely...the entire assemblages could not be inspected) dip molded. The key to differentiation is that a turn-mold bottle will almost always have numerous, perfectly horizontal though often faint striations on the glass surface in many places on the body, shoulder and neck. A dip molded bottle will usually have a horizontal line or glass discontinuity at the should interface or break between the upper body and lower shoulder, but will not have multiple, perfectly horizontal lines anywhere else on the bottle body, shoulder, or neck. No pontil scarred examples of a turn-mold have ever been noted by the author, though are conceivably possible. For more information click dip molds.
 Pattern
molds: Any
bottle mold can have a
pattern (or lettering) inscribed or cut into its surface. As used on this website the term
"pattern
mold" is a variation of the dip mold in which a pattern was inscribed on the
inside surface of the mold. With bottles the pattern was typically vertical lines or ribs
which resulted in a
distinct ribbed pattern on the glass surface. This gave rise the alternative name
"rib mold." Some molds had diamond (cross-hatched) or spiral rib patterns
engraved on the surface; these molds would have been two piece molds which could
open to
facilitate removal of the parison
(McKearin & Wilson 1978). The "Pitkin" style flask pictured to the
right
was produced in a pattern mold and actually patterned twice during the
"half-post" blowing operation (covered below). Pattern molding was more
common with glassware, but was used frequently to produce bottles during the
first half of the 19th century (Jones & Sullivan 1989).
Pattern
molds: Any
bottle mold can have a
pattern (or lettering) inscribed or cut into its surface. As used on this website the term
"pattern
mold" is a variation of the dip mold in which a pattern was inscribed on the
inside surface of the mold. With bottles the pattern was typically vertical lines or ribs
which resulted in a
distinct ribbed pattern on the glass surface. This gave rise the alternative name
"rib mold." Some molds had diamond (cross-hatched) or spiral rib patterns
engraved on the surface; these molds would have been two piece molds which could
open to
facilitate removal of the parison
(McKearin & Wilson 1978). The "Pitkin" style flask pictured to the
right
was produced in a pattern mold and actually patterned twice during the
"half-post" blowing operation (covered below). Pattern molding was more
common with glassware, but was used frequently to produce bottles during the
first half of the 19th century (Jones & Sullivan 1989).
Pattern molds were smaller than the finished bottle since the mold was used simply and primarily to impress a pattern on the glass surface, not to completely form the bottle base, body, shoulder, and/or neck. Once patterned, the bottle was removed from the mold and blown, expanded, and manipulated with tools in order to achieve the desired shape and size (Munsey 1970). The pattern on finished bottles is a series of variably subtle indentations and intervening humps which are typically more distinct towards the shoulder than towards the base. Pattern molded bottles will usually have the mold induced pattern covering the body and continuing from the sides "seamlessly" around the heel and onto the base (Kendrick 1968). Click pattern mold base to view a picture showing the pattern continuing on to the base of the bottle pictured to the right.
 Since
the bottle is only patterned and not completed formed by the mold, pattern molded bottles are really a variation of a
free-blown method described earlier. Because of
the post-patterning blowing of these type bottles, the adjective "expanded" is
often used to describe these bottles, i.e., "expanded vertical ribbing" like the
flask pictured to the right. Many or most pattern molded bottles had one pattern impressed
on them from one "dip" in the patterned mold. A feature of
pattern molded bottles is that the ribs are expanded (wider) on the body of the
bottle and drawn together at the shoulder/neck and base - a function of the post
pattern molding expansion. Many pattern molded bottles have ribs that are
swirled one direction or the other. This was caused by twisting the
bottle on the blowpipe while expanding (McKearin & Wilson 1978). Both of
the flasks pictured to the right (above and below) have swirled ribs indicating
being twisted while blown.
Since
the bottle is only patterned and not completed formed by the mold, pattern molded bottles are really a variation of a
free-blown method described earlier. Because of
the post-patterning blowing of these type bottles, the adjective "expanded" is
often used to describe these bottles, i.e., "expanded vertical ribbing" like the
flask pictured to the right. Many or most pattern molded bottles had one pattern impressed
on them from one "dip" in the patterned mold. A feature of
pattern molded bottles is that the ribs are expanded (wider) on the body of the
bottle and drawn together at the shoulder/neck and base - a function of the post
pattern molding expansion. Many pattern molded bottles have ribs that are
swirled one direction or the other. This was caused by twisting the
bottle on the blowpipe while expanding (McKearin & Wilson 1978). Both of
the flasks pictured to the right (above and below) have swirled ribs indicating
being twisted while blown.
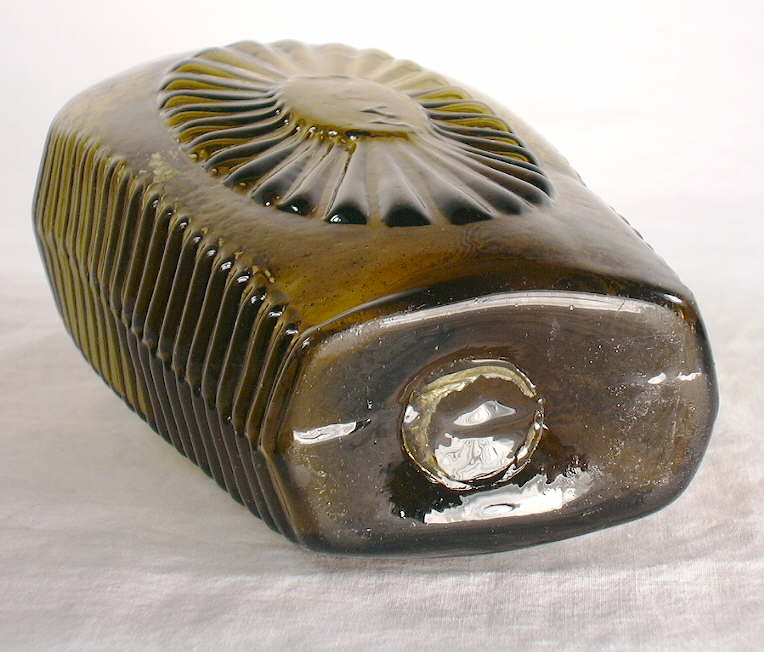
The bottle pictured to the left is an early American (late 18th to early 19th century) "nursing" bottle that was patterned once with a mold that had 19 engraved vertical ridges. This pattern would be referred to as having "19 vertical ribs." Click nursing bottle side view to see a close up of the side of this bottle showing the ribs somewhat more distinctly. This flask also has a glass-tipped pontil scar on the base. Whether these relatively common long flattened ovoid shaped flasks were used as nursing bottles is not known for sure, though that is what they are commonly referred to by collectors. These bottles were almost certainly used for liquor and a host of other liquid products (McKearin & Wilson 1978; Jones & Smith 1985). For more information click pattern molds.
 Half-post method:
A variation on the dip mold/pattern mold theme is
a method of bottle
production where the
gather is slightly
expanded then dipped
again into the glass pot to apply a second layer of glass over the initial
gather. This second
layer of glass typically covered the base and body portions of the first gather ending on the
upper shoulder. Postes was a French term for a gather of molten glass.
Thus the term
"half-post" for this method, though these bottles are well more that "half" covered by the second coating of glass (McKearin & Wilson 1978). The end
point for this second layer of glass is
indicated by a thickened ridge on the upper shoulder of the finished bottle.
Click
Pitkin shoulder to see a close-up picture (flask to the right) of this
ridge which shows just below the bottom of the neck and just above the pattern
mold ridges.
Half-post method:
A variation on the dip mold/pattern mold theme is
a method of bottle
production where the
gather is slightly
expanded then dipped
again into the glass pot to apply a second layer of glass over the initial
gather. This second
layer of glass typically covered the base and body portions of the first gather ending on the
upper shoulder. Postes was a French term for a gather of molten glass.
Thus the term
"half-post" for this method, though these bottles are well more that "half" covered by the second coating of glass (McKearin & Wilson 1978). The end
point for this second layer of glass is
indicated by a thickened ridge on the upper shoulder of the finished bottle.
Click
Pitkin shoulder to see a close-up picture (flask to the right) of this
ridge which shows just below the bottom of the neck and just above the pattern
mold ridges.
This method was used with regular shoulder height dip molds of various shapes and with pattern molds. Bottles produced by this method are often called "double-dipped" in collector jargon. Some early collectors incorrectly believed that the neck of these type bottles were "inserted" into the body of the bottle, a largely impossible feat. The term "inserted neck" still crops up occasionally however (McKearin & Wilson 1978). This production method is also often referred to as the "German half-post" method since it was believed to have originated in Germany (Munsey 1970).
 Certain types of half-post
produced bottles - like the "Pitkin" style flasks - were pattern molded after
the application of the second layer of glass. The flask could be patterned
once (like the nursing bottle pictured above left) or patterned twice giving a
"broken swirl" appearance to the bottle, which can often resemble
popcorn kernels. The forest green Pitkin style flask pictured
to the right above was produced by the half-post method;
note the horizontal ridge encircling the shoulder just below the neck.
This flask is single patterned on the upper 40% of the body and double
patterned on the lower 60% (click picture to enlarge). It was
most likely made at a New England glassworks between 1780 and 1820 and
would be referred as being "swirled to the right" (from the bottom of the body
upwards) which is the most common direction for swirling on New England
"Pitkins" (McKearin & Wilson 1978; Noordsy 2003). The light green "Pitkin"
style flask pictured in the pattern mold section above is another example of a
double patterned "broken swirl" flask from the same era. This is an unusual color for a New England
style "Pitkin" as most were blown in darker shades of green and
sometimes amber, e.g., olive green,
olive amber (Noordsy 2003).
Certain types of half-post
produced bottles - like the "Pitkin" style flasks - were pattern molded after
the application of the second layer of glass. The flask could be patterned
once (like the nursing bottle pictured above left) or patterned twice giving a
"broken swirl" appearance to the bottle, which can often resemble
popcorn kernels. The forest green Pitkin style flask pictured
to the right above was produced by the half-post method;
note the horizontal ridge encircling the shoulder just below the neck.
This flask is single patterned on the upper 40% of the body and double
patterned on the lower 60% (click picture to enlarge). It was
most likely made at a New England glassworks between 1780 and 1820 and
would be referred as being "swirled to the right" (from the bottom of the body
upwards) which is the most common direction for swirling on New England
"Pitkins" (McKearin & Wilson 1978; Noordsy 2003). The light green "Pitkin"
style flask pictured in the pattern mold section above is another example of a
double patterned "broken swirl" flask from the same era. This is an unusual color for a New England
style "Pitkin" as most were blown in darker shades of green and
sometimes amber, e.g., olive green,
olive amber (Noordsy 2003).
Not all Pitkin style flasks were made by the New England glass factories. Many were made by various glassworks a bit further to the west. The Pitkin style flask to the left was most likely produced at a Midwestern glass factory - Ohio or possibly western Pennsylvania (Pittsburgh) - during the first third of the 19th century. It's heritage is indicated by the brighter green color and the more circular shape of the bottle body. This flask was also twice pattern molded resulting in the "broken swirl" pattern (McKearin & Wilson 1978). Click Midwestern Pitkin close-up to view a close-up of this flask which distinctly shows the half-post "ridge" on the upper shoulder as well as the pattern mold ridges. This flask would be referred to as being "swirled to the left." Midwestern flasks were rarely if ever blown in olive-green or olive-amber and are most common in more vibrant greens, shades of amber, and aqua. For more information click half-post method.

Keyed & hinge molds: After the dip mold, the simple or "true" two-piece mold (typically hinged or fitted) is probably the oldest of the mold types dating back to at least the first century A.D. These molds could be shoulder height or full-height (like illustration to the left) and typically did not include any of the "finish" structure within the mold. The two-piece mold was in use for making bottles in the U.S. by at least 1809 as bottles with well established dates of manufacture are known to have been molded this way (McKearin 1970).
Most types of molded bottles are frequently referred to by collectors and archaeologists as having been produced in "two-piece" molds even though the mold was likely composed of more than two separate mold sections (covered later). The point being made by users of the term is that the body, shoulder, neck, and sometimes the base (as covered in this section) were molded by the two large and opposite sections of the mold. Though usually not totally accurate it is a reference that is unlikely to go away because of its pervasive use. In fact, many modern bottles were and are produced in molds that technically have up to nine different parts, but are still frequently referred to as having been produced in a two-piece mold (Toulouse 1969b).
|
|
The true two-piece "hinge mold" came in several different configurations which all had in common that there were truly only two molding sections to the mold, as illustrated above. The classic two-piece hinge mold produces a bottle with a base that was equally formed by each half of the mold, i.e., the base mold seam splits the base in to two equal, symmetrical portions. The mold was either hinged on the side as illustrated above (actual side hinged mold image below) or hinged on the bottom so that the mold opened like a waffle iron. Click bottom hinged mold to view an 1862 illustration of a bottom hinged, two-piece mold (Stein 1862).
 Although the location of the hinges (bottom or side) left no trace
on the bottles themselves, side hinged
two-piece molds (like illustrated above and pictured to the right) could only produce bottles
without any (or very little) molded indentation on the base, i.e., with flat bases like the
bottle base pictured to the left. Otherwise the mold would not open
properly once a bottle was blown in it. The ointment mold pictured
to the right, however, did produce a bottle with a
slight indentation to the base indicating that it was possible to produce at
least smaller bottles that did not have completely flat bases in side hinged
two-piece molds. It should also be noted that
many true two-piece molded bottles with pontil scars have slightly indented bases which are often
the result of the pontil rod pushing the flat and still hot, "plastic" base
inwards to help the bottle stand upright more easily with the otherwise protruding
pontil scar; the base was not necessarily molded that way. True
two-piece molds with distinctly indented bases (i.e., the indentation is
obviously molded and not pushed in by the pontil rod) had to have been base
hinged since the mold would not open properly with side hinges once a
bottle was blown into it.
Although the location of the hinges (bottom or side) left no trace
on the bottles themselves, side hinged
two-piece molds (like illustrated above and pictured to the right) could only produce bottles
without any (or very little) molded indentation on the base, i.e., with flat bases like the
bottle base pictured to the left. Otherwise the mold would not open
properly once a bottle was blown in it. The ointment mold pictured
to the right, however, did produce a bottle with a
slight indentation to the base indicating that it was possible to produce at
least smaller bottles that did not have completely flat bases in side hinged
two-piece molds. It should also be noted that
many true two-piece molded bottles with pontil scars have slightly indented bases which are often
the result of the pontil rod pushing the flat and still hot, "plastic" base
inwards to help the bottle stand upright more easily with the otherwise protruding
pontil scar; the base was not necessarily molded that way. True
two-piece molds with distinctly indented bases (i.e., the indentation is
obviously molded and not pushed in by the pontil rod) had to have been base
hinged since the mold would not open properly with side hinges once a
bottle was blown into it.
The bottle base pictured above left was blown in a mold that functioned similar to the illustration above with the base formed in equal halves by each side of the mold. The terms hinge mold base or snap case base are used by many to denote this configuration of the true-two piece mold. Though these terms are nominally accurate - the bottles were produced in a hinge mold and a snap case tool was often used - these terms or methods also pertain to virtually all mouth-blown bottles since most all molds were likely hinged and some type of snap case tool held all molded bottles that were not empontilled.
|
|
Another configuration of the true two-piece mold, which varied from the mold illustrated above, were molds in which the two halves of the base - as defined by the still continuous though not straight base seam - were not equal in size. As shown in the picture to the left (Dr. Hostetter's / Stomach Bitters) the entire depression area in the center of the base and bottom and right outer base edges were formed by a "flange" protruding from one mold half. The remaining outer perimeter area of the base (left and top portions of base in the image), outside of the depression area, was part of the other mold half which surrounded and accepted the "flange" from the other mold half when the mold halves were pressed closed. These type of asymmetric bases are often referred to as having been made in a "keyed mold" or as a "keyed" base or "key mold" base (McKearin & Wilson 1978). The utility of the "key" was in apparently allowing for a closer meshing and centering of the mold halves when brought together, similar to the post-bottom mold discussed later.
Other variations of the keyed mold type have a much less pronounced arching of the one side of the base into the other or have a squared off "notch" that has abrupt right angles instead of rounded arching. Click key mold base to view a picture of a ca. 1865-1875 patent medicine bottle with a more subtle rounded key mold base without a base depression. Click notched base to view a picture of an early American (1840s) pint liquor flask (Pittsburgh, PA.) that exhibits the "notched" or squared-off keyed base flange on the base. All these variations served the same function of centering the mold halves better.
Both of the basic styles of true two-piece mold bottles (straight and non-straight base mold seams) can be found with any of the four types of pontil scars overlaying the base mold seam, though the sand pontil is uncommonly seen on keyed bases. Pontil scars would provide date bracketing opportunities as discussed previously on this page, i.e., these bottles would very likely date between about 1810 and the early 1860s. All styles of true two-piece mold bottles largely disappeared by the mid 1870s allowing for a reliable dating end point for non-pontiled, hinge or keyed base bottles (Toulouse 1969b; Berge 1980; Jones & Sullivan 1989). The one notable exception to this dating is that round bottom or torpedo soda bottles continued to be produced in true two-piece molds until the early 20th century. Hinge mold bases can date back to at least 1810, but keyed bases appear to have originated in the late 1830s or early 1840s and disappeared by the early to mid-1870s (Farnsworth & Walthall 2011) allowing for a relatively reliable begin date for this type of base (Toulouse 1969b; McKearin & Wilson 1978). For more information click keyed & hinge molds.
 Post-bottom molds:
The
date or origin of this style of mold is unknown, though it was used in the U.S. at least as
early as the 1840s and as late as the early 1900s. It was the dominant
bottle mold type during the last third of the 19th century (Jones & Sullivan 1989;
McDougall 1990).
Post-bottom molds:
The
date or origin of this style of mold is unknown, though it was used in the U.S. at least as
early as the 1840s and as late as the early 1900s. It was the dominant
bottle mold type during the last third of the 19th century (Jones & Sullivan 1989;
McDougall 1990).
The post-bottom mold is actually a three (and sometimes more) part mold where the middle portion of the base is formed by a separate small plate or "post" with the neck, shoulder, body, heel, and outside edges of the base formed by the two side mold sections. Sometimes the finish was also partially or totally molded (i.e., the later tooled finish post-bottom molded bottles and most "ground top" fruit jars from 1858 on). See the ground top discussion on the Finish Types or Styles page for more information.
The illustration to the right shows the configuration of one type of post-bottom mold with the post an integral part of a larger base plate. In this illustration, the post itself is the only part of the larger base plate that makes contact with the bottle base. Click post-bottom mold to view an illustration of another type of post-bottom mold for which the post is actually a individual mold piece that is attached to the base hinge of the mold. As with the "key" or "notch" in the true two-piece molds discussed above, the function of the post was to orient and center the mold halves which would close around the outside diameter of the post (Toulouse 1969b). (Note: Like with the "true" two piece mold (hinge & key molds) noted above, these molds are also referred as simply a two piece mold even though there was at least a third base mold portion.)
|
Post-bottom mold produced bottle. The "post" seam is a result of a separate base mold section or plate. Bottle pictured is a Warner's Safe Tonic (Rochester, NY) - ca. 1879-1883 (Seeliger 1974). |
A typical and distinctly "seamed" post-bottom mold produced bottle is shown in the photograph to the left which is the base of a Warner's Safe Tonic (Rochester, NY) bottle that dates to between 1879 and 1883 (Seeliger 1974). The mold base plate or "post" produces a round mold seam centered on the base like that pictured. (The pictured base also has the initials A. & D. H. C. which stands for A & D. H. Chambers Glass Company (Pittsburgh, PA.) which was in business from 1843 through the mid to late 1880s (Toulouse 1971, Lockhart pers. comm. 2004).) Perpendicular to each side of the round post plate seam are straight mold seams which run to and around the heel of the bottle to become the side mold seams. This picture shows well the typical base appearance of a post-bottom mold produced bottle.
On a significant number of post-bottom mold produced bottles there is an apparent mold induced "edge" or mold seam at the upper edge of the heel that may appear identical to the heel seam produced by the cup-bottom mold discussed next. Some have called this a "cup-post base mold" because it has features of both mold types (Ayres 1980). However, any bottle with the mold seam proceeding around the heel and onto the bottle base to mesh with a round/oval mold seam within the confines of the base is still considered a post-bottom mold bottle regardless of the appearance of a seam around the upper heel. There is the possibility that some post-bottom molded bottles with an apparent mold seam on the upper heel are in fact a product of a hybrid mold type that had two moveable parts to the base plate: the regular round/oval post plate in the middle of the base and another circular plate surrounding that central post plate that meshed with the side halves of the mold and did leave a true cup-bottom mold type mold seam at the heel. Multi-part base plates are documented on the early Rickett's molds so there is some precedence to this notion (Jones & Sullivan 1989).
It is thought more likely that on a majority of bottles with this feature that it is a function of the interface of two mold pieces permanently attached together at that point - i.e., welded or bolted and perpendicular to each other. Specifically, each body half of the mold would have two pieces: one being the vertical body side section which extends down to the top of the heel where it would be permanently attached (welded/bolted) to the second part which was a flat horizontal plate with the "half-moon" cut-out for the post to fit in to. There would be the potential of a mold seam formed on the bottle by the intersection of these two immovable mold pieces, though it is not a mold seam in the classic sense which was caused by the interface of two movable mold parts. This conformation is not specifically described in the literature but is inferred from photographs of different molds showing this possibility (McKearin & McKearin 1941; Kendrick 1968; McKearin & Wilson 1978). Since the observed bottles also have an obvious post-bottom type base seam they would still be considered a post-bottom mold product and would follow the dating guidelines noted in the Bottle Type & Base Related Dating Notes on the Bottle Bases page.
In addition to the above variation possibility, there are several post-bottom mold variations or facts to be aware of, as described below:
 If the post
plate seam is not apparent on a bottle one is dealing
with, look very closely at the
heel to base transition area of the bottle. A post-bottom mold production is always indicated if the side
mold seams curl around the heel of the bottle and proceeds at all onto the base of the
bottle - even if the round/oval post plate seam is not obvious. The picture to
the right shows the distinct mold seams coming around the heel of the bottle
and disappearing at the edge of a molded depression in the center of the base.
The post plate mold seam is largely invisible because it forms the edge of the
depression, though it is slightly visible on the lower left side (click to
enlarge picture).
If the post
plate seam is not apparent on a bottle one is dealing
with, look very closely at the
heel to base transition area of the bottle. A post-bottom mold production is always indicated if the side
mold seams curl around the heel of the bottle and proceeds at all onto the base of the
bottle - even if the round/oval post plate seam is not obvious. The picture to
the right shows the distinct mold seams coming around the heel of the bottle
and disappearing at the edge of a molded depression in the center of the base.
The post plate mold seam is largely invisible because it forms the edge of the
depression, though it is slightly visible on the lower left side (click to
enlarge picture).Post-bottom molds were used to produce just about any type of bottles, with the majority of use of these molds made between the 1850s and the early 1890s. However, similar to so many other aspects of historic bottle dating, there are exceptions or variations based on the type or style of bottle and even bottle size. This is covered in the Bottle Type & Base Related Dating Notes section of the Bottle Bases page. For more information click post-bottom molds.

Cup- base molds: The origin of the cup-bottom mold (aka cup mold) is unknown, though they appear to have been used at least as early as 1850 (and likely 1840s) although pontiled scarred cup-bottom molded bottles are uncommon (McDougall 1990; Pastron & Hattori 1990). Empirical observations indicate that this was the dominant mold type for mouth-blown bottles from the late 1880s to the domination of bottle making by automatic bottle machines by the late 1910s. (Note: Most machine-made bottles were also produced in cup-bottom molds; see the machine-made section below.)
The cup-bottom mold was also at least a three-part mold where the third piece was a base plate which had an shallow depression that "cupped" and molded the entire base and the lower heel of the bottle, though on earlier items (1870s and earlier) it appears that the base plate was simply a flat piece of metal or even the floor of the glass works on which the two upper halves of the mold sat (Kendrick 1968; empirical observations). (Note: For the purposes of this website, bottle molds with a flat or lacking base plate are considered cup-bottom molds since they do not fit any of the other noted mold configurations.) The neck, shoulder, and entire body to the upper edge of the heel were formed by the two side mold sections which - unlike with a post-bottom mold - did not mold any of the actual base. Sometimes the finish was also partially or totally molded by the upper sides of a cup-bottom mold, particularly with tooled finish, cup-bottom mold produced bottles (the "improved" tooled finish) and most "ground top" canning jars. However, cup-bottom molded, mouth-blown fruit/canning jars are less common than post-bottom molded jars. (For machine-made jars cup-bottom molds were the norm.)
 At the upper edge of the heel there is usually a mold
line in evidence running around the circumference of the bottle. This line
indicates the interface between the lower edges of the side mold pieces and the
upper edge of the cup-bottom plate. From this mold line - called a "bottom
plate parting line" in the glassmaking world - the side mold seams branch off
perpendicular (Tooley 1953). Sometimes this heel mold seam is not obvious
or visible and appears integrated into the heel edge of the bottle, though
all cup-bottom molds had an interface of mold parts at the heel and the potential for a seam
there. The heel seam can also be non-existent on bottles from molds with
the previously noted flat, non-cupped mold base plate or no base plate at all,
i.e., simply the floor of the glass works (Kendrick 1968). This seems to
most commonly observed on the earlier cup-bottom mold produced bottles from the 1860s and
1870s which have a relatively sharp and almost non-existent heel (Kendrick
1968). Click
Smith & Davis druggist bottle base for an image of an early (ca. 1860)
druggist bottle with this feature.
At the upper edge of the heel there is usually a mold
line in evidence running around the circumference of the bottle. This line
indicates the interface between the lower edges of the side mold pieces and the
upper edge of the cup-bottom plate. From this mold line - called a "bottom
plate parting line" in the glassmaking world - the side mold seams branch off
perpendicular (Tooley 1953). Sometimes this heel mold seam is not obvious
or visible and appears integrated into the heel edge of the bottle, though
all cup-bottom molds had an interface of mold parts at the heel and the potential for a seam
there. The heel seam can also be non-existent on bottles from molds with
the previously noted flat, non-cupped mold base plate or no base plate at all,
i.e., simply the floor of the glass works (Kendrick 1968). This seems to
most commonly observed on the earlier cup-bottom mold produced bottles from the 1860s and
1870s which have a relatively sharp and almost non-existent heel (Kendrick
1968). Click
Smith & Davis druggist bottle base for an image of an early (ca. 1860)
druggist bottle with this feature.
The illustration to the above right shows an idealized example of what a cup-bottom mold could look like. As shown, the base and lower heel were formed by a depression cut into the base plate of the mold. It was likely that the base plates were smaller than that illustrated, which is is based on mold replicas produced for and pictured in a Western Collector Magazine article by Dr. Julian Toulouse in the late 1960s (Toulouse 1969b).
|
Cup-bottom mold produced bottle - no mold seams within the base. Bottle picture is a Cla-Wood Malt Tonic (Portland, OR.) - ca. 1906-1916 (White 1974). |
The image above is of an actual iron cup-bottom mold used for mouth-blown bottle production which most likely dates from the late 19th century. This shows that indeed the entire base plate was smaller than the Toulouse replica, though the actual cup-bottom forming portion was a relatively small, elevated portion within which the "cup" indentation base form was machined. This elevated portion would greatly assist in the easy centering of the mold halves when they were shut around the parison, much like the post of the post-bottom mold. It is not known for sure what type bottle this mold produced, though it appears to be a small medicine or ink bottle as the bottle the mold produced was only 1.25" in diameter and the height of the mold is only 3.25". There appears to be no finish form engraved into the upper neck portion of the mold (i.e., the bottle would not have an "improved tooled finish") implying that the finish was either applied and tooled or tooled to shape with the refired glass just below the blowpipe removal point. Click on the following links to view more images of this mold: view of the mold in the closed position; mold disassembled; close-up of the hinge mechanism. (Photos courtesy of Chuck Flexser.)
The bottle pictured to the right is a Cla-Wood Malt Tonic (Clarke-Woodward Drug Co., Portland, Oregon) produced in a cup-bottom mold during the early 20th century. Click Cla-Wood Malt Tonic to view a picture of this entire bottle. As shown in the picture there are no mold related seams on the base of a cup-bottom molded bottle which sets this type of molded base apart from the hinge, keyed, and post-bottom molded bottles which do have base mold seams. There can be embossing on the base (e.g., makers marks, mold marks, product names) as well as mold air venting marks during the later end of mouth-blown bottle production (base air venting virtually always places a mouth-blown bottle after 1900).
Cup-bottom molds were used to produce just about any type or class of mouth-blown bottles, with the majority of use made between the late 1880s and late 1910s when automatic machines dominated the bottle making market. As noted, cup-bottom molds continued to be the mold type of choice on automatic bottle machines also (Toulouse 1969b). However, similar to so many other aspects of historic bottle dating, there are exceptions or variations based on the type or style and even size of bottle. For more information click cup-bottom molds.
 Three-piece
molds:
In conjunction with the true two-piece mold, one of the earliest mold types to
be used in the U.S. was the "three-piece mold" which was likely first used in
about 1814, patented by the Henry Ricketts
(Bristol, England) in 1821 or 1822, and likely adapted into the U.S. by the 1830s
(McKearin & Wilson 1978; Hume 1991).
Although earlier versions of a three-piece mold may pre-date the Rickett's mold
it is not certain. If so, they would have been essentially a dip mold with
two shoulder mold sections added. Rickett's patent added several other
features, including hinged shoulder parts and foot controls for opening and
closing the mold, both of which were significant improvements in efficiency
(Jones 1986). The
Rickett's mold also consisted of at least four parts - two opposing
shoulder parts, dip mold body portion, and a moveable base plate which could
be changed to achieve different base configurations or for different embossing.
This was likely the
first
plate mold
(McKearin & Wilson 1978; Jones 1983). Most true Rickett's produced bottles
are embossed on the base with H. RICKETT'S & CO. GLASS WORKS BRISTOL, date between 1821 and the 1850s, and usually have a
sand
pontil scar.
Three-piece
molds:
In conjunction with the true two-piece mold, one of the earliest mold types to
be used in the U.S. was the "three-piece mold" which was likely first used in
about 1814, patented by the Henry Ricketts
(Bristol, England) in 1821 or 1822, and likely adapted into the U.S. by the 1830s
(McKearin & Wilson 1978; Hume 1991).
Although earlier versions of a three-piece mold may pre-date the Rickett's mold
it is not certain. If so, they would have been essentially a dip mold with
two shoulder mold sections added. Rickett's patent added several other
features, including hinged shoulder parts and foot controls for opening and
closing the mold, both of which were significant improvements in efficiency
(Jones 1986). The
Rickett's mold also consisted of at least four parts - two opposing
shoulder parts, dip mold body portion, and a moveable base plate which could
be changed to achieve different base configurations or for different embossing.
This was likely the
first
plate mold
(McKearin & Wilson 1978; Jones 1983). Most true Rickett's produced bottles
are embossed on the base with H. RICKETT'S & CO. GLASS WORKS BRISTOL, date between 1821 and the 1850s, and usually have a
sand
pontil scar.
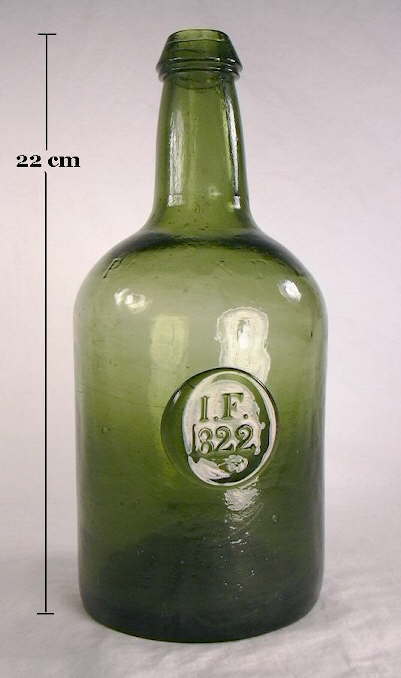 Morphologically,
typical three-piece mold bottles have a horizontal mold seam encircling the
bottle where the shoulder and body meet and two mold seams on opposite sides
running vertically from the shoulder seam, up the shoulder, and variably up the
neck and/or finish. Click on the picture of a light amethyst liquor bottle
below to view a close-up of the very distinct mold seams on the shoulder and
neck of this later mouth-blown, three-piece mold liquor bottle dating from the
early 20th century (1900-1910). Consider the location of the mold seams in
the picture with the conformation of the three-piece mold in the illustration
above. Three-piece mold liquor bottles were a popular style and
manufacturing method into the early 20th century and are shown in catalogs
dating until at least 1908 (Illinois Glass Co. 1908).
Morphologically,
typical three-piece mold bottles have a horizontal mold seam encircling the
bottle where the shoulder and body meet and two mold seams on opposite sides
running vertically from the shoulder seam, up the shoulder, and variably up the
neck and/or finish. Click on the picture of a light amethyst liquor bottle
below to view a close-up of the very distinct mold seams on the shoulder and
neck of this later mouth-blown, three-piece mold liquor bottle dating from the
early 20th century (1900-1910). Consider the location of the mold seams in
the picture with the conformation of the three-piece mold in the illustration
above. Three-piece mold liquor bottles were a popular style and
manufacturing method into the early 20th century and are shown in catalogs
dating until at least 1908 (Illinois Glass Co. 1908).
 The vertical body side seams on earlier (1821 to about 1840) three-piece mold
bottles disappear right at the junction of the shoulder and neck (Jones 1986).
This is typical of the early Ricketts' bottles which were not molded above this
point; the neck instead being formed by glassblower manipulation. The
olive green bottle pictured to the left is an early sand pontiled
Ricketts' liquor bottle which is blob sealed and dated (1822). This bottle
is also embossed H. RICKETT'S & CO. GLASS WORKS BRISTOL on the base and PATENT on the shoulder. The
horizontal shoulder seam is faint but in evidence as well as the vertical
shoulder seams, which both terminate right at the neck-shoulder junction
indicating that the neck and finish were both formed by glassblower manipulation.
It should be noted that similar (though usually a bit taller and smaller in
diameter) three-piece molded cylindrical bottles with PATENT embossed on
the shoulder were widely made and used for spirits in the U. S. from the 1830s
to 1870s. Click
Tall, moderately slender bodied, straight neck "Patent" style spirits cylinder
(mid-19th century) for more information on these bottles.
The vertical body side seams on earlier (1821 to about 1840) three-piece mold
bottles disappear right at the junction of the shoulder and neck (Jones 1986).
This is typical of the early Ricketts' bottles which were not molded above this
point; the neck instead being formed by glassblower manipulation. The
olive green bottle pictured to the left is an early sand pontiled
Ricketts' liquor bottle which is blob sealed and dated (1822). This bottle
is also embossed H. RICKETT'S & CO. GLASS WORKS BRISTOL on the base and PATENT on the shoulder. The
horizontal shoulder seam is faint but in evidence as well as the vertical
shoulder seams, which both terminate right at the neck-shoulder junction
indicating that the neck and finish were both formed by glassblower manipulation.
It should be noted that similar (though usually a bit taller and smaller in
diameter) three-piece molded cylindrical bottles with PATENT embossed on
the shoulder were widely made and used for spirits in the U. S. from the 1830s
to 1870s. Click
Tall, moderately slender bodied, straight neck "Patent" style spirits cylinder
(mid-19th century) for more information on these bottles.
Later vertical side mold seams end immediately below the base of the applied finish (about 1840 through the 1880s). The latest three-piece mold bottles (1890s into the 1910s) have tooled finishes with the vertical side mold seams ending on the upper portion of the neck or in the finish itself, i.e., end just beyond where the finishing tool ended. The liquor bottle pictured to the left has the side mold seams ending within the finish if one looks closely making this an "improved" tooled finish. Three-piece mold bottles are not embossed on the body of the bottle, though as noted above may have embossing on the shoulder (common), neck (unusual), and/or base (also common).
Most bottles which are commonly referred to as three-piece molds were actually made in a mold that had a fourth base plate piece, like noted above for the Rickett's bottles. Use of a separate base piece probably made construction of the mold easier. Although most three-piece mold bottles actually had four mold parts, referring to them as "three-piece" molds will continue due to its ubiquitous use over the years, similar to the two-piece mold discussed earlier. To suggest changing the name would be confusing and unproductive since most people understand what is being referred to (Toulouse 1969b). The four-piece mold is a variation of the three-piece mold with two body halves instead of one; this mold type is discussed in the green box below. For more information click three-piece molds.
 Three part molds with three body-mold
leaves: This mold type is a distinct variation of the above described three-piece mold
with a very different orientation to the mold portions. Instead of the
single body mold and split (two-part) shoulder/neck molds like described for the typical
three-piece mold bottle, this three-piece mold is composed of three more or less
equal sized pieces that fit together along vertical seams, i.e., three equal mold
'leaves' that produce a bottle that has three vertical mold seams from heel to
upper neck or finish. One of the mold pieces was typically attached
permanently to the base plate, with the other two hinged so that they could open
to insert a gather and to extract the blown item. The base can be either
of a 'post-bottom' or 'cup-bottom' design (McKearin & McKearin 1941; Toulouse 1969b).
This type mold is referred to as a three-piece 'leaf' mold on this website.
Three part molds with three body-mold
leaves: This mold type is a distinct variation of the above described three-piece mold
with a very different orientation to the mold portions. Instead of the
single body mold and split (two-part) shoulder/neck molds like described for the typical
three-piece mold bottle, this three-piece mold is composed of three more or less
equal sized pieces that fit together along vertical seams, i.e., three equal mold
'leaves' that produce a bottle that has three vertical mold seams from heel to
upper neck or finish. One of the mold pieces was typically attached
permanently to the base plate, with the other two hinged so that they could open
to insert a gather and to extract the blown item. The base can be either
of a 'post-bottom' or 'cup-bottom' design (McKearin & McKearin 1941; Toulouse 1969b).
This type mold is referred to as a three-piece 'leaf' mold on this website.
 This
early method of molding was used primarily to produce what is termed 'blown three mold glass'
and other highly decorative type bottles. A benefit of this mold
conformation was the ability to engrave much more elaborate designs than could
be produced with conventional two-piece molds; designs that covered the entire
bottle right up to the mold seams (McKearin & McKearin 1941; Toulouse
1969b). A typical example of an item produced in a three-piece 'leaf' mold is the late 19th century salt shaker pictured to
the right. It has three vertical mold seams from the heel to the roughly
cracked-off finish rim surface, and a cup-bottom mold conformation. One vertical seam can be
seen in the middle of the bottle; the other two vertical seams are not visible
but in the vicinity of where the lines point to in the picture. As this
picture shows, the mold engraved pattern is quite elaborate and integrates well
around the mold seams.
This
early method of molding was used primarily to produce what is termed 'blown three mold glass'
and other highly decorative type bottles. A benefit of this mold
conformation was the ability to engrave much more elaborate designs than could
be produced with conventional two-piece molds; designs that covered the entire
bottle right up to the mold seams (McKearin & McKearin 1941; Toulouse
1969b). A typical example of an item produced in a three-piece 'leaf' mold is the late 19th century salt shaker pictured to
the right. It has three vertical mold seams from the heel to the roughly
cracked-off finish rim surface, and a cup-bottom mold conformation. One vertical seam can be
seen in the middle of the bottle; the other two vertical seams are not visible
but in the vicinity of where the lines point to in the picture. As this
picture shows, the mold engraved pattern is quite elaborate and integrates well
around the mold seams.
Pictured to the left is a much earlier three-piece 'leaf' molded bottle. This early American bottle was produced by the Keene Marlboro Street Factory, Keene, NH. in the 1820s or 1830s and is classified as GIII-16 by McKearin & McKearin (1941). The three vertical mold seams on this bottle are also well disguised by the elaborate body pattern and are only obvious where a horizontal or diagonal line intersects the mold seam. For more information click three-piece 'leaf' mold.
For additional information, see the discussion of three-piece molds on the Bottle Bases page. Also, click on pages 578-579, pages 580-581 to view the section of Toulouse's 1969 article 'A Primer on Mold Seams' that deals with both types of three-piece mold formed bottles.
 Notes on
four-piece molds:
The term four-piece mold refers to a mold that has four main body parts - two
for the shoulder and neck (and sometimes extreme upper body) and two for the majority (or all) of the
body. Four-piece molded bottles are very similar to the three-piece molded
bottles in
that there is a horizontal seam on or just below the shoulder with the side
mold seams running vertically up the shoulder and neck from this horizontal
seam. However, four-piece mold bottles also have vertical body side
mold seams which run down from the shoulder seam to at least the heel of
the bottle. The picture to the left shows these shoulder/body seams.
Click
star base liquor bottle to see a picture of this entire bottle which
dates from the late 1870s to mid 1880s (applied finish, no air venting). Notes on
four-piece molds:
The term four-piece mold refers to a mold that has four main body parts - two
for the shoulder and neck (and sometimes extreme upper body) and two for the majority (or all) of the
body. Four-piece molded bottles are very similar to the three-piece molded
bottles in
that there is a horizontal seam on or just below the shoulder with the side
mold seams running vertically up the shoulder and neck from this horizontal
seam. However, four-piece mold bottles also have vertical body side
mold seams which run down from the shoulder seam to at least the heel of
the bottle. The picture to the left shows these shoulder/body seams.
Click
star base liquor bottle to see a picture of this entire bottle which
dates from the late 1870s to mid 1880s (applied finish, no air venting).Virtually all four-piece molds also had a fifth base plate portion which could have the conformation of either a "post-bottom" or a "cup-bottom." Review the descriptions for the post-bottom molded and cup-bottom molded bases on the Bottle Bases page for more information. If one is dealing with just a fragment of the lower body and base of a four-piece mold bottle (utilizing either base plate type) it would be impossible to tell the difference between a four-piece and a two-piece molded bottle; one needs the shoulder intact to differentiate. The utility of four mold sections was to allow for the changing of various mold portions ) to either add embossing to the body of the bottle or to change the capacity of the bottle without the need for creating an entirely new mold. This type mold is called a "sectional plate mold" for that reason. Four-piece molds like this are fairly common with liquor cylinders, beer bottles, and Hutchinson and crown finish sodas made between the early 1880s and mid 1910s (Elliot & Gould 1988). A four-piece mold Hutchinson soda bottle from 1900-1910 is pictured at this link: The Dalles Soda Works. |
 Turn-molds:
The
turn-mold is more of a process than a mold and could be produced in about
any full height cylindrical bottle producing mold. All turn-mold bottles (also called a "paste mold") are
round in cross section since no other shape could be turned or twisted in the
mold to produce the seamless body distinctive of these bottles. The inside
surface of a (usually iron) turn-mold was coated with a "paste" of organic fiber
composed of resins and linseed oil boiled down to a gummy consistency.
This was brushed onto the hot mold, then dusted with fine sawdust (sometimes
even flour!) which upon subsequent baking formed a carbon lining on the inside.
These molds were also wetted between each blowing to extend the life of the
coating (Scholes 1952). Upon contact
with the very hot glass (on the end of the blowpipe) some of the water turned to steam. The steam formed a
cushion that the bottle "rode" on while the parison was expanded and rotated by
the glassblower. The following is from Skrabec (2007) and a brief
description of the materials and process:
Turn-molds:
The
turn-mold is more of a process than a mold and could be produced in about
any full height cylindrical bottle producing mold. All turn-mold bottles (also called a "paste mold") are
round in cross section since no other shape could be turned or twisted in the
mold to produce the seamless body distinctive of these bottles. The inside
surface of a (usually iron) turn-mold was coated with a "paste" of organic fiber
composed of resins and linseed oil boiled down to a gummy consistency.
This was brushed onto the hot mold, then dusted with fine sawdust (sometimes
even flour!) which upon subsequent baking formed a carbon lining on the inside.
These molds were also wetted between each blowing to extend the life of the
coating (Scholes 1952). Upon contact
with the very hot glass (on the end of the blowpipe) some of the water turned to steam. The steam formed a
cushion that the bottle "rode" on while the parison was expanded and rotated by
the glassblower. The following is from Skrabec (2007) and a brief
description of the materials and process:
Paste molding used thin cast-iron molds with a carbonaceous paste baked into the surface. The paste could be a simple mix of wax resin and sawdust. The mold was then saturated with water prior to blowing the glass. The blower then gathered molten glass to be blown. Once the gather was put in the mold, it was closed by the mold boy. The blower blew into the mold as he twirled the blowpipe. The wet surface contacting the hot glass formed a vapor layer (steam cushion), allowing the piece to be twirled and eliminating the mold line at the part.
The combination of the steam cushion and bottle rotation produced the distinctively smooth and polished glass surface of a turn-mold produced bottle; a characteristic not seen on other types of bottles with the exception of fire polished and/or free-blown items (Atwater 1893; Toulouse 1969b; Munsey 1970). Turn-mold bottles will, however, be very symmetrical and even proportioned throughout whereas free-blown bottles are not typically symmetrical (Jones & Sullivan 1989).
Very frequently the granular texture of the paste on the surface of the mold, the presence of foreign particles (sand or grit), and/or imperfections on the mold surface - in conjunction with the bottle rotation - caused the formation of concentric horizontal rings on the body of the bottle. It is known that some turn-molds were made of apple or cherry wood at the Whitney Glass Works (Glassboro, NJ) as late as the early 20th century (Lohmann 1972). Wooden molds would also be more likely to have uneven inside surfaces due to the effects of the extreme heat of blowing bottles and had a limited lifespan resulting in iron molds being the standard for virtually all bottle production (Scholes 1952). The picture above right is of a turn-of-the-century (19th to 20th that is) "hock" wine bottle that shows these rings, which are usually - but not always - apparent on turn-mold bottles. Because of the rotation of the bottle in the mold and the wetted paste coating, whittle marks (discussed earlier) are rarely if ever seen on turn-mold bottles (Toulouse 1969b; Munsey 1970). The brilliant blue bottle below left is a turn-mold beer bottle with an applied mineral finish dating from approximately 1885-1895. Click on the picture to enlarge it as it exhibits the faint concentric rings on the body/neck and high gloss surface consistent with its turn-mold heritage.
 Because of the rotation of the bottle in
the mold (not the opposite as the name "turn-mold" would suggest) embossing on the body of
the bottle was impossible; paper labeling or the occasional
blob seal was the only way to notify the
product purchaser of what product the bottle contained (Toulouse 1969a). A
very large majority of
turn-mold bottles have no embossing on the base, though some base embossed
examples are occasionally
observed. This would have entailed a
secondary molding base plate that replaced the original mold base
plate after the bottle was rotated in the mold but before it cooled/solidified
or a revolving base plate that spun with the bottle, most likely
immediately after detachment of the blowpipe (Toulouse 1971; Lockhart pers. comm. 2004).
In fact, William F. Modes (of Modes Glass Co.,
De Steiger Glass Co. and Streator Bottle
& Glass Co. fame) patented a "Mold for Blowing Turned Bottles" in 1887
which included such a revolving base plate feature. The following is quoted from that 1887
patent:
Because of the rotation of the bottle in
the mold (not the opposite as the name "turn-mold" would suggest) embossing on the body of
the bottle was impossible; paper labeling or the occasional
blob seal was the only way to notify the
product purchaser of what product the bottle contained (Toulouse 1969a). A
very large majority of
turn-mold bottles have no embossing on the base, though some base embossed
examples are occasionally
observed. This would have entailed a
secondary molding base plate that replaced the original mold base
plate after the bottle was rotated in the mold but before it cooled/solidified
or a revolving base plate that spun with the bottle, most likely
immediately after detachment of the blowpipe (Toulouse 1971; Lockhart pers. comm. 2004).
In fact, William F. Modes (of Modes Glass Co.,
De Steiger Glass Co. and Streator Bottle
& Glass Co. fame) patented a "Mold for Blowing Turned Bottles" in 1887
which included such a revolving base plate feature. The following is quoted from that 1887
patent:
"The nature of the present invention consists, first, in a rotary bottom which has formed in relief on its top portion the characters or marks which are to be imprinted in the bottom of the bottle which is to be turned in the mold to give it an exterior finish. It is old to turn bottles in molds for polishing purposes, and it is old to imprint characters on the bottom of bottles which are not turned in the mold; but I claim to be the first one to employ a rotary bottom in the mold." (U. S. Patent Office 1887)
To view the entire patent click on the following link: Patent #364,840 - "Mold for Blowing Turned Bottles" - June 14, 1887. Toulouse (1971) noted in his write-up for Streator that "...by 1885, with 60 blowers (many of them German "twister blowers")..."; twister blowers being glassblowers producing turn-mold bottles. In any event, base embossed turn-mold bottles are very uncommon the most abundant observed by this author are German made turn-mold beer bottles base embossed variably with H. HEYE and BREMEN and/or HAMBURG . Click on the following links to see images of an H. HEYE base embossed beer/ale bottle that dates from the late 19th century most likely: full view of the bottle (9.5" tall); close-up of the neck and crudely applied mineral type finish that is typically seen on beer bottles of a late 19th century manufacture; base view showing the embossing BREMEN / H. HEYE / HAMBURG with typical rotation marks on the body of the bottle in evidence. These German produced bottles are quite commonly encountered in the American West (empirical observations) and probably throughout North America. In addition, some Japanese turn-mold beer bottles have been observed with base embossing. This is described on the Miscellaneous & Foreign Bottle page in the Chinese/Asian Bottles section.
It is possible that many or most of the turn-mold bottles sold by American glass makers were imported and not actually produced in the U.S. May Jones, in the first volume of her nine volume bottle history booklets called collectively the The Bottle Trail, quotes a Owens-Illinois Company provided history that notes that their predecessor (Illinois Glass Company) imported the turn-mold bottles they sold and that "...in the United States, turn mold bottles were not generally produced" (Illinois Glass Company 1903, 1908, 1911; Jones 1961). As noted earlier, however, it is known that the Whitney Glass Works (Glassboro, NJ) - a large producer of bottles - did manufacture turn-mold bottles with wooden molds as late as the early 20th century (Lohmann 1972). The Fairmount Glass Works (Indianapolis, IN.) listed "turn mold round brandy" bottles in their 1910 catalog, though the actual source is unknown. In addition, De Steiger Glass Co. also produced turn-mold bottles, likely some with base embossing as William Modes was a major factor in this company. Toulouse (1969b) notes that patents were granted in the U.S. in the 1870s and 1880s for "seamless bottles." And finally, an 1892 letterhead for the Streator Bottle & Glass Company (Streator, IL.) noted that they were "Manufacturers of Turned-Mould Bottles and Lettered Ware in Amber and Light Green Colors" indicating probable U. S. manufacture during the era of high popularity for these type bottles. So it appears certain that turn-mold bottles were produced in the U.S. Although likely that a large percentage of turn-mold bottles were not made in the U.S., they are ubiquitous on U.S. historic sites that date from the 1880s through about World War I. It should be be noted that some turn-mold bottles have been possibly identified as early as the 1850s and 1860s (Switzer 1974; Beaudet 1981; Boow 1991; Gerth 2006) although some of these may have been free-blown and/or dip molded bottles which are often mistaken for turn-molds due to an absence mold seams. For more information click turn-molded bottles to view the pertinent section of the Bottle Body Characteristics & Mold Seams page.
 Plates & plate molds: The
term plate is used to describe an
interchangeable, typically iron or brass engraved plate (picture below) which was used in a bottle mold
to produce different embossing patterns for "different" bottles blown in the same
mold. By
simply taking out one engraved plate and replacing it with another differently
engraved plate, the same mold could produce many different uniquely embossed bottles of the same shape and design.
The bottles pictured to the right are a
pair of 1880s San Francisco, CA. whiskey cylinders - Wolters Bros. & Co. (left)
and Thos. Taylor & Co. (right) - that were blown in the same
plate mold. This is confirmed by a base mold flaw (small mold
surface line) that is present on the base of both bottles in the exact same
spot. The plates were inserted in the mold within the area outlined by the
embossed box. Click
Wolters Bros. embossing for a close-up of the embossing of the left bottle.
The lettering inside the box is from the plate, but the box itself was engraved
into the mold surface (Thomas 2002).
Plates & plate molds: The
term plate is used to describe an
interchangeable, typically iron or brass engraved plate (picture below) which was used in a bottle mold
to produce different embossing patterns for "different" bottles blown in the same
mold. By
simply taking out one engraved plate and replacing it with another differently
engraved plate, the same mold could produce many different uniquely embossed bottles of the same shape and design.
The bottles pictured to the right are a
pair of 1880s San Francisco, CA. whiskey cylinders - Wolters Bros. & Co. (left)
and Thos. Taylor & Co. (right) - that were blown in the same
plate mold. This is confirmed by a base mold flaw (small mold
surface line) that is present on the base of both bottles in the exact same
spot. The plates were inserted in the mold within the area outlined by the
embossed box. Click
Wolters Bros. embossing for a close-up of the embossing of the left bottle.
The lettering inside the box is from the plate, but the box itself was engraved
into the mold surface (Thomas 2002).
These type bottles are commonly called a "slug plate" by collectors (somewhat redundant since the term "slug" is used to refer to a piece of metal), but are more properly called simply a "plate" or "lettered plate" and bottles from this type mold referred to as having been produced in a "plate mold" (Whitall, Tatum & Co. 1880; Munsey 1970; Jones & Sullivan 1989). Plate molds were significant in that it made all kinds of proprietary bottles (i.e., uniquely embossed for a specific customer) affordable since an expensive private mold did not have to be made for each customer (Whitall, Tatum & Co. 1880a; Munsey 1970; Elliott & Gould 1988). On square or rectangular bottles the plates are sometimes called a "panel" or "panels" (White 1978).
 Plates
and plate molds seem to have originated in England with the Rickett's mold in
1821 where the base plate could be exchanged for another and the base embossing
changed. In the U.S., the earliest obvious plate molded bottles appear to
be soda/mineral water bottles like the example pictured to the left where the plate is located in the middle of
one side. These type and shape of rectangular plate molded soda/mineral
water bottles appeared first in the late 1840s, were particularly
popular throughout the U.S. during the 1850s and 1860s, and were gradually
phased out in favor of other designs in the 1870s (McKearin & Wilson 1978; Markota 1994). The
pictured blue-green mineral water bottle is
an early California Gold Rush era soda/mineral water bottle (Lynde &
Putnam)
from San Francisco, CA. that dates from between 1850 to 1851 (Markota
1994).
Plates
and plate molds seem to have originated in England with the Rickett's mold in
1821 where the base plate could be exchanged for another and the base embossing
changed. In the U.S., the earliest obvious plate molded bottles appear to
be soda/mineral water bottles like the example pictured to the left where the plate is located in the middle of
one side. These type and shape of rectangular plate molded soda/mineral
water bottles appeared first in the late 1840s, were particularly
popular throughout the U.S. during the 1850s and 1860s, and were gradually
phased out in favor of other designs in the 1870s (McKearin & Wilson 1978; Markota 1994). The
pictured blue-green mineral water bottle is
an early California Gold Rush era soda/mineral water bottle (Lynde &
Putnam)
from San Francisco, CA. that dates from between 1850 to 1851 (Markota
1994).
 The picture to the
right is of a cast iron mold plate dating from between 1915 and 1918. It
was used for producing prescription bottles for a Detroit (MI.) pharmacy which
was in listed in the Detroit business directories only during that time period
(Mark Hawkins pers. comm. 2006).
Engraving is reversed of course so that the embossing will read correctly on the
finished bottle. This plate would have fit in a mold that produced bottles
similar to the
Blumauer & Heubner druggist bottle
discussed on the "Bottle Bodies & Molds Seams" page. Note the air venting holes incorporated into the
embossing pattern (click to enlarge photo) which is an indication of a
post-1900 heritage. (Air venting is covered next.) For more
information click
plates and plate molds.
The picture to the
right is of a cast iron mold plate dating from between 1915 and 1918. It
was used for producing prescription bottles for a Detroit (MI.) pharmacy which
was in listed in the Detroit business directories only during that time period
(Mark Hawkins pers. comm. 2006).
Engraving is reversed of course so that the embossing will read correctly on the
finished bottle. This plate would have fit in a mold that produced bottles
similar to the
Blumauer & Heubner druggist bottle
discussed on the "Bottle Bodies & Molds Seams" page. Note the air venting holes incorporated into the
embossing pattern (click to enlarge photo) which is an indication of a
post-1900 heritage. (Air venting is covered next.) For more
information click
plates and plate molds.
 Mold air
venting: Mold air venting was at least a minor revolutionary
progression in bottle making technology during the last quarter of the
19th century. The first (or one of the first) patents for this
technology was granted to Charles D. Fox in April of 1874. Click
Charles D. Fox's patent #149,461 to view this patent.
It appears, however, that the technique was not widely applied to bottle
making until the very early 1880s (Thomas 2002). Air venting
consists of small holes drilled into the forming part of the mold - often
in conjunction with other mold air passage chambers (see the Fox patent
linked above) - which allow for the air inside the mold to escape quicker
while the bottle was being blown and expanded. This resulted in
bottles that meshed closer to the inside shape of the mold with less glass
distortion and sharper design features and embossing. It also likely
increased production since bottle inflation would conceivably go faster
with venting. Prior to venting, the hot gases inside the mold had to
escape from either the top of the mold (where the blowpipe was attached to
the neck portion of the
parison) or the gaps where the mold sections came together (Elliott &
Gould 1988).
Mold air
venting: Mold air venting was at least a minor revolutionary
progression in bottle making technology during the last quarter of the
19th century. The first (or one of the first) patents for this
technology was granted to Charles D. Fox in April of 1874. Click
Charles D. Fox's patent #149,461 to view this patent.
It appears, however, that the technique was not widely applied to bottle
making until the very early 1880s (Thomas 2002). Air venting
consists of small holes drilled into the forming part of the mold - often
in conjunction with other mold air passage chambers (see the Fox patent
linked above) - which allow for the air inside the mold to escape quicker
while the bottle was being blown and expanded. This resulted in
bottles that meshed closer to the inside shape of the mold with less glass
distortion and sharper design features and embossing. It also likely
increased production since bottle inflation would conceivably go faster
with venting. Prior to venting, the hot gases inside the mold had to
escape from either the top of the mold (where the blowpipe was attached to
the neck portion of the
parison) or the gaps where the mold sections came together (Elliott &
Gould 1988).
The evidence of air venting is very small marks or bumps that can be found just about anywhere on the surface of a bottle but are most common on the shoulders, body corners, base, mold seams, and sometimes incorporated within the embossing pattern itself as indicated by the embossing plate pictured above. Air vent bumps are typically about the size or slightly smaller than a pin-head - though are sometimes bigger - and appear like embossed "period" dots as they are formed by the glass just slightly extruding into the vent holes when being blown. Air venting occurs on both mouth-blown and machine-made bottles. Machine-made bottle molds sometimes have the vent holes incorporated into the joints of the mold, or otherwise obscurely located, making them sometimes difficult or impossible to detect. Often machine-made bottle mold venting marks are obvious like on this mid-20th century Coca-Cola® bottle which has copious numbers of venting marks scattered throughout the body and embossing pattern; only a few of the vent marks are pointed out in the image (Kendrick 1967, 1968).
 Some of the earliest venting marks were a larger, paper-punch sized "blob"
on the shoulder of the bottle, which has been referred to as "open
venting" (Elliott & Gould 1988). Click
"blob" type air venting to view a close-up picture of this
unusual venting method on an early to mid-1880s
Peruvian Bitters bottle (San Francisco, CA). According to
Thomas (1977), this style is believed to have been used during a narrow time
frame of about 1883 to 1885 for at least Western American made bottles.
Air venting was first placed in the shoulder area of bottle molds as this
is the last place the bottle "fills" in the mold since bottles inflate or
expand from the base upwards when blown (Kendrick 1967).
Some of the earliest venting marks were a larger, paper-punch sized "blob"
on the shoulder of the bottle, which has been referred to as "open
venting" (Elliott & Gould 1988). Click
"blob" type air venting to view a close-up picture of this
unusual venting method on an early to mid-1880s
Peruvian Bitters bottle (San Francisco, CA). According to
Thomas (1977), this style is believed to have been used during a narrow time
frame of about 1883 to 1885 for at least Western American made bottles.
Air venting was first placed in the shoulder area of bottle molds as this
is the last place the bottle "fills" in the mold since bottles inflate or
expand from the base upwards when blown (Kendrick 1967).
Most vent marks are small and hard to photograph - but easy to illustrate. Click on the photo to the above right to view an illustration of the same bottle showing where the actual air venting marks are located. The places to look on a bottle in order of likely probability of being present are as follows: shoulders, vertical body edges (square or rectangular bottles), other locations on the body, on the base (click on base venting for an illustration), incorporated into the side mold seam (often hard to determine), or integrated within the embossing pattern (variably noticeable). Air venting marks can often be found in several or even all of these locations on the same bottle. The picture to the left shows distinct venting marks on the shoulder of a three-piece mold liquor bottle that dates from the early 20th century. Two spaced bumps on the shoulder on each mold half are a very common orientation for venting marks on cylindrical bottles. For more information click mold air venting.
Note: One of the best sources for information
on molds, molding, and mold seams is in Dr. Julian Toulouse's often cited two-part article entitled
"A Primer on Mold Seams" in the November and December 1969 editions of the long
defunct magazine The Western Collector (Toulouse 1969b). Faster
loading "jpg" scans of
this milestone work are available by clicking on the following links - 2
magazine pages per scan, 20 magazine pages in total. The page numbers listed here coincide with the pages of
the original articles. (Articles reproduced courtesy of Dr. Cecil Munsey.)
Part I -
pages 526-527,
pages 528-529,
pages 530-531,
pages 532-533,
pages 534-535.
Part II -
pages 578-579,
pages 580-581,
pages 582-583,
pages 584-585,
pages 586-587.
A better quality version of the entire article, which is more suitable for printing, is available by clicking on the following link: " Primer on Mold Seams" - Parts I & II This file (pdf) is viewable in Adobe Acrobat Reader.
|
For more information on molds and
molding, |
Return to the top of this page.
At some point in the production of all mouth-blown bottles, whether molded or free-blown, the fully expanded bottle must be removed from the blowpipe and the "finishing" of the bottle completed. Finishing is the glassmaking term for the completion of some type of lip or "finish" at the mouth of the bottle where the blowpipe was disconnected. That is the primary subject of this section, although the two main methods for removing the bottle from the blowpipe are covered first; both methods which result in primitive finishes.
|
NOTE: The author of this website has prepared a summary of the mouth-blown bottle finishing methods section on the Bottle Finishes & Closures page (which the following "Finishing" section is based on) which is available as a downloadable and printable (pdf) article entitled: "The Finishing Touch: A Primer on Mouth-blown Bottle Finishing Methods with an Emphasis on "Applied" vs. "Tooled" Finish Manufacturing." This copyrighted article by the websites author is pending publishing as part of a future Society for Historical Archaeology book on bottle and glass manufacturing but is being made available to users of this site as a free download. (It is 32 pages and full of illustrations.) |
Cracking-off, bursting-off, and shearing: Mouth-blown bottles were removed from the blowpipe via one of three primary methods: the cracking-off process, the bursting-off method, or by shearing (cutting) the neck off from the blowpipe. All of these methods of blowpipe detachment are usually indistinguishable from each other on the finished item since the vast majority of bottles received post blowpipe manipulation at the removal point (Munsey 1970).

|
Mechanical Cracking-Off Method One interesting variation of the "cracking-off" method is found in William F. Modes (of Modes Glass Company and Streator Bottle & Glass Company fame) 1887 patent for a "Mold for Blowing Turned Bottles." This patent included two significant innovations. The first was a rotating mold base plate which would allow for embossing on the base of a turn-mold bottle. The other dealt with an "...adjustable cutter placed at the top of the mold, whereby it, by the rotation of the glass in the mold, will so nearly sever the surplus material when the glass is soft that a little jar will break off the part to be removed. The means now employed for severing the surplus glass is a file kept wet with water, involving considerable labor as compared with my cutter, and the work is not so well done." While the bottle was rotated the "cutter" would score the glass at the desired ("adjustable") cracking-off point which was consummated with a sharp tap on the blow-pipe. This is one of the many innovations that gradually moved the process of bottle making inexorably towards full mechanization. To view the entire patent click on the following link: Patent #364,840 - "Mold for Blowing Turned Bottles" - June 14, 1887. |
Cracking-off ("cracked-off," "wetting off") is the process of applying a small amount of water, usually via a wet wooden paddle, or via a cold and/or wet piece of iron, to the point on the hot just blown bottle where the glassmaker wishes to remove it from the blowpipe. Applying water or cold/wet iron (compared to the very hot glass) weakens the glass at the point of application and all that is needed to sever the bottle from the blowpipe is a sharp tap on the blowpipe itself with one of the glassmaker's tools (U. S. Patent Office 1887; Kendrick 1968; Innes 1976). (Note: The box to the right describes a partial mechanical variation of this age-old technique.) The result of this process is a variably rough and sharp tubular end to the neck. (Click empontilling and cracking off to see an illustration of these processes.)
The picture above shows a non-fire polished, cracked-off finish on a 1850s era "scroll" flask which was classified as GIX-15 by McKearin & Wilson (1978). On some early American bottles - typically 1860s or before like the pictured flask - this was the rough though completed finish. Based on empirical observations, American-made bottles with this most cursory of finishes rarely date after the 1860s.
 The
bursting-off (aka "burst-off" or
blow-over) method results in a similar, roughly broken
off, unfinished appearance to the bore (image to the right below).
This process entailed the
blowing of a relatively large bubble in the glass just above the mold top (i.e.,
above the upper end of the bottle neck beyond the mold edge) which thinned the
glass sufficiently to allow the bubble to "burst" - with either a subtle twist
of the blowpipe and/or a larger puff of air from the blower (gaffer) - detaching
the blowpipe (Howard 1950). The bottle is then
removed from the mold via tongs or a metal (or wooden) rod stuck in the bore.
The
bursting-off (aka "burst-off" or
blow-over) method results in a similar, roughly broken
off, unfinished appearance to the bore (image to the right below).
This process entailed the
blowing of a relatively large bubble in the glass just above the mold top (i.e.,
above the upper end of the bottle neck beyond the mold edge) which thinned the
glass sufficiently to allow the bubble to "burst" - with either a subtle twist
of the blowpipe and/or a larger puff of air from the blower (gaffer) - detaching
the blowpipe (Howard 1950). The bottle is then
removed from the mold via tongs or a metal (or wooden) rod stuck in the bore.
Many bottles imported from Europe - particularly British made ink and small sauce bottles - can have this as the completed finish and can date as late as the 1920s (Wills 1974; Boow 1991). These finishes look very similar to the cracked-off finish but have some subtly differing characteristics as follows: the top surface of the finish is usually very jagged and sharp; the glass at the bore which forms the jagged top is distinctly thinner than the glass of the neck right below; there is no type of pontil mark on the base as these bottles were produced in a later era; and there is often - but not always - a "bulge" on the upper neck below the jagged finish which was a result of the glass expanding beyond the top surface of the mold (Kendrick 1968; Boow 1991). These type bottles are occasionally encountered on American historic archaeological sites. Most of the burst-off bottles seen today were relatively recently imported from England for the American collector market, though the bottles date from the late 19th to 1920s era (Wills 1974; Boow 1991). The image to the above left is an example of a burst-off finish on an English ink bottle made during the early 20th century. The burst-off finish was apparently uncommon on American made items (Jones & Sullivan 1989).
The burst-off method may have been commonly used to quickly detach the blowpipe in the U. S. though most of the bottles would have received post-molding work to produce a more refined finish. The link below is to an early 20th century film clip (probably American) of a mouth-blown "shop" blowing bottles. Of particular note here is that the gaffers in this shop are using the burst-off method to detach the blowpipe. Note that the gaffer quickly inflates the bottle and efficiently bursts off the blowpipe by pulling it skillfully away from the mold while twisting and/or snapping it abruptly. This film clip indicates that shearing or cracking off wasn't always used or necessary and that the burst-off method was possibly quite common. Although this film clip may have been done to show the quickness that blowers could achieve mouth-blowing bottles, it is likely that the bottle produced would normally have been finished further by hand and the burst-off "finish" not left as is. Film clip is compliments of the Owens-Illinois Glass Company (thanks to Phil Perry).
Early 20th century mouth-blown bottle making film clip.
Shearing was both a finish style and blowpipe detachment method produced by detaching the blowpipe from the bottle with some type of shears which typically resembled tin snips (Hunter 1950). The shears cut the hot glass analogous to cutting thick plastic with scissors (Barber 1900). It is likely that the shears which glassmakers used were more frequently used to score the glass at the desired break-off point so that a tap of the blowpipe would detach the the bottle (Jones & Sullivan 1989); similar to the cracking off described earlier. The resulting finish - if little manipulation was applied besides some very cursory tooling to smooth out the edge - is called a sheared lip or finish. The term "sheared lip" is commonly used by collectors and archaeologists to refer to simple cracked-off finishes, true sheared finishes, and to the fire polished versions of both methods (described next). Sheared finish bottles date similarly to the cracked-off finishes, i.e., usually prior to 1870. Click sheared finish for a picture of a finish that is typical of what is called sheared.
For more information on the above subjects see the cracking off and shearing section of the main Bottle Finishes & Closures page.
|
Once cracked-off or sheared from the blowpipe the vast majority of mouth-blown bottles received additional hand manipulation devoted to forming a finish that made the bottle opening (bore) more uniform or suitable for some closure method. The primary post-blowpipe finish manipulations are described as follow, beginning with the generally oldest methods. |
 Fire polished finish:
Once the bottle was removed from the blowpipe as described above, one
additional finishing step was usually added. The bottles upper neck was reheated in a furnace (often a
glory hole) to smooth out the crude or sharp edges where
the blowpipe was detached. The result of fire polishing is a finish or lip edge that
is smooth and glossy with the top of the finish being rounded and slightly
thickened (Jones & Sullivan 1989). The picture to the right is a close-up picture of a finish with these features on an early American
figured flask (ca. 1820 and classified as GVIII-2 by McKearin & Wilson (1978)). This method of
completed finish - cracking-off/shearing followed by fire polishing - was commonly
used on
figured flasks dating from the first half of the 19th century and is very rarely
found on bottles produced after about 1860 (Deiss 1981). Click
sunburst
flask to view a picture of this entire flask.
Fire polished finish:
Once the bottle was removed from the blowpipe as described above, one
additional finishing step was usually added. The bottles upper neck was reheated in a furnace (often a
glory hole) to smooth out the crude or sharp edges where
the blowpipe was detached. The result of fire polishing is a finish or lip edge that
is smooth and glossy with the top of the finish being rounded and slightly
thickened (Jones & Sullivan 1989). The picture to the right is a close-up picture of a finish with these features on an early American
figured flask (ca. 1820 and classified as GVIII-2 by McKearin & Wilson (1978)). This method of
completed finish - cracking-off/shearing followed by fire polishing - was commonly
used on
figured flasks dating from the first half of the 19th century and is very rarely
found on bottles produced after about 1860 (Deiss 1981). Click
sunburst
flask to view a picture of this entire flask.
Note: Re-firing in the finish area was a common pre-finishing task to soften the glass for finish formation or manipulation with fire polishing a common post-finishing treatment to smooth out the irregularities of most types of applied and tooled finishes on mouth-blown bottles. The process was likely used well into the 20th century until mouth-blown bottles were replaced by automatic bottle machines. This is different than the simple cracked-off/sheared then fire polished finish described here. (Incidentally, it appears that in the earlier days of bottle making machines, bottles were sometimes fire polished at the finish (or entire body) to smooth out irregularities of the sealing surface and/or to achieve a polished finished appearance to the bottle [Lockhart et al. 2009b])
 Ground
rim/lip or finish: Along with fire polishing, the grinding
down of the cracked-off top surface of the finish (i.e., rim) was one of the simplest
methods for "finishing" a bottle since the functional parts of this finish were
fully mold formed and not requiring tooling to shape. Once removed from the blowpipe and
annealed, the rough top surface of the finish (i.e., rim) was ground down flat to
"finish" the bottle and sometimes to facilitate closure sealing. The
ground finish pictured to the right is on a
Lightning fruit jar
which dates from between 1882 and the early 1900s (Toulouse 1969a; Creswick
1987).
Ground
rim/lip or finish: Along with fire polishing, the grinding
down of the cracked-off top surface of the finish (i.e., rim) was one of the simplest
methods for "finishing" a bottle since the functional parts of this finish were
fully mold formed and not requiring tooling to shape. Once removed from the blowpipe and
annealed, the rough top surface of the finish (i.e., rim) was ground down flat to
"finish" the bottle and sometimes to facilitate closure sealing. The
ground finish pictured to the right is on a
Lightning fruit jar
which dates from between 1882 and the early 1900s (Toulouse 1969a; Creswick
1987).
This finishing process produces the following general diagnostic characteristics:
 Laid-on ring
- (aka "string rim"): Once the blowpipe was removed, a
strip, string, or band of glass could be applied around the
outside of the extreme upper neck forming the laid-on ring finish. Once
applied, this band/string of glass received little or no post-glass application
tool work. (Click
applying a string finish to view an illustration of this process.) The entire finish is comprised of the applied glass and sheared/cracked-off bore of the bottle. This ring of glass performed several functions - to give
strength reinforcement to the bore of the bottle and to provide an anchor for
wiring down a cork if necessary. This method of finishing produced primitive applied
finishes which are the precursors to the applied finish (covered
later) .
Laid-on ring
- (aka "string rim"): Once the blowpipe was removed, a
strip, string, or band of glass could be applied around the
outside of the extreme upper neck forming the laid-on ring finish. Once
applied, this band/string of glass received little or no post-glass application
tool work. (Click
applying a string finish to view an illustration of this process.) The entire finish is comprised of the applied glass and sheared/cracked-off bore of the bottle. This ring of glass performed several functions - to give
strength reinforcement to the bore of the bottle and to provide an anchor for
wiring down a cork if necessary. This method of finishing produced primitive applied
finishes which are the precursors to the applied finish (covered
later) .
The image to the right is of a mid-19th century French wine bottle finish which shows crudity typical with this type finish. There are many variations on the theme of the laid-on ring or string finish. If interested in viewing more examples, consult either Jones (1986: 49-71), Jones & Sullivan (1989: 95-96), or Van den Bossche (2001). Laid-on ring finishes typically date from - or prior to - the 1860s and are particularly common on bottles made prior to 1850 (Deiss 1981). Be aware that there are many bottles that appear to have laid-on ring finishes but are actually either applied or tooled (covered later on this page). The subtle variations differentiating these can be difficult to even the trained eye, though the true laid-on ring is usually crudely asymmetrical, has no horizontally concentric tooling marks in evidence on the finish, and simply looks as though a strip of glass was wrapped around the upper neck just below the bore with little other handwork done - which is just what was done. (See the finish examples covered in Part II: Types or Styles of Finishes.)
 Rolled or folded-in/out finish:
This method of producing a finish is a very early use of some type(s) of
finish manipulation tools and is most common on early figured flasks, medicinal, and
food bottles dating from or before the 1870s (Deiss 1981). Once the blowpipe was removed from the
bottle, the hot glass at the removal point was reheated as necessary then either rolled/folded into the bore of
the bottle
or folded out onto the extreme upper neck (probably with a "tool" no more
complicated than an iron nail) to smooth out and form
this simple finish
(Jones & Sullivan 1989). This folding certainly provided extra strength
to the rim and upper bore of the bottle by "doubling" over the glass.
Rolled or folded-in/out finish:
This method of producing a finish is a very early use of some type(s) of
finish manipulation tools and is most common on early figured flasks, medicinal, and
food bottles dating from or before the 1870s (Deiss 1981). Once the blowpipe was removed from the
bottle, the hot glass at the removal point was reheated as necessary then either rolled/folded into the bore of
the bottle
or folded out onto the extreme upper neck (probably with a "tool" no more
complicated than an iron nail) to smooth out and form
this simple finish
(Jones & Sullivan 1989). This folding certainly provided extra strength
to the rim and upper bore of the bottle by "doubling" over the glass.
The picture to the left shows a crudely rolled or folded-in finish on an 1850s pontiled medicinal bottle (DR. D. JAYNE'S / HAIR TONIC - PHILADA (Philadelphia, PA.)). The finish on the pictured bottle is crude enough so that parts of it appear to be rolled out, although when in hand, the glass is obviously inwards. For an example of an rolled finish that was distinctly folded out, click HERE. When rolled to the inside, this finish is also called an infolded lip (White 1978).
 Flared or Flanged
finish: A variation of the above was the flared or flanged lip or finish. This
method also entailed the use of some type(s) of tool(s) to manipulate the hot
glass at the end of the neck to create a relatively thin finish which projects away from
the top of the bore at a more or less 90° angle. According to Kendrick
(1968), the mouth of a bottle "...could be expanded to form the flared lip,
either by the use of a
jack, or by inserting a cone-shaped plug into the mouth of the bottle as the
pliable mass (glass) rotated." The bottle would obviously
have had to be rotated by turning the pontil rod or snap case tool.
(Click
forming a flared finish to view an illustration of a gaffer working at
a chair forming a flared finish.) The picture
to the right
shows a flared finish on a small ink or utility
bottle produced by an eastern American glasshouse (ca. 1845-1855).
Flared or Flanged
finish: A variation of the above was the flared or flanged lip or finish. This
method also entailed the use of some type(s) of tool(s) to manipulate the hot
glass at the end of the neck to create a relatively thin finish which projects away from
the top of the bore at a more or less 90° angle. According to Kendrick
(1968), the mouth of a bottle "...could be expanded to form the flared lip,
either by the use of a
jack, or by inserting a cone-shaped plug into the mouth of the bottle as the
pliable mass (glass) rotated." The bottle would obviously
have had to be rotated by turning the pontil rod or snap case tool.
(Click
forming a flared finish to view an illustration of a gaffer working at
a chair forming a flared finish.) The picture
to the right
shows a flared finish on a small ink or utility
bottle produced by an eastern American glasshouse (ca. 1845-1855).
Based primarily on empirical observations, but also corroborated in Deiss (1981), this method of finishing was most commonly used in the U.S. between the 1830s and 1870, though it can date back to antiquity in Europe (Toulouse 1969b; Van den Bossche 2001). This early flared finish can be difficult to discriminate from finishes produced by the methods covered below. To the experienced eye it can be distinguished from later applied or tooled flared finishes by the thinness of the glass that forms the flared portion; much thinner glass than produced by these other methods. Bottles with this finish are usually pontil scarred (empirical observations).
Both the rolled and flared finishes
were formed from the reheating and working of the glass at the blowpipe
detachment area and not to have entailed the addition of any extra, post-blowpipe
removal glass to
the finish (Toulouse 1969b). This differentiates these methods from the next important one...
|
For more information on the relatively primitive finishing methods covered above, see the pertinent sections of the main Bottle Finishes & Closures page. |
 Applied finishes:
Between the early 1800s and the 1880s - and particularly between about 1830 and
1885 - the most common way of finishing a bottle entailed an application of
additional glass at the point where the blowpipe was removed (U. S. Patent
Office 1860; Howard 1950; Jones 1986). (Click
applying a string finish to view an illustration of glass being applied to
the cracked-off end of the neck.) This applied hot glass was then
manipulated - often with additional re-firing to keep the glass workable - with a more technologically advanced (than used for the finishes
noted above) "lipping" or "finishing" tool to form a much wider variety of more
complex and varying finish styles. The applied finish pictured to the
right shows distinct evidence of the tooling
which slightly "overshot" the lower edge of the lower finish (collar) and
flattened down some of the applied glass spillover on the neck. (Height of
this finish is about an inch.)
Applied finishes:
Between the early 1800s and the 1880s - and particularly between about 1830 and
1885 - the most common way of finishing a bottle entailed an application of
additional glass at the point where the blowpipe was removed (U. S. Patent
Office 1860; Howard 1950; Jones 1986). (Click
applying a string finish to view an illustration of glass being applied to
the cracked-off end of the neck.) This applied hot glass was then
manipulated - often with additional re-firing to keep the glass workable - with a more technologically advanced (than used for the finishes
noted above) "lipping" or "finishing" tool to form a much wider variety of more
complex and varying finish styles. The applied finish pictured to the
right shows distinct evidence of the tooling
which slightly "overshot" the lower edge of the lower finish (collar) and
flattened down some of the applied glass spillover on the neck. (Height of
this finish is about an inch.)
 To
the left is an illustration from an 1876 patent which shows a typical calipers
type finishing tool used to create a type of applied, one-part "blob" finish used
for carbonated beverages. (Click
J. Lamont's May 29, 1876 Patent #183,267 to see the entire patent.) As
with other finishing tools for applied finishes, the illustrated design only
formed the dimensions of the finish itself and did not really affect the upper
neck below the finish - an important distinction when comparing applied
finishing to the "tooled" finishing methods discussed later.
To
the left is an illustration from an 1876 patent which shows a typical calipers
type finishing tool used to create a type of applied, one-part "blob" finish used
for carbonated beverages. (Click
J. Lamont's May 29, 1876 Patent #183,267 to see the entire patent.) As
with other finishing tools for applied finishes, the illustrated design only
formed the dimensions of the finish itself and did not really affect the upper
neck below the finish - an important distinction when comparing applied
finishing to the "tooled" finishing methods discussed later.
This more entailed tooling of the finish glass and generally more complex design of most applied finishes is what differentiates this method of finishing from the simple "laid-on ring" finish described earlier. (Note: A laid-on ring must be considered a type of simple and early applied finish since the "ring" often received some cursory tooling and had to have been wrapped around the neck with a tool. This distinction is really only pertinent to bottles having the following one-part finish types: champagne, string rim, or flared ring.) Groove ring wax seal type canning/fruit jars have a type of applied finish that is called a "pressed, laid-on ring" and was largely produced the same way as the applied finish described here, with the forming to shape done with some sort of pressing tool in a single operation (Toulouse 1969a; Creswick 1987). The picture below right is of a pressed laid-on ring finish on an 1870s canning jar.
The 7th edition (1842) of the Encyclopedia Britannica (Vol. X, p. 579) contains an English period explanation of the process of applying and tooling a finish beginning at the point where the bottle is detached from the blowpipe:
The finisher then warms the bottle at the furnace, and taking out a small quantity of metal (glass) on what is termed a ring iron, he turns it once round the mouth forming the ring seen at the mouth of bottles. He then employs the shears (finishing tool) to give shape to the neck. One of the blades of the shears has a piece of brass in the center, tapered like a common cork, which forms the mouth (inside of the finish), to the other blade is attached a piece of brass, used to form the ring (outside of the finish). (From McKearin & Wilson 1978; clarification added parenthetically.)
 The "shears" noted
in the passage above were an
early variety of finishing tool which is not illustrated on this website
though a newer (late 19th century) version illustration is shown above.
(An artists rendition
of the described "shears" may be found on
page 217 of McKearin & Wilson [1978] or page 52 of Deiss [1981] and is
reproduced at this link:
1842 finishing shears illustration). In any
event, the
description above briefly but clearly describes the post-blowpipe application of
additional glass, which is then formed to shape with a tool - i.e., an applied finish.
The "shears" noted
in the passage above were an
early variety of finishing tool which is not illustrated on this website
though a newer (late 19th century) version illustration is shown above.
(An artists rendition
of the described "shears" may be found on
page 217 of McKearin & Wilson [1978] or page 52 of Deiss [1981] and is
reproduced at this link:
1842 finishing shears illustration). In any
event, the
description above briefly but clearly describes the post-blowpipe application of
additional glass, which is then formed to shape with a tool - i.e., an applied finish.
The first finishing tool to be patented in the United States was at least as early as 1855, although it was not a patent for the original concept of a finishing tool - tools which were already in use and certainly not patentable - but instead for an specific variation in such tools (U. S. Patent Office 1855, 1856; Toulouse 1969b). Click Amasa Stone's August 7, 1855 Patent #13,402 to see this entire original patent - illustrations and descriptive text. Click Amasa Stone's September 23, 1856 Patent #15,788 to view Stone's 1856 patent a groove-ring wax seal finishing tool (image to the above right) which was thought to be the first patent for a finishing tool, but is now known to be the second (Toulouse 1969a).
The collector term - and the term used on this website - for this general category of finishing and finishes is an applied finish or sometimes a "true" applied finish. These could also be termed "applied & tooled" finishes since tooling of the added glass was necessary to create the desired finish shape and size (Deiss 1981; Roller 1983; Boow 1991). For simplicity it is just referred to as an applied finish here. This type of finish also goes by an array of mostly collector originated terms including "crudely applied lip", "glob top", and "globby top", "drippy top", etc.
As described on this website, the production of a "tooled" or "improved tooled" finish (next section) entailed a different manufacturing process than a "true" applied finish. It is important to clearly differentiate "tooled" and "applied" finishes for dating purposes. Simply expressed, an “applied” finish entailed the application of additional glass and a “tooled finish” did not.
|
For more information, including very specific information on how to determine if a finish is applied or not, click applied finish. |
 Tooled finishes:
This method of finishing is a result of the
glass for the finish-to-be being blown with the rest of the bottle, not
added in a separate hand application as with the applied finish
described above. Once the blowpipe was severed from the bottle neck, the
finish was shape formed and made smooth and precise by the reheating or
re-firing of the end of the neck and hand or mechanical tooled to shape (Deiss 1981; Roller 1983).
It appears that typically the finishing tool was held stationary and the bottle
turned via the snap tool holding it - often by rolling the snap tool handle on
the arm(s) of the glassmakers
chair with the left hand while holding the finishing tool with the right, or
the reverse if left handed (U. S. Patent Office 1893; Palmer 1917).
Below right is an illustration of a typical tool used for tooled finish forming.
Tooled finishes are also called "wiped" finishes by some (Preble 1987;
Fike 1998).
Tooled finishes:
This method of finishing is a result of the
glass for the finish-to-be being blown with the rest of the bottle, not
added in a separate hand application as with the applied finish
described above. Once the blowpipe was severed from the bottle neck, the
finish was shape formed and made smooth and precise by the reheating or
re-firing of the end of the neck and hand or mechanical tooled to shape (Deiss 1981; Roller 1983).
It appears that typically the finishing tool was held stationary and the bottle
turned via the snap tool holding it - often by rolling the snap tool handle on
the arm(s) of the glassmakers
chair with the left hand while holding the finishing tool with the right, or
the reverse if left handed (U. S. Patent Office 1893; Palmer 1917).
Below right is an illustration of a typical tool used for tooled finish forming.
Tooled finishes are also called "wiped" finishes by some (Preble 1987;
Fike 1998).
 Empirical observations indicate that there
were two distinct variations of the tooled finish based on mold conformation and
finishing activity - the "standard" and the "improved" tooled finishes - both of
which can be accurately referred to as "tooled finishes" as a
group. However, by
making a distinction between the two subtle variations there is some bottle
dating refinement possible. These types are described below.
Empirical observations indicate that there
were two distinct variations of the tooled finish based on mold conformation and
finishing activity - the "standard" and the "improved" tooled finishes - both of
which can be accurately referred to as "tooled finishes" as a
group. However, by
making a distinction between the two subtle variations there is some bottle
dating refinement possible. These types are described below.
"Standard" tooled finish: In the collector and (usually) archaeology worlds - and on this website - this is usually just called a tooled finish. This simple and generally oldest tooled finishing method entailed a mold where the finish conformation was not significantly pre-formed in the mold. The shape of the base, body, and neck of the bottle were formed by the mold, but not the precise shape of the finish. To put it differently, the entire neck and future finish portion of the bottle was blown in the mold with the rest of the bottle but there was limited (or no) pre-forming of the finish by the mold. Although the oldest of the two tooling methods, it also continued in use up until being replaced by machine-made methods, overlapping the "improved" tooling method described below.
 The
"standard" tooled finish is
identified by a side mold seam that distinctly ends or fades out on the neck below the bottom
edge of the finish. Click two-piece
post-bottom
mold to see an illustration of a typical bottle mold.
As you will see, the upper neck portion of the mold does not perform any molding of the
finish shape, just the neck shape. This type mold could have produced a bottle finished with
either an applied finish (using glass applied to the neck end) or a tooled finish (by
re-heating and tooling the end of the straight neck). With the latter process, the glassblower would have
cracked-off/sheared the blowpipe high enough to leave "extra"
glass to work with - by reheating and tooling - in creating a finish. The "standard" tooled finish could be considered a transition type tooled finish that was
easily adapted to bottles produced in molds that were previously finished with an applied
finish. The picture to the left shows the finishes of two bottles which
were blown in the same exact mold but one (right) has an applied finish and the
other (left) a "standard" tooled finish. Obviously this mold was
in use during the finishing transition period for the glassmaker that
produced these bottles (Peruvian Bitters; likely produced by the
San Francisco & Pacific Glass Works in the early to mid 1880s).
The
"standard" tooled finish is
identified by a side mold seam that distinctly ends or fades out on the neck below the bottom
edge of the finish. Click two-piece
post-bottom
mold to see an illustration of a typical bottle mold.
As you will see, the upper neck portion of the mold does not perform any molding of the
finish shape, just the neck shape. This type mold could have produced a bottle finished with
either an applied finish (using glass applied to the neck end) or a tooled finish (by
re-heating and tooling the end of the straight neck). With the latter process, the glassblower would have
cracked-off/sheared the blowpipe high enough to leave "extra"
glass to work with - by reheating and tooling - in creating a finish. The "standard" tooled finish could be considered a transition type tooled finish that was
easily adapted to bottles produced in molds that were previously finished with an applied
finish. The picture to the left shows the finishes of two bottles which
were blown in the same exact mold but one (right) has an applied finish and the
other (left) a "standard" tooled finish. Obviously this mold was
in use during the finishing transition period for the glassmaker that
produced these bottles (Peruvian Bitters; likely produced by the
San Francisco & Pacific Glass Works in the early to mid 1880s).
"Improved" tooled finish: This tooled finish variation is referred to on this site as either an "improved finish" or the "improved tooled finishing" method. Towards the later end of the mouth-blown era (late 1890s through the 1910s) many molds did significantly pre-form most or all of the basic external finish shape, i.e., the upper neck portion of the mold cavity had the finish shape included. Kendrick called this type mold a "closed" mold as versus an "open" mold which did not form any of the actual finish conformation (Kendrick 1963). (Bottles produced in this latter mold had to be finished with an applied or tooled finish, as described above.) After the bottle was removed from the mold, the finish shape and bore conformation was made more precise – to ensure proper closure fit - with minor re-firing and/or tooling of the extreme upper portion of the finish (Deiss 1981). The improved tooled finish is identified by a side mold seam that ends or fades out well into the conformation of the finish itself, often just short of the rim of the finish. The concentric tooling marks are evident only in the upper portions of the finish.
The picture to the above right shows the "improved" tooled finish characteristics close-up (click to enlarge). The location of the seam on this bottle makes it readily apparent that the basic finish form, including the lower ring, was formed by the mold. The pictured "straight brandy" finish is on an Oregon Importing Company (Portland, OR.) cylinder liquor bottle that dates between 1904 and 1915 (Thomas 1998). The "improved" finish usually identifies a mouth-blown bottle as having been produced after 1895-1900 (empirical observations).
 The
illustration to the left shows a cup-bottom closed mold which has the
conformation of the external screw thread finish incorporated into the mold
itself showing how an improved tooled finish is formed. (This mold type is also
referred sometimes to as a
blow-over mold.) A bottle produced in this type of mold would have had either some
post-molding/post-blowpipe tooling done to the extreme upper finish portion above the screw
threads or the finish rim would have been ground flat to remove the rough edges
created when the blowpipe was cracked-off. One of these processes would have had to be done to make the upper finish
suitably smooth to reliably accept a screw cap.
The
illustration to the left shows a cup-bottom closed mold which has the
conformation of the external screw thread finish incorporated into the mold
itself showing how an improved tooled finish is formed. (This mold type is also
referred sometimes to as a
blow-over mold.) A bottle produced in this type of mold would have had either some
post-molding/post-blowpipe tooling done to the extreme upper finish portion above the screw
threads or the finish rim would have been ground flat to remove the rough edges
created when the blowpipe was cracked-off. One of these processes would have had to be done to make the upper finish
suitably smooth to reliably accept a screw cap.
 The
picture to the right shows the type of finish - on a ca.
1910-1915 flask - that would have been produced by a mold like that pictured
to the left. It is mouth-blown with molded external threads which also exhibits
tooling marks in the finishing area above the top of the screw threads
(click to enlarge). A
bottle with this type of external screw thread finish almost certainly dates
from the 1900-1918 era; this type finish was used frequently on liquor bottles and flasks
like that pictured. Click
external screw cap to view the discussion of mouth-blown external screw
thread finishes and caps on the "Types of Bottle Closures" page.
The
picture to the right shows the type of finish - on a ca.
1910-1915 flask - that would have been produced by a mold like that pictured
to the left. It is mouth-blown with molded external threads which also exhibits
tooling marks in the finishing area above the top of the screw threads
(click to enlarge). A
bottle with this type of external screw thread finish almost certainly dates
from the 1900-1918 era; this type finish was used frequently on liquor bottles and flasks
like that pictured. Click
external screw cap to view the discussion of mouth-blown external screw
thread finishes and caps on the "Types of Bottle Closures" page.
As already noted, all tooled finishes potentially show some concentric tooling marks with the "standard" tooled finish having these marks extending onto the neck below the finish. Due to the amount of tooling on most bottles produced with this finishing method, the upper side mold seam is often substantially "wiped out" making it difficult to determine how much shape forming the finish received in the mold versus how much was purely from the tooling actions. It is quite possible that many (maybe most?) tooled-finishes-to-be had at least the basic finish conformation formed in the mold as that would have been an easy way to provide the proper quantity of glass in the correct area for adequate finish completion. However, the subsequent re-firing and finishing tool action to "finish" the finish eradicated most or all of the signs of the side mold seam for as far as the tool reached on the outside of the neck. The absence of the mold seam in the finish itself likely makes many "improved" tooled finishes actually appear to be "standard" tooled finishes. In other words, if the mold seam is evident within the finish, one knows that it is an improved" tooled finish; if the side mold seam is not evident in the finish then one can't say for sure that it was not partially molded, only that physically it is a tooled finish. This is belaboring a fine point, but it does have dating implications.
In any event, the actual finish glass for all tooled finishes was not typically added to the neck terminus like with an applied finish - a technological advance which would have constituted a significant savings in the labor necessary to finish a bottle. To picture the difference in these finish classes another way, the blowpipe detachment point on an applied finish was at or just above the point where the finish and neck meet in the finished bottle; the blowpipe detachment point on tooled finishes was (or became) the top surface of the finish. Besides the labor savings, the tooled finish was a major innovation in that the bore and upper neck of bottle could be made more smooth, properly tapered, and of uniform dimensions as compared to the applied finish. This allowed for more reliable sealing of the bottle with a cork in particular since more of the inside surface of the finish was in contact with the cork (Deiss pers. comm. 2003).
On this website this class of finishes will be simply referred to as "tooled" finishes, with the distinct between the "standard" and "improved" versions made when useful. In the existing literature this finishing method is sometimes, though infrequently, referred to descriptively as a "wiped" finish, because the finishing tool "wipes" out traces of the upper side mold seams (Preble 1987; Fike 1998).
|
For more information, including very specific information on how to determine if a finish is applied or tooled, click tooled finish. |
|
During the late 18th up through the mid to late 19th century, glass making was typified by small glass makers with the ability to easily move geographically to follow cheap materials - particularly fuel to stoke the round-the-clock fires required for the glass melting pots. The late 19th through the first third of the 20th century was typified by expansion and consolidation into larger operations that were immobile, because of the increasing complexity of the machinery, but were easily accessed by the expanding and improving transportation networks. The high capital cost of the fully automatic bottle machines (the first being the Owens Bottle Machine during its monopoly era just prior to WW1) created a lengthy period of "technology lag", where some companies which could not afford the conversion to automation managed to stay operational until the cost of doing business could not compete with the automated firms. Some type of automated equipment was making about 90% of all bottles by 1917, and virtually all bottles by the 1920s; the remaining hand shops disappearing during that era (Scoville 1948; Davis 1949; Munsey 1970). The next section of this page covers machine-made bottles. |
Return to the top of this page.
 |
|
Click on the machine-made beer bottle picture above to see an illustration of this bottle showing the major diagnostic characteristics of a typical machine produced bottle. |
The natural transition of almost all craft based or manual manufacturing industries during the 19th and early 20th centuries was towards machines and automation, i.e., "the displacement of skill by machinery" (Barnett 1926). The glass industry was of course no different. Barnett (1926) described the era as follows:
The history of the introduction of machinery for the manufacture of bottles consequently falls into three periods, each of which is characterized by the introduction of a new form of machine:
| For further
information... An excellent overview of the transition from mouth-blown to the early semi-automatic bottle making machinery - and the labor disruption and displacement it catalyzed - is found in George Barnett's (1926) book Machinery and Labor; specifically Chapter III entitled The Introduction of Semi-Automatic Bottle Machinery. In addition, one of the better technical discussions on the mechanics of machine bottle production - with copious illustrations - is found in the Hand Book of Glass Manufacture (Tooley 1953), in a chapter entitled Feeding and Forming by H. H. Holscher of the Owens-Illinois Glass Company. |
The above gives the general time eras that are addressed by the first two sections below: Semi-Automatic Machines (and the later fully automatic versions of similar machines) and the revolutionary Owens Automatic Bottle Machine - the first fully automatic bottle making machine. All machine-made (semi-automatic or fully automatic) bottles have in common the fact that they were blown with the air provided by a machine not that of a glassblowers lungs like with mouth-blown (hand-made) bottle production. The bottles produced by either class of machines are - with one exception discussed later - largely impossible to differentiate from each other.
With all semi and fully automatic bottle machines, the initial gob of glass is either sucked (Owens Automatic Bottle Machine), hand placed (semi-automatic machines), or dropped (gob feeder or "flow" automatic machines) into the initial parison mold and held in place by the neck ring (ring mold) portion of the parison (or blank) mold which also forms the finish of the bottle. The rest of the blowing process is the same with all these machines and as follows. After initial forced air expansion of the gob (or pressing with a plunger or piston depending on the machine type) the "pre-bottle" parison is then shifted to the second blow mold (the neck ring is still holding the bottle) where the body of the bottle is expanded to the desired size with machine induced blowing (Pearson 1928; Miller & Morin 2004). The bottle forming process is now completed, the bottle removed from the blow mold, and sent to the lehrs for annealing.
There were two primary processes used by the various types of semi and fully automatic machines. These are called the blow-and-blow and press-and-blow processes or machines and are briefly discussed and link illustrated below (and discussed further down the page in more depth):
Blow-and-blow: This process entailed machine blowing of the parison in both the parison and blow molds. The most well know (and first) example of this type of machine was the Owens Automatic Bottle Machine. Click Owens machine cycle - stages 1-3 and Owens machine cycle - stages 4-6 to see a schematic representation of the entire blow-and-blow cycle. These illustrations show the Owens machine cycle which includes the sucking up of glass in Stage 1, cutting the glass off with a "knife" (Stages 2 and 3), and the remainder of the cycle (4-6) where the parison is moved from the parison mold (comprised of at least two parts) to the blow mold for full expansion of the bottle (illustrations after Tooley 1953). These illustrations also typify the general cycle of all automatic blow-and-blow machines, except for how the glass is fed into the parison/blank mold. Gob feeder supplied machines were fed from above as shown in the press-and-blow machine cycle stage 1 (link below).
Press-and-blow: The process for press-and-blow machines is very similar to the blow-and-blow cycle except that the parison is mechanically "pressed" not blown into shape by a plunger or piston in the typically one-piece parison (block) mold (Tooley 1953). To view illustrations of how press-and-blow machines cycled, click on the following links: press-and-blow machine cycle - stages 1-3 and press-and-blow machine cycle - stages 4-7. The press-and-blow process was generally only used for wide mouth bottles and jars due to the physical limitations of the one-piece parison mold and parison removal. These type machines were also the first machines (semi-automatic) developed and adopted in the mid-1890s for canning jars and other wide mouth wares (Miller & Morin 2004). The first production bottles known to have been made on semi-automatic (press-and-blow) machines were wide mouth Vaseline bottles made by the C. L. Flaccus Glass Co. (Beaver Falls, PA.) in 1894 (Miller & Morin 2004; Lockhart et al. 2007d). These bottles are usually identified by having a valve mark on the base. Click on the following link - John Schies patent #722,634 (March 10, 1903) for a press-and-blow semi-automatic machine - to see the patent for an early bottle machine that was likely used by the Pennsylvania Glass Co. of which Schies was president (Lockhart pers. comm. 2009). This Schies patent machine looks very similar to the O'Neill machine pictured below.
 Semi-automatic machines developed over the period of time
between 1882 - when Philip Arbogast patented a two mold pressing and then
blowing bottle making process which was the precursor to the later two mold
machine processes (click
Arbogast's July 11, 1882 patent #260,819 to see the original patent) - to the WW1 era when "feed and
flow" devices (i.e.,
gob feeders) were introduced turning the semi-automatic machines into fully
automatic machines (Barnett 1926; Cable 1999; Iwen 2006). As the time span indicated, this was a gradual development
with acceleration towards full automation occurring when the Owens machine began
significant production about 1907; first production essentially beginning in
1905 (Miller & McNichol 2002).
Semi-automatic machines developed over the period of time
between 1882 - when Philip Arbogast patented a two mold pressing and then
blowing bottle making process which was the precursor to the later two mold
machine processes (click
Arbogast's July 11, 1882 patent #260,819 to see the original patent) - to the WW1 era when "feed and
flow" devices (i.e.,
gob feeders) were introduced turning the semi-automatic machines into fully
automatic machines (Barnett 1926; Cable 1999; Iwen 2006). As the time span indicated, this was a gradual development
with acceleration towards full automation occurring when the Owens machine began
significant production about 1907; first production essentially beginning in
1905 (Miller & McNichol 2002).
Initially, semi-autos required several men to operate them, though over time more parts of the process were automated. Eventually (by about 1910 or a few years later) the only thing that was not automatic was the actual feeding of the glass into the machine. The glass still had to be gathered by hand from the glass pot by a semi-skilled glassworker and that gob fed manually into the first parison or blank mold. The numerous different semi-automatic machines had processes similar to the fully automatic Owens machine, except that the speed was limited by how fast the workers could feed the proper size and temperature gobs of glass into the machines (Pearson 1928; Cable 1999; Miller & McNichol 2002). The early semi-automatic machines were referred to as "No Boy" machines since all of the processes were automatic (except for the feeding of glass) and replaced most of what had been boys work prior (Howard 1950). Similar to the Owens machine and first devised by Arbogast in 1881 (patented in 1882), semi-automatic machines utilized two molds: a parison (blank) pre-forming mold followed by a second separate blow mold where the bottle was fully formed. The blank/parison mold concept was the revolutionary invention of Philip Arbogast that made possible the automated production of bottles by machines, although the implementation of the blank/parison mold - which forms the "finish" of the bottle - was not realized until the 1890s with the first semi-automatic machines (Howard 1950).
|
Narrow neck press-and-blow machine? It should be noted that one fairly early press-and-blow semi-automatic machine was designed to produce narrow bore bottles. It was noted in 1910 that the Cumberland Glass Company (Bridgeton, NJ) had "...succeeded in perfecting a machine that will satisfactorily produce narrow neck bottles, such as catsups, beer bottles, etc., at a big saving over the hand method." (National Glass Budget 1910) The method used was unusual and may have been unique in bottle-making history: "The machine differs from all others, and in getting the neck upon the bottle, the vessel is made in two sections, the neck being put upon the bowl with a second operation. This is accomplished so that there is no perceptible mark upon the bottle showing the joint, and the bottle stands every possible test as to strength. The machine is operated much as all pressing machines are" (National Glass Budget 1910; Lockhart pers. comm. 2007). Although products of this machine are not conclusively known a bottle such as the one at this link - offset seams shoe polish bottle - may well be a product of the described machine as there is a distinct and abrupt interface edge at the shoulder where the mold seams for both the body and neck end and are offset. This little bottle has a moderately narrow neck and a distinct valve or ejection mark on the base indicating press-and-blow machine manufacture. Added evidence to this theory is that an identical shape and size (2 oz.) "Round Shoe Polish" bottle is shown in the "Machine Made Ware" section of Cumberland's 1911 catalog (Cumberland Glass 1911). |
The 1908 photo to the left is from the Lewis Hine collection at the Library of Congress and shows an early, probably O'Neill (Barrett 2011) semi-automatic 4 mold press-and-blow milk bottle machine, with the following caption: "Machine that blows 4 milk bottles at a time. No "lung blowers" employed. Travis Glass Co., Clarksburg W. Va. Manager says machines are fast coming into play in bottle industry, plans eventually to have machines in place of "carrying in boys." Location: Clarksburg, West Virginia" (Library of Congress). This two table semi-automatic machine would have been hand fed with glass (furnace likely to the right of the machine) and does have the two different mold sets with the parison molds - where the first "press" part of the cycle took place - on the right. Blowing air would have been supplied by the hose visible at the top of the set of blow molds to the left, where the final "blow" part of the cycle took place. This image also shows that on many early (and later) press-and-blow machines the parison mold was one-piece (noted by the absence of mold hinges in the image) as the relatively narrow parison could be removed from either the base or finish end (depending on the type machine and bottle) whereas the blow mold had to be two-piece (hinges obvious in image) to remove the expanded and finished bottle if there was any narrowing from the body to the neck/finish (like a typical milk bottle would have). Similar semi-automatic machines would have been used for the production of wide mouth food and canning jars.

Although the body, neck, and finishes (and related mold seams) look like typical machine-made items, the bases of bottles produced by many (possibly most) early blow-and-blow cycle semi-automatic machines can be hard to distinguish from the bases of many late 19th and early 20th century mouth-blown bottles due to an absence of machine induced diagnostic evidence on the base. An example is the bottle pictured to the left which is the base of a machine-made, post-bottom mold produced Hall's Wine Tonic. It is most likely English made - though found commonly in the U.S. - and dates from the early 20th century (approximately 1910-1920). This bottle could have been produced by either a semi-automatic or fully automatic non-Owens bottle machine; most likely the former though one can not be sure of that from the diagnostic features in evidence. This bottle was not produced by an Owens Automatic Bottle Machine since the base is not marred by any suction scarring and, in fact, has no identifiable parison induced mold seams of any type. This lack of parison mold seams on the base may indicate an early semi-automatic machine production by an unknown type machine.
The Hall's bottle does exhibit most of the other standard machine-made body and finish features (#1-#4, #7) as described at the following link - Bottle Dating: Machine-made bottles portion of the Dating Key - though parison induced ghost seam evidence is limited and faint (it could be mistaken for the crudity of a mouth-blown bottle). The general diagnostic features of a machine-made bottle are also covered briefly in the illustration available by clicking on the amber beer bottle to the above right. Click Halls Wine Tonic to view a picture of that entire bottle. If one only had a partial example of the bottle - missing the finish and upper neck - it could be easily interpreted as a mouth-blown bottle as the diagnostic features on the finish and upper neck are necessary to make the distinction.
 As noted earlier, bottles produced by semi-automatic machines are
largely impossible to differentiate from
those produced by non-Owens
type fully-automatic bottle machines. This is because early non-Owens automatic machines
were essentially
semi-automatic machines made fully-automatic with the addition of a glass feeding device (i.e.,
a
gob feeder). The one possible exception where a semi-automatic
bottle might be distinguishable is via a comparison of bottles produced by the
same mold or similar type bottles produced by the same maker. If the
different bottle weights vary significantly this would indicate that the glass
was likely gathered and fed by hand; the glass weight difference implies a lack
of gob feeder machine precision and evidence of semi-automatic production
(Peters pers. comm. 2007). In general, excluding the base, semi-automatic
machine-made bottles are physically indistinguishable from all types of machine-made
bottles; that is, all machine-made bottles share virtually identical body,
shoulder, neck, and finish related diagnostic features. The only for sure base related exception is that the Owens Automatic Bottle Machine
will often (primarily in the early days of the machine) leave a distinctive scar
on the base which differentiates its products from both
semi-automatic and other non-Owens fully automatic machines; a subject covered in the next section
(Toulouse 1967; Miller & McNichol 2002). Also see the "Modern
(non-Owens) Bottle Making Machines" section below for more information.
As noted earlier, bottles produced by semi-automatic machines are
largely impossible to differentiate from
those produced by non-Owens
type fully-automatic bottle machines. This is because early non-Owens automatic machines
were essentially
semi-automatic machines made fully-automatic with the addition of a glass feeding device (i.e.,
a
gob feeder). The one possible exception where a semi-automatic
bottle might be distinguishable is via a comparison of bottles produced by the
same mold or similar type bottles produced by the same maker. If the
different bottle weights vary significantly this would indicate that the glass
was likely gathered and fed by hand; the glass weight difference implies a lack
of gob feeder machine precision and evidence of semi-automatic production
(Peters pers. comm. 2007). In general, excluding the base, semi-automatic
machine-made bottles are physically indistinguishable from all types of machine-made
bottles; that is, all machine-made bottles share virtually identical body,
shoulder, neck, and finish related diagnostic features. The only for sure base related exception is that the Owens Automatic Bottle Machine
will often (primarily in the early days of the machine) leave a distinctive scar
on the base which differentiates its products from both
semi-automatic and other non-Owens fully automatic machines; a subject covered in the next section
(Toulouse 1967; Miller & McNichol 2002). Also see the "Modern
(non-Owens) Bottle Making Machines" section below for more information.
From as early as 1910, gob feeders (aka "feed and flow" devices) which automated the glass feeding, were beginning to be developed to fit most of the myriad of semi-automatic "No Boy" machines existing at that time though many of these early feeders met with limited success due to problems (Howard 1950). These devices dropped a carefully measured gob of glass into the parison/blank mold removing the last hand manipulated part of the process for the semi-automatic machines (Cable 1999). The following describes the processes and is from Iwen (2006):
How to automatically transfer molten glass from the continuous tank furnaces to the automatic blowing and pressing machines baffled the best minds in the business for years... Simply described, a gob feeder consists of a trough or spout leading from the working end of a continuous tank furnace to an area above the automatic forming machines. As the molten glass flows down the spout, automatic shears cut the stream into gobs of the right size and shape, which then drop into a mold on the forming machine. (Iwen 2006)
The gob feeders removed the "semi" part of the process and converted all of the adaptable semi-automatic machines to fully automatic production between about 1916-1917 and the early 1920s (Barnett 1926; Cable 1999; Miller & Morin 2004; Iwen 2006). The illustration to the right above is from a Fairmount Glass Works (Indianapolis, IN.) bottle catalog from around 1930. It shows (click to enlarge) the gob feeder attached to the glass furnace (far right) hanging over and "feeding" the bottle blowing machine (right center). This illustrates well how a gob feeder could be added to what could have been a hand fed semi-automatic bottle blowing machine prior to the feeder. As soon as they became available to small outfits, virtually everyone adopted the Lynch, Hartford-Empire, and a few other feeder machines and the days of the semi-automatic machines were over. And actually, so were the days of the Owens machines; covered next (Lockhart pers. comm. 2005).
|
A significant addition to this website, which will be ongoing for some time, is the inclusion of a series of articles primarily authored by Bill Lockhart on the early bottle making machines from the very late 1800s to the first couple decades of the 20th century. These are highly informative, interesting and well illustrated articles on the early days of bottle making automation! Bernas, Barry. 2011. The Evolution of Jar Machine. (Originally privately published as part of the 2011 Fruit Jar Annual.) This article is being made available here compliments of the author and is a fascinating history of the late 19th century evolution of wide mouth, press-and-blow jar making technology and machines. Click on the following link to access this article: http://www.sha.org/bottle/pdffiles/evolutionjarmachineBernas.pdf Lockhart, Bill. 2014. Frank O'Neill and the O'Neill Glass Machines. Historic Glass Bottle Identification & Information Website, E-published February 2014. Another great article web published here exclusively! This article is about some significant late 19th to early 20th century, press-and-blow, semi and fully automatic machines that were eventually able to make narrow neck bottles as well as wide mouth bottles and jars. This article is available at this link: http://www.sha.org/bottle/pdffiles/ONeillmachines.pdf (Photo of an O'Neill machine is to the left at the beginning of this section.) Lockhart, Bill and Barry Bernas. 2014. Turning Blue: Charles Blue and the Early Jar Machines. In the "Guide to Collecting Fruit Jars: Fruit Jar Annual 2014" by Jerry McCann , pp. 19-47. Privately published. As noted in the articles introduction: Charles Edwin Blue created the first really successful jar and wide-mouth bottle machine. Between 1894 and 1912, Blue patented ten such machines, corresponding to the rise of the Atlas Glass Co. – from 1896 to 1902. This study examines the earliest machines – made by Blue and others – the manufacturing characteristics they left on jars, and ramifications applied to identifying early jars made by the Atlas Glass Co. This article is available on this website at this link: http://www.sha.org/bottle/pdffiles/TheBlueMachine.pdf Lockhart, Bill, Beau Schriever, Bill Lindsey and Carol Serr. 2014. The Ashley Semiautomatic Bottle Machine. Historic Glass Bottle Identification & Information Website, E-published June 2014. Yet another great article web published here exclusively! This article is about what was most likely the first narrow mouth, press-and-blow, bottle producing machines originating during the very late 19th to early 20th centuries. These were nicknamed the "Johnny Bull" machines. This article is available at this link: http://www.sha.org/bottle/pdffiles/AshleyMachines.pdf ...more to come in the future! Also of interest is the following Owens-Illinois Glass Company, 1956 manual as described:
Owens-Illinois Glass Company.
1956. "Operations Manual." Owens-Illinois Glass Company, Toledo, OH.
This is a fascinating internal bottle machine manufacturing company
manual (with no overall name) that is divided into three parts as
noted below. It is dated as from 1956. Each part is
linked separately to files on this website for ease of downloading:
|
Owens Automatic Bottle Machine

 The
Owens Automatic Bottle Machine was probably the most revolutionary
development in bottle making since the discovery of glass, although it must
be noted that
Philip Arbogast's
1882 invention/patenting of the concept of the two-mold process - with the
initial blank or parison mold forming the finish of the bottle - greased the
skids for Michael Owens famous machine (Howard 1950). The Owens
machine was, however, the
first totally automated bottle machine where every part of the process from
the drawing of glass to the blowing of the bottle to the
extraction of the bottles from the machine for moving to the annealing lehr
was done without human intervention or assistance except to maintain or fix
the machine. (Image to the left is a commemorative glass bust of
Michael Owens - inventor of the fully automatic bottle machine - produced by
the Owens Bottle Co. at their Heisey Plant in Newark, Ohio in 1927, a few
years after Owens death.)
The
Owens Automatic Bottle Machine was probably the most revolutionary
development in bottle making since the discovery of glass, although it must
be noted that
Philip Arbogast's
1882 invention/patenting of the concept of the two-mold process - with the
initial blank or parison mold forming the finish of the bottle - greased the
skids for Michael Owens famous machine (Howard 1950). The Owens
machine was, however, the
first totally automated bottle machine where every part of the process from
the drawing of glass to the blowing of the bottle to the
extraction of the bottles from the machine for moving to the annealing lehr
was done without human intervention or assistance except to maintain or fix
the machine. (Image to the left is a commemorative glass bust of
Michael Owens - inventor of the fully automatic bottle machine - produced by
the Owens Bottle Co. at their Heisey Plant in Newark, Ohio in 1927, a few
years after Owens death.)
Unlike the semi-automatic machines (and later gob feeder automatic versions) which received the glass from above, the rotating Owens machine dipped the base of the parison mold (aka the "measuring" or "blank" mold) into the glass tank where the molten glass was sucked into that mold via a vacuum. After enough glass was sucked into the parison/blank mold - which was sized to measure the amount of glass (thus the alternative name "measuring mold") - a mechanical blade or "knife" cut the glass flow off at the base of that mold (the blade also formed the base of that mold) usually leaving a variably "sloppy" scar which shows on the base of the finished bottle (Howard 1950; World Book Encyclopedia 1958; Miller & McNichol 2002; Russ Hoenig [Owens-Illinois Glass Co. engineer] pers. comm. 2009). A picture of the Owens Bottle Machine #6 is to the right (from Walbridge 1920). The Owens machine was patented on August 2nd, 1904; click Owens Patent to view the actual 1904 patent drawings and descriptions.
The link below allows a user to view an amazing short movie clip that shows two different early Owens Automatic Bottle Machines in operation. The first machine is the "Machine #5" which the film clip script notes as having been made in 1906 in Toledo, Ohio. This was apparently the earliest of the viable commercial machines and the precursor to the machine pictured to the above left. This film clip was made to help promote and sell Owens machines to potential buyers. The first person shown operating Machine #5 is Emil Bock, a mechanical genius who worked with Michael Owens from the "bicycle pump" early machine experimentation days (1890s) and transformed Mike's ideas into workable steel machines. Michael Owens is the second person shown picking up and examining a couple beer bottles. This clip is also reported to be the only movie ever made showing Michael Owens who was reputed to be "camera shy." The last half of the clip shows a much larger, 15 head "AQ" machine in operation at an Owens-Illinois plant in 1959 (Walbridge 1920; Owens-Illinois Co. 1959; Perry pers. comm. 2007). Of particular note, the 1959 portion of the clip shows the sucking up and cutting off of the glass from the continuous tank by the parison or blank mold. Towards the end it also shows the shift of the parison from the parison/blank mold to the blow mold. Film clip is compliments of the Owens-Illinois Glass Company. (Many thanks to Phil Perry - a senior engineer with that company - who graciously provided this clip.)
Film clip of an early Owens Automatic Bottle Machine in operation.
There are no noticeable diagnostic differences (to the bottles produced) between semi-automatic machine induced characteristics and those of fully automatic machines except that the earlier Owens machine often left a distinctive "feathered" suction scar which seems to be most pronounced on the earlier (1920s and before) Owens machines. The general diagnostic features of a machine-made bottles are covered in some depth on the Bottle Dating: Machine-made bottles portion of the Dating Key or briefly in the illustration that is available by clicking on the amber beer bottle above right.
As noted, the suction scar is the diagnostically distinctive mark found on the base of many bottles produced by the Owens machine (and possibly, on bottles produced by other later suction based machines). The mark is a result of the mechanical "knife" which cuts off the glass being drawn upwards into the parison mold via a suction process once enough glass is drawn to produce the desired bottle (World Book Encyclopedia 1958). Click Owens machine cycle - stages 1-3 to see an illustration of a portion of the Owens machine cycle which shows schematically how the knife cuts off the glass (Stages 2 and 3). Click Owens machine cycle - stages 4-6 to see the rest of the cycle where the parison is moved from the parison mold to the blow mold for full expansion of the bottle (after Tooley 1953). These two illustrations together show the general process that the Owens machine uses. A different illustration of the Owens machine operation from the 1958 World Book Encyclopedia is available by clicking Owens Machine Illustration. These illustrations also typify the general cycle of all automatic blow-and-blow machines, except for how the glass is fed into the parison/blank mold. The process for press-and-blow machines is very similar except that the parison is mechanically "pressed" (not blown) into shape by a plunger or piston in the generally one-piece (not including the neck ring) parison mold (Miller & Morin 2004). To view illustrations of how press-and-blow machines operated, click on the following links: press-and-blow machine cycle - stages 1-3; press-and-blow machine cycle - stages 4-7.
 Suction scars are a more or less round, very fine
line that is can be either incised into (typical) or raised above the glass surface. If the
mold knife was dull or poorly fitting, the scar gets a "feathered" or "splotchy"
edge edge to it, like shown in the picture to the left. The feathering is
a result of the sliding action of the knife and the rolling of slivers of glass
in the narrow clearance between the knife, mold, and the drawn glass. The
pictured bottle actually shows some of these glass slivers imbedded into the
bottle base adjacent to the suction scar itself. Suction scars are usually
not perfectly centered and will frequently slop over onto the heel and lower
sides, particularly on square and oval bottles. This latter feature is
particularly pronounced on smaller bottles (Toulouse 1969b; Miller & McNichol
2002).
Suction scars are a more or less round, very fine
line that is can be either incised into (typical) or raised above the glass surface. If the
mold knife was dull or poorly fitting, the scar gets a "feathered" or "splotchy"
edge edge to it, like shown in the picture to the left. The feathering is
a result of the sliding action of the knife and the rolling of slivers of glass
in the narrow clearance between the knife, mold, and the drawn glass. The
pictured bottle actually shows some of these glass slivers imbedded into the
bottle base adjacent to the suction scar itself. Suction scars are usually
not perfectly centered and will frequently slop over onto the heel and lower
sides, particularly on square and oval bottles. This latter feature is
particularly pronounced on smaller bottles (Toulouse 1969b; Miller & McNichol
2002).
Bottles with suction scars date no earlier than 1905 and typically are after about 1910 when the Owens machine really accelerated its climb towards the dominance of the bottle market. By 1917, 90-95% of the bottles in the U.S. were being made by machine with fully half of the total made by the Owens machines (Barnett 1926; Miller & Sullivan 1981). Thus, half the American made bottles from the late 1910s would have suction scars. Apparently as time passed the Owens engineers discovered a combination of technique, glass formula, and glass temperature that eliminated the feathering on the Owens bottles (Miller & Morin 2004). A very roughly cut-off suction scar like shown in the picture is usually the product of an earlier Owens machine, i.e., 1905 through the 1920s, though suction scars with some minor roughness have been noted into the 1930s (Lockhart pers. comm. 2005; empirical observations). It is known that various patented improvements were made to the machines in the early 1930s that appear to have resulted in cleaner, less "messy" scars (Lockhart pers. comm. 2006). Without this feathering the suction scar can be virtually indistinguishable from the parison induced base marking produced by other types of machines; see the "Modern (non-Owens) Bottle Making Machines" section below for more information. The Owens machine dominated the bottle market through most of the 1920s, though by the end of that decade, gob feeder machines surpassed the Owens machines in production with only 30% of U.S. production being Owens machine produced by 1947 (Miller & Sullivan 1981). The last Owens machine in the U.S. reportedly shut down in 1982, though they could still be in use in other countries (Miller & McNichol 2002). It should also be noted that by the 1920s, competitive and often smaller, European suction based machines (e.g., Redfern, Wilzin, Severin) were also competing with the Owens machine and likely induced some type of base suction mark on the bottles like that formed by the Owens machine since the parison/blank mold glass feeding process was the same (Pearson 1928).
 The proportion of machine-made to hand-blown bottles increased dramatically
after 1905 when the Owens Automatic Bottle Machine was first licensed for
production (Miller & McNichol 2002). As noted by William Walcott, Vice
President of the Owens Bottle Company, this machine was "...rapidly
introduced into factories during the period of from 1904 to 1906"
(Walbridge 1920). As noted above, by 1917 only 5-10% of the bottles and jars produced in
the U.S. were hand-blown; 90-95% were produced by automatic and
semi-automatic methods and exhibit typical machine-made characteristics.
The total number of bottles produced in the United States also dramatically
rises from 7,777,000 gross in 1899 (all mouth-blown) to 24,000,000 gross in
1917, most of which were machine made (Barnett 1926; Miller & Sullivan
1981). These numbers help to determine general dating break
probabilities between bottles with machine-made and tooled
finishes. For example, given the incredible quantities of bottles
produced by machines after 1917, a bottle with machine-made characteristics
is highly likely to have been made after that date. Likewise, the
probability that a bottle exhibiting mouth-blown diagnostic features (i.e.,
tooled finish) dating prior to 1917 is very high and after the early 1920s, very
low, though hand blowing shops were still operating to some extent up to
World War II and even beyond for highly specialized orders or items
(Toulouse 1971).
The proportion of machine-made to hand-blown bottles increased dramatically
after 1905 when the Owens Automatic Bottle Machine was first licensed for
production (Miller & McNichol 2002). As noted by William Walcott, Vice
President of the Owens Bottle Company, this machine was "...rapidly
introduced into factories during the period of from 1904 to 1906"
(Walbridge 1920). As noted above, by 1917 only 5-10% of the bottles and jars produced in
the U.S. were hand-blown; 90-95% were produced by automatic and
semi-automatic methods and exhibit typical machine-made characteristics.
The total number of bottles produced in the United States also dramatically
rises from 7,777,000 gross in 1899 (all mouth-blown) to 24,000,000 gross in
1917, most of which were machine made (Barnett 1926; Miller & Sullivan
1981). These numbers help to determine general dating break
probabilities between bottles with machine-made and tooled
finishes. For example, given the incredible quantities of bottles
produced by machines after 1917, a bottle with machine-made characteristics
is highly likely to have been made after that date. Likewise, the
probability that a bottle exhibiting mouth-blown diagnostic features (i.e.,
tooled finish) dating prior to 1917 is very high and after the early 1920s, very
low, though hand blowing shops were still operating to some extent up to
World War II and even beyond for highly specialized orders or items
(Toulouse 1971).
Although Owens machines were the first automatic machines they had one fatal flaw unconnected with their actual operation: they were really only economical for large orders. Most of the early bottles produced on Owens machines were not embossed as few companies were large enough to make it economically feasible to have expensive proprietary molds made to produce embossed bottles (Miller & McNichol 2002). Thus, Hartford-Empire and other gob feeder type automatic machines were economically superior to the Owens machines for these types of bottles. As the Owens machines wore out, they were generally not replaced with new Owens machines (Lockhart pers. comm. 2005).
The bottles pictured above right are almost identical bottles for the same product. Both are embossed: GROVES TASTELESS / CHILL TONIC PREPARED BY / PARIS MEDICINE CO. / ST. LOUIS. The bottle on the right is mouth-blown with a tooled finish and cup-bottom mold conformation to the base with no other markings. The example on the left was made by an Owens machine showing a very distinct and slightly feathered suction scar that curls around the side of the bottle on the back (lower side in the picture). Click the picture to view a larger version to see the details better. Both of these bottles are also discussed in depth as an example of the transition from mouth-blown to machine-made manufacturing on the Bottle Finishes & Closures page.
Modern (non-Owens) Bottle Making Machines
 There
was also another large class of non-Owens machine-made bottles that exhibit a
suction mark-like base marking/circle not induced by the glass feeding process -
suction or gob feeder. In fact, most non-Owens machine-made bottles made
in the 20th century have some form of this attribute. The picture to the
right is of a modern beer bottle (produced in 2002 by the Owens-Illinois
Glass Company) that exhibits the distinctive "baffle mark" induced
by the base plate ("baffle plate") of the parison or blank mold portion of an Individual Section Machine (Tooley
1953; Phil
Perry, O-I engineer, pers. comm. 2005). This base marking is an
off-center, usually incised circle that is explained in the follow excerpt from
Miller & Morin (2004) in reference to a grouping of mid-20th century bottles:
There
was also another large class of non-Owens machine-made bottles that exhibit a
suction mark-like base marking/circle not induced by the glass feeding process -
suction or gob feeder. In fact, most non-Owens machine-made bottles made
in the 20th century have some form of this attribute. The picture to the
right is of a modern beer bottle (produced in 2002 by the Owens-Illinois
Glass Company) that exhibits the distinctive "baffle mark" induced
by the base plate ("baffle plate") of the parison or blank mold portion of an Individual Section Machine (Tooley
1953; Phil
Perry, O-I engineer, pers. comm. 2005). This base marking is an
off-center, usually incised circle that is explained in the follow excerpt from
Miller & Morin (2004) in reference to a grouping of mid-20th century bottles:
"The last group of bottles...are those that have parison mold lines but no valve mark or suction scar. They could have been produced by a number of different machines from early semi-automatics to fully automatic machines. The Hartford Empire Company I. S. (Individual Section Machine) that was introduced in 1925 was one of these machines and it is one of the major types of glass blowing machines in use today (Miller and Sullivan 1991:103). In this cluster of machines, the parison is filled by a gob feeder, partly blown to fill the parison mold and then transferred to the blow mold for completion. In the transferring of the parison to the blow mold, the base of the two molds almost always becomes off-centered which leaves faint mold lines from the parison mold on the base and sides of the vessel. Look at any modern glass bottle and you can almost always see a slightly off center circle on the base. Coming off that circle are some wavy mold lines that are a little off center from the lines going up the side of the vessel at the base but which come back into alignment near the neck of the vessel. These have been referred to as “ghost mold lines” but might be more accurately called parison mold lines."
This feature on the base (and body) of the bottle is also, as noted, called a "parison mold seam" or "parison mold line." These features (base and side parison mold lines/seams) are portrayed and pointed out in the image above (click to enlarge). These machine-made base markings never have the "feathering" of the true suction scar; otherwise these type bottles share the same diagnostic features as the Owens Machine produced bottles as covered on the Bottle Dating: Machine-made bottles portion of the Dating Key.
Most bottles today are still made by Individual Section (I. S.) Forming machines. Since modern bottle making is beyond the scope and coverage range of this website, we direct you elsewhere. The Owens-Illinois Glass Company maintains a very nice website that includes a short section on their glassmaking past and present, including information on their current glassmaking process as well as decoding their more recent makers marks: http://www.o-i.com/about/corporate/glassmfg.asp
The following 1956 Manual may also be of interest as described and linked below:
Owens-Illinois Glass Company.
1956. "Operations Manual." Owens-Illinois Glass Company, Toledo, OH.
This is a fascinating internal bottle machine manufacturing company manual (with
no overall name) that is divided into three parts as noted below. It is
dated as from 1956. Each part is linked separately to files on this
website for ease of downloading:
Part 1 - Bottle Defect Definitions & Corrections (This section is full
of illustrations about various manufacturing defects, corrective measures and
general information pertinent to machine manufacture.)
Part 2 - I.S. (Individual Section) Bottle Machine Information & Operation
(This section is an illustrated work about the functioning and operation of the
blow-and-blow type I.S. machine - a type that is still in operation today I
believe.)
Part 3 - Job Duties Manual (This section outlines the various duties
of workers in the operation of the above noted machines.)
|
For more information on
machine-made bottles, |
C. Bottle & Glass Makers Markings
 The subject of bottle makers marks is a complex one
as is virtually everything to do with bottle dating and identification. However,
the subject is important to the dating of bottles, how the bottle
was made to some extent, and for the determination of origin (Questions #1, #3, and #4 on the
Homepage).
The subject of bottle makers marks is a complex one
as is virtually everything to do with bottle dating and identification. However,
the subject is important to the dating of bottles, how the bottle
was made to some extent, and for the determination of origin (Questions #1, #3, and #4 on the
Homepage).
The following is quoted from the introduction to the book Bottle Makers and Their Marks by Dr. Julian Toulouse and is one of the better quick summaries on the subject of maker's marks pertinent to the goals of this website. (Note: Dr. Toulouse wrote his book from the perspective of assisting collector's as well as archaeologist's as implied in the following quote.):
Trademarks, whether registered or not, brand names, and other marks and symbols of identification found on bottles are datum points in determining the history and ages of the collectors' bottles. When the owner of the mark is known, and when more exact dates can be assigned to its use, the mark becomes a means of dating the piece upon which is appears. If the mark was used for many years, we may have to rely on other considerations in order to date the piece within the mark's span of years. (Author's note: "considerations" would include manufacturing based diagnostic features (a primary goal of this website) and/or local research in to the user of the bottle, if that fact is known via embossing or labeling.) If the period of use of the mark was short, the age of the bottle may be pinpointed to a short period of time. In some instances, lucky for the collector but unlucky for the user of the mark, the period may be reduced to one or two years. One factory making beer bottles in the 1880s, whose ownership, name, and mark changed five times in eleven years, has helped historical archaeologists date a number of sites in the western United States. (Toulouse 1971)
Click Bottle & Glass Makers Markings page to view this section which is on a separate webpage. Also included on the Bottle & Glass Makers Markings page are links to scores of articles written by the Bottle Research Group for the The Federation of Historical Bottle Collectors (FOHBC) publication Bottles & Extras, as well as for purely e-publishing on this website, which deal with the subject of glassmakers and maker's marks - the identification and history behind them.
|
"ENCYCLOPEDIA OF MANUFACTURERS MARKS ON GLASS CONTAINERS" This work is a massive treatise on American glass container manufacturers from the late 18th century to the present day more or less. As of early 2021 all of the Makers Markings sections are complete!If printed out (well over 6000 pages!) it comprises the complete 14 volumes of the "Encyclopedia of Manufacturers Marks on Glass Containers." Although complete now, Bill Lockhart (U. of New Mexico [retired] and the primary author of these articles) and the Bottle Research Group are now in the process of revising many of these completed and published articles adding additional information found since the original publishing date. Final copies of all the alphabetical "Logo Tables" - PDF tables of the actual markings, the associated glass makers that used them, and dates of use - are posted in their entirety just below. All of the "A" through "Z" manufacturers article links are found on the Bottle & Glass Makers Markings page. Supplementary files to complete each alphabetical section - e.g., "Preface/Introduction & Table of Contents" and the pertinent "List of Factories" and "Logo Table" of actual bottle markings - have been posted and linked in the appropriate alphabetical section on that same page. (These articles are also referenced and linked on the Reference Sources/Bibliography page.) |
Makers Markings Logo Tables - As a part of the above noted "Encyclopedia of Manufacturers Marks on Glass Containers" project is the ongoing completion of (completed in 2021!) and revisions to the "Makers Markings Logo Tables" by the BRG - a major milestone in assisting with the dating of historic bottles. This alphabetical listing of specific embossed bottle/glass containers makers markings includes the marks used by various bottle/glass making companies in the United States and Canada as well as some in England and Mexico. The actual makers marking "logos" are listed along with the name of the company that used the marking, the date range for the use of that marking, and the makers marking article(s) that cover that particular marking and maker. These tables taken as a whole constitute essentially a "quick reference" dating guide to the makers markings found on historic bottles!
Makers Markings Logo Tables
Combined Makers Markings Table
(Out of date but useful)All the above articles and tables are now (early 2021) considered final although any may be revised in the future as new information is available.
SEARCHING THIS WEBSITE:
To do a word/phrase
or image search of this website
one must use the following Google search link:
Search the SHA/BLM Historic Glass Bottle Identification & Information
Website
(Note: Search results for this website will be just below the
final top-of-the-page Google paid ads.)
8/6/2022
Return to the top of this page.
This website created and managed by:
Bill Lindsey
Bureau of Land Management (retired) -
Klamath Falls, Oregon
Questions? See
FAQ #21.
Copyright © 2022 Bill Lindsey. All rights reserved. Viewers are encouraged, for personal or classroom use, to download limited copies of posted material. No material may be copied for commercial purposes. Author reserves the right to update this information as appropriate.


